Samsung Galaxy A51 Camera Tips, Camera App Features and Usage - 48MP, Night Mode, Macro By Gizmo Times
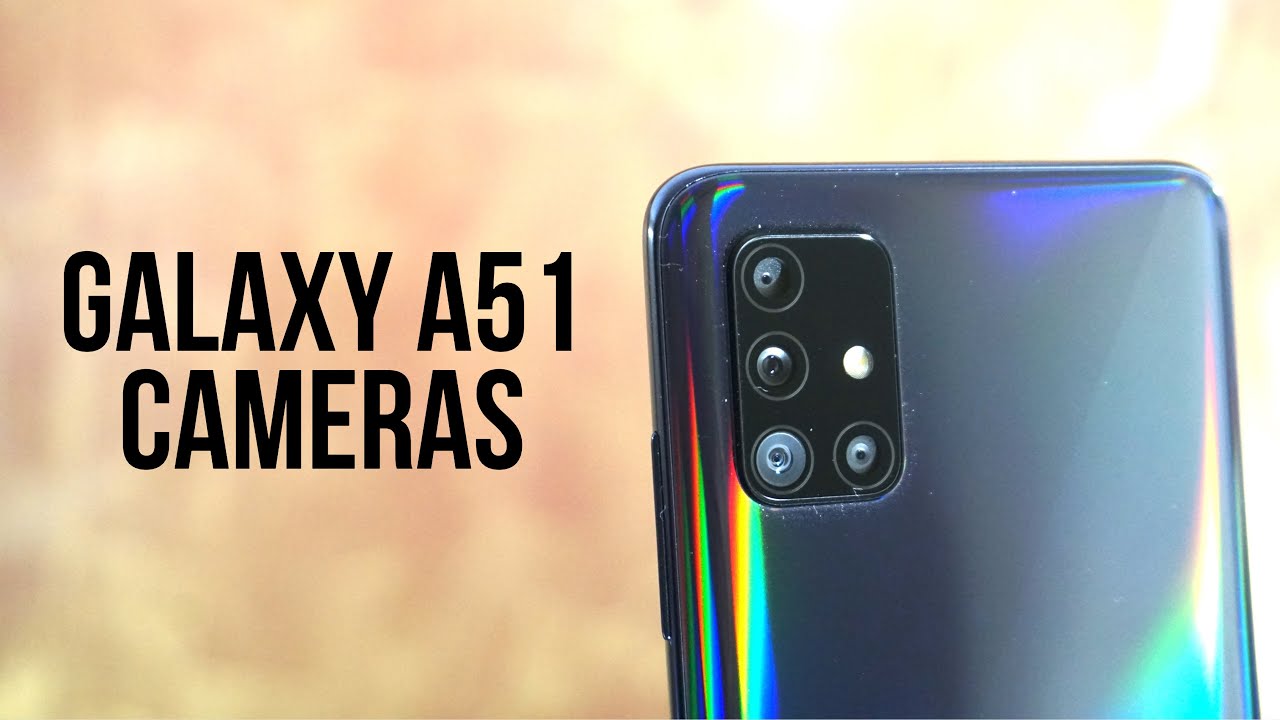
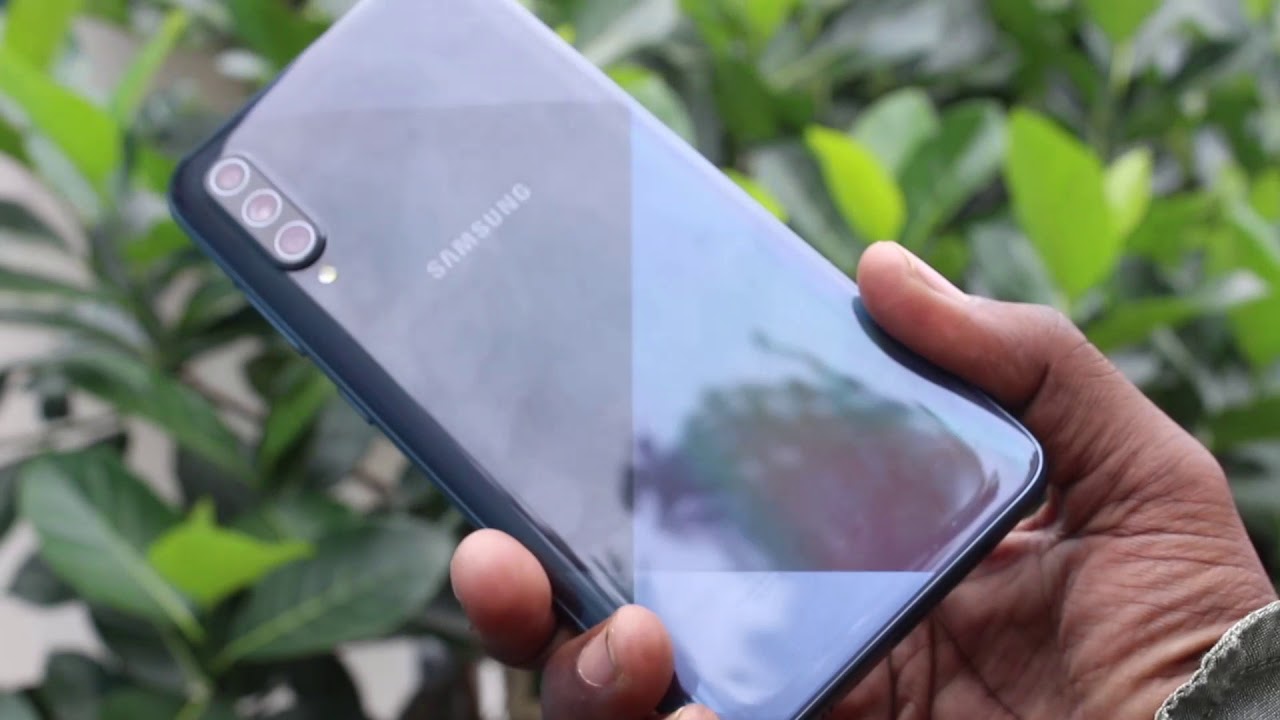
Hey guys, this Jayden is no times, and you're watching a video about the tips and tricks for the cameras on the Samsung Galaxy, a 51, the Galaxy, a 51 comes with a quad camera combination, which you can see towards the back of the phone, there are three cameras in a vertical arrangement, and then this one towards the side. Firstly, if you are confused about which cameras- which let's explain that first so the top camera, the first one- is actually a depth sensor, it's a 5 megapixel depth sensor with the F 2.2 aperture. The second one is going to be the primary camera, that is, the 48 mph AFCEL camera, and it comes with the F 2.0 for sure. It's, the Samsung's 40 tempest answer which is capable of your sample MB captures, but you can still take 48 mp4s if you want to take it from that camera. Third, one is the wide-angle camera, it's a 12, megapixel F, 2.2, wide-angle camera and the fourth one is the macro camera. It's the F 2.4 macro ground with a 5 megapixel resolution. So those were the cameras, there's also a flashlight on the friend.
This is the camera cutout or within the screen itself. It's a 32, megapixel F 2.0 camera. So now, let's talk about what is offered in the camera application here, there's quite a lot to offer. So that's why I thought: let's do our tips and tricks video so that you'll be able to understand what are the major things that you can do here and how Queen how you can take advantage of whatever features are available in the smartphone, so, firstly to swipe and change between the cameras. Firstly, it's between the rear, camera and front camera.
If you just swipe it up to down, it will actually activate the frame facing camera for you with that beautified filters there so swipe it again, and it would take you to the rear camera. So that's the easiest way. This obviously there's this shortcut as well, but again, it's better to do it with this way, because sometimes, if you are holding the phone in the horizontal position this way, you can't reach this one. With the second hand, if you are busy with that, so it's easier to actually swipe it and activate the camera through the swipe itself. Next, one is about turning off the scene optimizer.
So what happens here is there's a scene optimizer, which is this option towards the top. What happens is whenever you are trying to take a photo in the landscape areas or any special place? You would want to have this regularly turned on the reason for that is. It would actually set up everything based on that particular scene. It would change the colors. Sometimes we have noticed that the colors are a bit washed out in some areas, or sometimes there are too heavily optimized.
So that's where we would usually want to turn off the scene. Optimizer the scene, optimization being turned off. It would actually take an actual capture. Then you might edit it based on your own preferences, but turning it off is a better option. Their next portrait light focus.
So this is the option that you want to use if you want to take some background, refocus some pictures. This is a life absorption. So if you are trying to take a picture of anything like the Pringles box here, you could actually take a photo with the background blur. So if you focus on this, everything in the background will be blurred, and you can now set up how much exposure you want to have on this one and once you take the photo, you can also now check it out, and this is the amount of blur that you can have on this one. So this is the blur you can see the blur towards the back is now reduced.
Now it would go to the maximum, so that can be changed as well. So once you take the photo, you will notice that this picture is quite well lured towards the background. So that's how it is, and in this you can also change the background effect. So this option of changing the background effect and I select the area of the picture. You want to actually change the effect off, and can now change the amount of blood that you need in the background.
So if you notice here there's this particular learner in the background that can be reduced or increased based on how much you want it, and apart from that, there is also this pin blur, and this is the zoom blur and the color point. So these are the different options of for blur that you can apply and save them multiple times after you take the initial capture, so life focus is not just about the porter captures, but more than that, you can do that to the software editing and that software is provided by Samsung itself in the gallery application. So the next step is about the video recording and the super stabilization, so Samsung. What Santa has done in recent times is they have offered the video stabilization options on the air series. There are some AC responds that have a much better one, but that the Samsung Galaxy a 51 as well.
If you go into the video mode, you have the option of stabilization. So this is that steady hands or a super steady mode. So once you turn this on and if you try to take a cam video, let me do a quick comparison. Video here, the soil, just shake it up a bit, and we'll see this some dragging so that drag is because it tries to stabilize and then take a video. So this is with that regression or not now without distillation as well.
Let's take a quick video that way, and now, let's compare it, you see that obviously there are some differences between both. This is without stabilization and now this is with the civilization, so you'll see that it's less dragging here, and it's pretty stabilized when you turn this on, but one thing is that it would actually make things a bit more stretched out. So if you are okay with that in the landscape, videos, then using the super trendy mode would be pretty a good addition to your feature, because what happens is when you try to take a video of some sports being played or if you are trying to take a Lancer video, a regular video having it stable. If you don't have a tripod, if you don't have a stand to hold your phone having it in the hand, you will always notice shakes which is common on any smartphone cameras. But if you have this option turned on, it would actually make the videos pretty much stable.
No promote is one feature that you would want to know about. Row mode is something where you can change a few things like the white balance can be changed. You can have it to to convince' or the amount of light. Usually people have want to have it at around 5000 Kelvin for the almost cool white and the bomb at the center of that, and then you have the exposure values as well. You can increase or reduce the exposure.
This is mostly for those who want to take low-light captures and want to have their own settings there. This is the ISO setting it can go from 100 to 800 ISO, and then you can take a capture based on your perfect requirement. So this is the three settings that you can change, so you don't have anything else. You don't have the option to focus it manually, it's just a regular to happen focus. So the only thing three things that you see here are the ISO, the white balance, as well as the exposure value.
Those three things can be changed in the pro mode. Is the AR emoji that something not new? It's been there pretty much always, and this is how it looks like so if you see that this is the AR emoji and Here I am looking at the camera, and it would actually turn its eye. So it's taking in all that is pretty much well and, as you can see, this is the smile. Let me change the avatar now, now opening the mouth, so these things are pretty easy, and they are being done pretty well. So this is again the same way, so this is AR emoji, which is not new, and you also can set up a proper face, and you can create it, create an AR emoji based on your requirements.
That can also be done here now, if you're, someone who wants to actually take a forty, eight megapixel capture for your future usage, or you want to save a high-resolution picture of something you can do that by going to this aspect ratio option under the aspect ratio options, you see the for each two three edges. So what happens? There is foolish to three edge. Is the 48 mph Age the lens here you can zoom into it. You can't do anything because 48mph mode, where that sensor is going to do all the job for you to capture the picture, and you can't do anything else. So this is the 48 mph after that is record, captured here, and you'll, see that the details are pretty well taken in because of that heavy resolution.
And if we go into the details of this picture, you see the resolution is 8,000 into six thousand pixels, and you have everything on auto. So it's F two point: zero 1 by 50 seconds of the shutter speed, then the four point: six zero is the focal length and the ISO range is also set up there automatically. So those are things that you see there, and you can turn on the 48 mph aspect, ratio, option and change it from there. Now, if you wanna, take some low-light pictures apart from the pro mode, there's also a dedicated night mode that is given in the list off for these features. So you have the night mode here so hold your phone steady when taking night phones night photos, so this is again a bright condition.
So the picture is taken pretty fast. But usually the pictures are done take time to capture when you are trying to take it in low-light conditions, because the exposure time is or the shutter speed is increased there. The shutter time, and you'll have to hold the phone steady or again have it on private, otherwise, a night mode wouldn't work really well, and this is the switcher to the wide-angle camera and the regular camera in then. This works not just for the regular mode, but also for the night mode. So you can use the night mode with the regular camera or also with the wide-angle camera.
Now the dedicated macro sensor that is given here the or the macro lens the forth one is this one: you can activate it from here, and now you can go close to any object and try to capture a picture. So this is how you would take the macro shot. It would be just about 3 to 4 centimeters close that you need to go, and then you can take the picture there. So not just this I'll take another capture here. So this is how my macro camera capture can be taken.
So you have to be this close to the camera and then all the details are well taken in, and this is a 5 megapixel capture that is done by the macro camera on the Samsung Galaxy, a 51. No. This is also a super slow motion option here. So what happens in super slow is, since the light conditions are pretty dull here. What happens here is that it would take a video recording of 720p, and that is 480 720p is the resolution and 480 fps is the spirit of the capture.
So if you go into the big division, it would want. You to point a camera at something, so this is that some object. We are trying to show pointer to a camera parcel, and it's showing skittles, which is in a way wrong, but then this is the best that it could do. So. Thank you, Pringles is what it shows there, and this also apps that you can go to, and you can install them as well, but the extra vision, basically is that, where it tries to tell you what that particular thing is, if you predict it as some flower, it would try to show you images of similar flocks, and then you can know which flower it is.
So that's the vision there, and this is the switcher between the regular camera and the wide-angle camera, and these are the major tips and tricks it's not a complete dive into something else. It's just about the camera application to let you know how you can take better advantage of the camera app and the four cameras have a given towards the back. It's the set-up of 48 mph, sir 12 MP y de +, 5 MP depth and 5 MP macro cameras. So these four cameras do work quite well, and it is a decent camera, a smartphone, the galaxy, a 51, but this was the Tips & Tricks video to let you know how you can take advantage of these four cameras and make a better use of them. So that's it in this video.
If you have any other doubts about this smartphone. Do let me know in the comment section below, and I'll try to answer them, and this reading is going to have some more thanks for watching and soon a next video.
Source : Gizmo Times
Phones In This Article


Related Articles


Comments are disabled
Latest Articles


