Pixel 4 Astrophotography Mode is MAGICAL - How It Works! | The Tech Chap By The Tech Chap
Hey guys Anton the tech job and a few days ago, I tweeted a couple of photos, I've taken using the pixel 4 in my bat gun, and those of you asked me if I would make a video about it. So here we are, and if you do enjoy this video, then it'd be amazing. If you could hit that subscribe button and ding that little notification bell, so you're one of the first to see my next video, so I want to show you how the pixel for macrophotography mode works, see how it compares to the iPhone 11, Pro and Huawei Mate 30 Pro, which have two of the best night mode cameras out there, and then I've asked my friend Ashley who's, a professional photographer and just all-round space nerd one. She thinks of the photos, how we can edit them and also to give a few beginners tips. This is the set off it's just a tripod with essentially three car phone mounts attached to it. So I can get the phone side-by-side.
That's it no extra equipment, lenses or many other funny business. Let's start with the pixel, and all you have to do- is open the camera app and go to night sight mode. Then, if it's dark enough and stable enough, you can't do this handheld. It automatically goes into macrophotography mode, then simply tap the shutter button and wait for up to 4 minutes. So yeah you'll need to be patient for this as it takes 16 different 15-second long exposures, but the end result is stunning.
The pixel is the only phone with a dedicated Castro mode, but on the iPhone, where detects you in low-light it'll automatically turn on night mode, which is usually a five-second long exposure. But since we've got on a tripod here, and I want to get the best out of it, I'm manually adjusting it to the maximum long exposure, which seems to be between 28 and 30 seconds, and this is the result. Finally, on the Huawei Mate 30 Pro, which right now is only available in China, but I still wanted to see what it could do in night mode. It can take up to a one-minute-long exposure. The results do look pretty good, although sometimes you can actually see the outline of the lens in the photo, which isn't ideal.
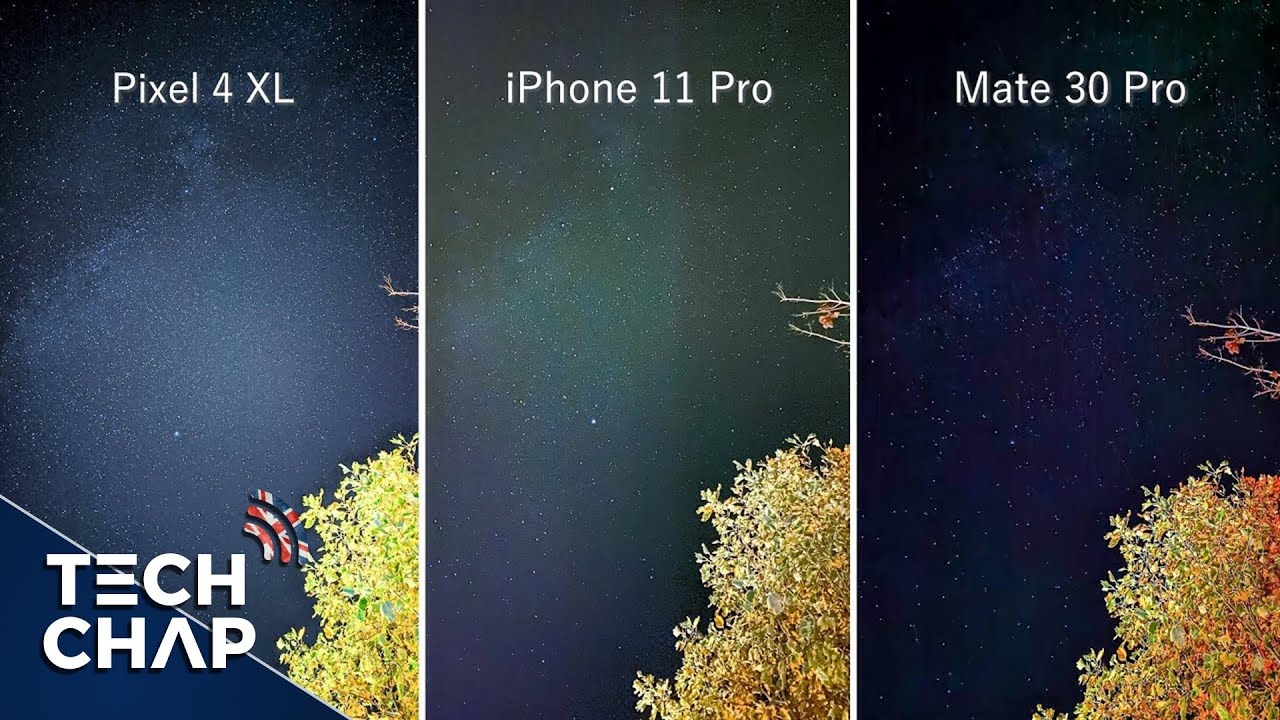
Also, just look at the difference between taking a regular photo on the May 30 Pro, which takes about two seconds versus the 50. Second long exposure shot I couldn't quite believe it, but in some cases I found the basic photo to be better than the night mode. So here are a few examples: side by side with all the phones using their respective night modes and the pixels Castro mode, no edits no filters. This is straight out of the camera on all of them. They were all pretty good, but the pixel is definitely the best which I guess you'd expect, given that it does have a dedicated mode for this type of photography.
Now this is the difference between a photo using the pixel for standard night sight mode, which you can do handheld that takes about four seconds versus the four-minute Castro mode on a tripod. You don't have to use a tripod. You can always just prop the phone up against something, or we've been said. Time will and place on the floor with the camera, pointing up or then even getting the photo yourself if you're happy to sit still and count up to four minutes, I'm sure you'll agree. This is impressive stuff.
But while these photos straight out of the camera, do look good, a little of editing can make them look amazing. So I sent a few of my shots over to my friend, who knows way more about Castro photography than I. Do I mean she's, taken these photos herself using high-end, professional camera setups, but I want to see what she makes of the pixels photos and how we can make the look even better hi I'm Ashley, a photographer out of Charlotte North Carolina I'm, a commercial photographer with a focus on food, but I also love weddings, but I'm, extremely passionate about Castro photography and immediately the pixel for Lima just stood out right off the bat. So, typically, when you're taking macrophotography photos you're using a long exposure and if you don't have a motorized tracker on your tripod you're, going to start to see star trails and your photos, if you do any longer exposures than say 25 seconds or 30. So what I was really impressed with right off the bat is the pixels' ability to eliminate the star trails and the lack of noise in the photos.
That's typically something that photographers will do in Photoshop, or they'll. Buy software specifically for but Google Pixel 4 is immediately stacking. These photos with multiple exposures on top of each other and what that will do is reduce the noise and reduce the star trailing in the photos, so very impressed with the pixel 4. But there are a few ways that you can take these photos to the next level using just a couple tricks in Lightroom or Photoshop. So we're going to make this super quick, there's a lot of scientific ways that you can edit macrophotography photos, but for this example, we really just want to bring out the definition of the stars.
So the first thing is to change the white balance up the contrast: bring up your whites. That's really going to help bring out some lightness and the Stars push the clarity just a little further. Now the curves are super important, so I definitely want to increase the lights here and bring down the dark. That seems kind of obvious decrease the shadows, and already we can start to see a little more definition in this photo. I'm going to skip down here to sharpening and noise reduction like I mentioned.
I was really impressed with the lack of noise in the photo and the sharpness of the stars without any star trail. So I really think these are minimal, so we'll skip over those guys. Now. One thing you will need to do with these photos is adjusted the vignetting there's a lot of and getting around here due to the lens, but we can edit that just a little like this, and if you push it too far, you'll start to see the imperfections down here, but we want to make sure that it's better but not pushed over the edge, and we can get a little more into the actual photo by cropping it. So let's go ahead and crop it just a little.
That'll also help with the vignette II. Then I want to adjust the light white balance just a little more bring out a little more color. This is all subjective, and there you have it before and after there's a lot of ways to make your photos stand out from the others, but there's definitely a couple fundamental tips that I would love to share with you guys to make your photos even better. The number one being location, location, location, the Milky Way, is not going to peak everywhere, but the biggest thing you need to worry about is light. Pollution.
I would recommend you guys use pick your location using a light pollution map. You can find these all over the internet if you, google things like dark sky, finder or light pollution map, and what you're looking for is the bottles scale. So the border scale is basically a scale from 9 down to zero on how dark the skies are and to get these truly beautiful, actual photography photos with true definition in the Milky Way and the stars: you're, really what I'm going to stay under class 4 or lower. But in addition you also want to pick time of year. So we all know the moon has phases so picking a lower moon scale such as the New, Moon or even just waxing or waning, 20% or less, is a great idea, the Milky Way Peaks from March to October in the Northern Hemisphere.
So, if you're in stay, so if you're in London you're going to want to do it between March and October, with the best time being in the summer months, July June August, those are great times. The Milky Way is gonna, be lined up and down here in the Southern Hemisphere middle to end of October through the beginning of March. So just the opposite of the Northern Hemisphere, and the third thing is composition, as we showed you with the pictures before it's really great, to have something in the frame that kind of helps define the night sky, a perfect contrast other than that things like buildings or mountains, or a tree anything really to kind of put up against the night sky so that you can see the contrast of the Milky Way along with something else interesting in the frame, so that your eyes just have something else. To look at would love to answer any of your questions. You can follow me at Ashley West or photo, thanks.
So much Tom, a big thanks to Ashley for those tips, and I'll leave a link to Instagram in the description which I definitely recommend checking out the pixel for is far from perfect, especially when it comes to things like battery life, but there's no other phone right now that can take photos like this granted. It's not the most practical and I think for a lot of people. It could be a try it once and then never again, type of gimmicky feature, but personally I love it, and it's been so much fun. Learning more about your photography and showing the photos I've, taken literally from my back garden with a phone, it's insane. But what do you think of it? Are you impressed or do you think it's all just a bit of a gimmick? Let me know in the comments below thank you, so much for watching guys do hit that like and subscribe button if you enjoy the video want to see more from me, and I'll, see you next time right here on the tech jab.
Source : The Tech Chap
Phones In This Article

Related Articles


Comments are disabled
Latest Articles


