OnePlus 9 Camera Features, Tips and Tricks By Techniqued
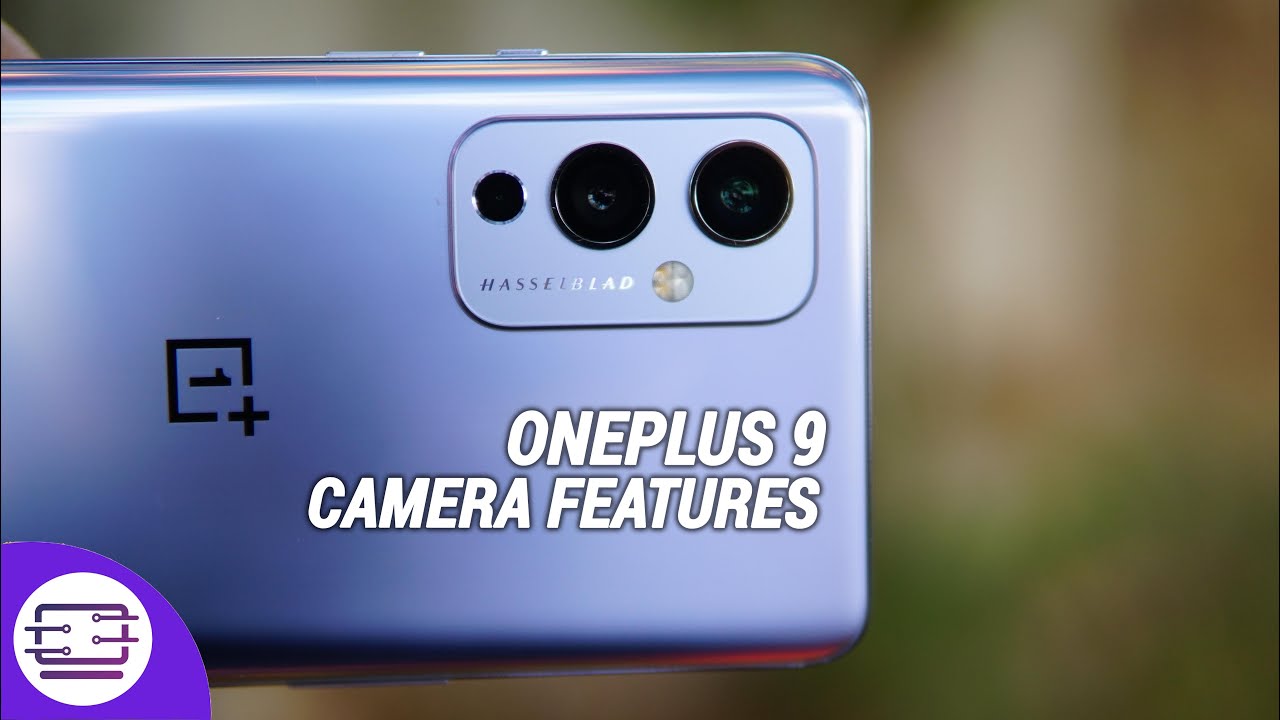
Hello friends welcome to technique. This is normal here and in this video we're going to talk about the camera features of the OnePlus 9, and we'll also share some tips and tricks to get the best out of your OnePlus 9 camerae. We all know: OnePlus has made the cameras on the 9 and the 9 pro in partnership with Hasselblad, and these cameras are optimized by Hasselblad. So we have a primary 48 megapixel sensor. Then you also get a 50 megapixel ultra-wide angle sensor and a mono sensor is also included. So that's the camera setup of the OnePlus 9.
So let's just go into the camera and show you uh the features available. So this is the OnePlus 9 camerae. So at the bottom you can see different modes, so we'll come to each of the mode in a while. So here we have the option for going shifting to the uh, the ultra-wide angle lens or the regular lens, or you can go with the 2x zoom. So this is the digital zoom.
So remember, unlike the OnePlus 9 pro here, we don't have a telephoto lens. Instead, this is a digital zoom, and here you can see there are options to choose some filters available for your photos. We can just choose some filters, so quite useful filters. If you just want to change the narrative of the photos, you can go with these filters, then at the top we get the timer flash. Those are self-explanatory.
The third option is the macro mode. So if you want to shoot macros just turn on this mode, so this will enable macros uh on your smartphone. You can shoot uh a distance of 1 to 1.5 inches. That's how you can shoot, then now we can change this aspect. Ratio, that's again self-explanatory, so you can also take a high resolution images.
So just turn on this. You can take higher resolution images using the primary sensor. So that's the main option. Now, let's go to the settings. So if you go to settings so here we have the ultra short HDR, so ultra short HDR learns your environment and intelligently blends multiple frames into an optimal photo, so you get the best HDR shot once you turn this on smart scene recognition.
So this detects the scene say, for example, landscape, portraits, uh, close up flowers, uh leaves all those things it recognizes, so scene detection is available. Then you can see. Additional options are also there. So these are nothing much different. You can see here you can.
You can also see the custom modes available. So these are the custom modes. You can actually rearrange these modes, so these are the options available, so you can actually uh by default. The photo is turned on when you open the camera, but you can actually select which you want, and you can also change you can see here. You can just change the options.
You can just drag and rearrange this option, so now I'm just rearranging nights cape near the photo. So if you come back uh here, you can see the nights cape is near to photos so based on whatever kind of photos, you click. You can actually change the settings, though that's the quite useful feature. So these are settings available for your restore, like a self-explanatory, uh, nothing much to talk here now. If you go to the video recording uh here, we have uh the ultra stable or the super stable mode.
Then we have the nights cape option. So if you are taking videos in the night mode or rather in low light, you can turn on the nights cape. You will get some pretty good, nights cape videos. We have also done this nights cape in our uh detailed camera review. So you can check out that then you can see that there is a portrait mode available for videos.
So again this has been done in our camera review. So video portrait, you get the blurred background or the both effect for the videos, so you can just enable the video portrait, and it will detect the uh the edges and that does the video portrait as well. Now you can see that there are different options here. You can see the dynamic video is that HDR can be turned on. So once you turn on the HDR you'll get resolution as 1080p and 4k.
Only so no other options are there uh, there's just a 30 fps option. You can also shoot in 8k, so you can see here. There is an option now to shoot in 8k as well, so you can just go ahead with this option, so there you go, you can just see 4k and 8k that uh 30 and 60 fps is supported, so you can go with uh these options, so in 4k you get uh 30 and 60 fps and 8k. It's 30 fps HDR option is available only for 1080p and 4k at 30 fps. So these are the options you can also select the uh this the aspect ratio- and this is this- does not have an optical image stabilization.
It has electronic image stabilization, but stabilization is quite good, actually. So these are the options available now here we have the slow motion so slow motion. You can go with the 10 1080p at 240, fps or 720p. Then a time-lapse and panorama. Then uh.
If you go to nights cape here again, you can see that there is an option for tripod mode exposure. Shots take 8 to 30 seconds, so 30 second, is what uh this mode takes. So you need a tripod to get this uh tripod mode, otherwise uh some minor shakes also can uh cause issues with the photo. So that's the nights cape mode, so you can enable the tripod mode, and you can see starburst is recommended while shooting with the light. So that's another option available.
Then, if you go to the portrait, so by default, portraits uh is selected at 2x, zoom, so uh by default lights at 2xzoom, but this does not have a telephoto lens and, as a result, a 2x zoom. If you take portraits it's kind of a blurred, or rather not that sharp. So it's always better to take portraits in 1x, where you have to stand around some around 1 to 7 feet away and what it does is it gets you better portraits than the 2x or 2x zoom so uh, since this does not have a telephoto lens and the 2x is digital and SSL. The portraits did not come out perfect, but 1x portraits are kind of okay so better to go with that. So that's the portrait option, and here we also have the pro mode.
We have the option to add just the ISO white balance, the shutter speed exposure and the focus mode, and here we have the JPEG and the raw format, so you can select which format you want. So those are the options, and you get the tilt shift option as well. So these are the options, and you can see that you can also just swipe from the bottom to get all these modes. So these are the options available in the OnePlus 9 camerae, and you can just try out this camera and get the best out of your camera. If you still have not watched our camera, you can also check out that video to get an idea about how the camera performance is.
So these are the uh tips and tricks and features of the camera on the OnePlus.9 hope you enjoyed watching this video do hit that like button and also hit the red subscribe button for more videos, thanks for watching hope to see in our next video have a great day.
Source : Techniqued
Phones In This Article


Related Articles


Comments are disabled
Latest Articles


