My Full iPad Workflow for Photography (Lightroom CC 2021) By Faizal Westcott
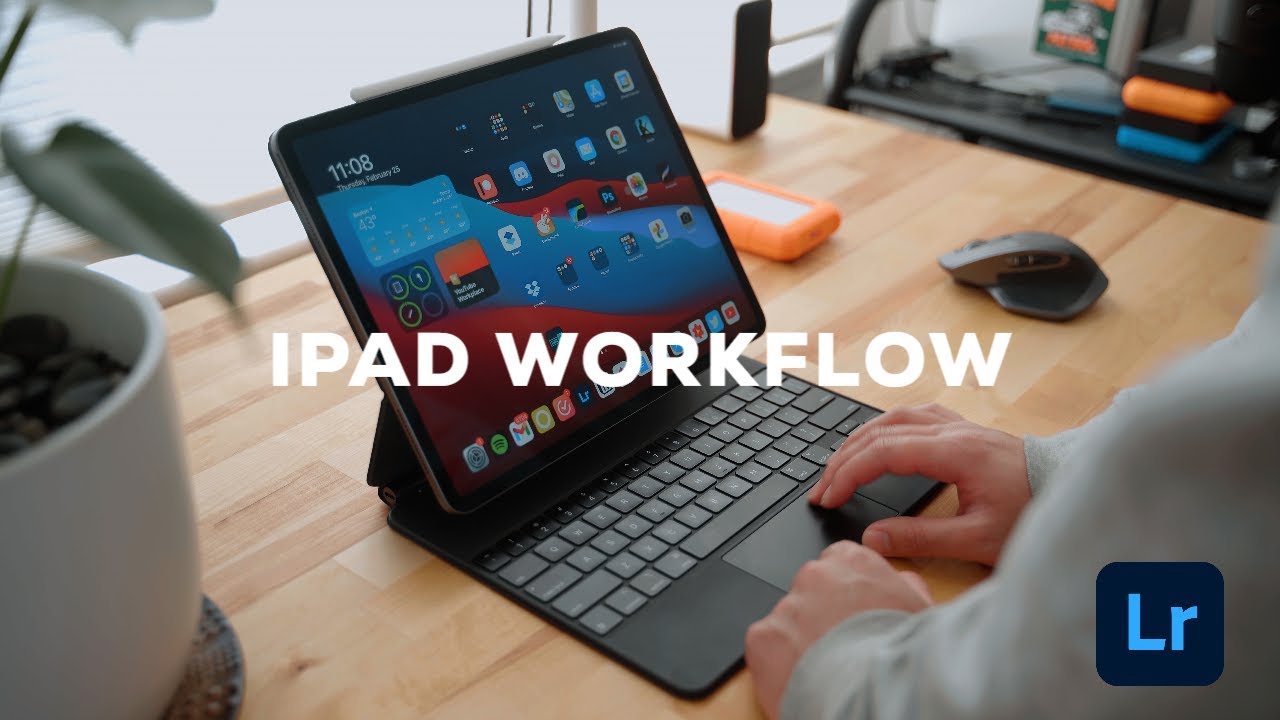
This video is sponsored by myself if you're looking for some crispy presets inspired by your favorite film stocks check out my Lightroom presets link in the description how's it going everyone uh in today's video. I want to do a little chill sit down where I go through my entire editing, workflow on my iPad Pro a lot of you liked the idea of this video. When I brought it up in one of my previous videos so yeah, I think it could be pretty beneficial to any photographer looking to set up their own workflow on an iPad. I think these things have become super powerful in the past couple years, especially with the introduction of iPadOS. It's really made iPads much more like a laptop than a tablet. Yeah.
The iPad has become my place, for you know: writing project, managing watch, YouTube videos and occasionally edit my photos when I'm on the go, I'm mostly proficient in Lightroom classics, so I still use it as my main way to edit my photos, but there's something to be said about you know being able to edit on a desktop computer and then picking up your iPad hopping on the couch and continuing right where you left off in the editing process. I think that is really, really cool. Personally, I want to incorporate my iPad more in my editing workflow, especially when it comes to editing my street photography when it comes to editing on the iPad. I move at a much slower pace and I think a lot of that is because of the hands-on style of working on an iPad you're using your fingers, an Apple Pencil pinching in and out of your image to check, focus or sharpness or whatever it's just a lot more hands-on, and you know with that. You move at a much slower pace.
You don't have hot keys or anything like that, like you would on the desktop. So the editing process is definitely a lot slower on the iPad, but I actually find that somewhat beneficial when it comes to editing my own street photography speaking of slow pace, let's get right into it, so my approach to importing is pretty simple. Most cases I'm importing back at home, but if I'm not, and I'm editing say while I'm on a trip, I will have to import onto an external hard drive, and so I go straight from my camera's SD card onto one of these hard drives that I have. This is a LaCie hard drive for terabytes. I find four terabytes is a good size for you know one year's worth of my personal work, importing your photos to the right place.
This whole process or stage in my workflow is sneaky important, because I could easily put my photos in some random place, and you know not have a consistent way of organizing my files and that's going to lead to pretty bad file management and just some terrible headaches later down the road. So I always make it a point to have an external hard drive with me all the time. So I can back up my photos onto this hard drive. My iPad does have internal storage, but it's so limited in space. So I rarely ever upload my photos onto my internal storage.
The only case I would do that is, if I just didn't, have my hard drive for whatever reason. So once I've got my files from my SD card onto my hard drive here, I'm pretty much ready to get them into Lightroom cc and start picking the photos I want to keep and get rid of, but before we get into Lightroom cc and import the photos. I just want to talk about some of the peripherals that I use with my iPad Pro. So, as you all probably know already, the iPad has just one USB port, so it makes having a dongle pretty much a necessity, especially if I want to be charging my iPad, and you know using an external, hard drive and importing from a SD card all simultaneously. I use this hub from hyperdrive and I really like it because it's unlike most dongles it has no cord sticking out.
So it's actually laying flush against the iPad, and it almost makes it look like it's part of it. It has your basic SD USB. A micro SD also has an audio port as well or audio jack, and it also has a fast charging USB c port, and when I'm editing on my iPad, I always have it plugged into one of my portable hard drives in this case. I'm using anger powerhouse 100. , one final thing, and it's specific to the iPad's display.
You want to make sure you have true color tone and night shift off. These two settings are both found under the brightness control, and they essentially affect the way your display looks depending on the environment and the light hitting the iPad. So this is going to. You know, constantly be changing the picture or the color of your iPad's display. You don't want to have that when you're editing photos, so I personally always make sure I have these off.
Also in terms of brightness, I always max out the brightness to 100. Just to you know, keep that consistency, okay, let's finally get into Lightroom and import these photos all right. So we're in Lightroom cc and on the bottom left is my library, where we'll add new photos to, so I don't have any new photos to actually edit with you all today. I just haven't been out shooting all that much recently, but for the sake of this video, I'm going to be importing those xe4 photos from when I did uh the Lacey, the liker, the Lacey adapter video. If you haven't seen that video go check it out, it's a pretty fun one.
So I'll go over to current year, and here I have an album for each month in Lightroom cc, you have the option of making a folder or an album to import. I click this little blue photo icon in the bottom here, and I choose from files because that's how I'll be able to import photos. I just put onto my hard drive once these photos are in Lightroom, I'm basically ready to start photo culling. So we got our picks on this album, and it's time to call through the photos and make these selections to get into this window for a photo calling. You click this little star symbol on the right side.
This basically brings you into Lightroom speed, review mode, and I really enjoy this part of Lightroom cc. I think they designed it really well, so I can swipe up or down on the left side or the right side of the image. So if I swipe up or down on the left side, I can make these star ratings and then, if I swipe up or down on the right side, I make these flag ratings. My approach to photo culling is really, really simple. I don't mess with star ratings or yeah.
I just don't mess with the star ratings. Furthermore, I just do pick flag pics for the photos I want to keep and then for all the photos. Furthermore, I don't want to keep. Furthermore, I filter them out by going over to the filter and then choosing neutral, so the neutral would essentially be everything I didn't pick just keeping the neutral photos visible and then selecting all and deleting them, so I'll wipe them off of Lightroom cc to save space there you go, I'm basically left with just the selections I just made. So it's a very simple uh rundown of how I photo call my photos, okay time to finally edit the photos.
So I've picked a couple photos that I'm going to edit with you all today, so I'm going to show you how I went from these originals to these final edits. Okay, I cleaned up my space a bit here. I realized that when I'm filming the screen, it doesn't give a good representation of all the edits I'm making. So I'm also going to do a screen record plus the overhead uh shot just so you can get a good sense of what the image is. Looking like and not be different from what you know.
My color grade is like on top of the video, so we are starting with this first shot, which was taken in New York city. It's a hood of a car, a bit Trippe. This was taken with the x100f, so I was obviously attracted by all these lines happening in the hood of this car. So I want to uh get rid of this top section here, so I'm going to crop this first. I always use a 4x5 for my portraits.
Well, not all the time, but most of the time, just because it's one it's uh, I think it's the portrait orientation for Instagram and I just like the ratio. Actually, I want this to sort of look like it's a car, but also not like it's a car, so I want to have like hints of it, so you have the hint of orange, which I really like. I want to make sure that's there. I really want to focus on this um, this portion of the car, because it's where the lines are the most compelling, I guess uh one thing about using the Apple Pencil and adjusting crop on Lightroom cc is it is really sensitive. So sometimes it's a bit annoying and also when you there's no way to like to confirm your crop other than clicking out of it.
Just kind of scares me sometimes, and since this is a fulfill raw file, I can go into the profile menu and under camera, matching there are different folders here. If you go to camera matching, I have all the different fulfill film simulations that are available on the x100f, so it's really cool how you can still shoot raw and still get the benefit of film simulations within Lightroom. What are we in here? I like Asia. Actually I like how this gives a good starting point, so this is something I actually do in. My workflow is check out if I want to start with one of these as a starting point.
Um velvet vivid is looking pretty good too, but I like the less saturated look of Asia. I think the next thing we're going to do obviously is adjusted the exposure, so I will go to light, and I'm going to just boost it slightly just to bring in more of the details. You can go into uh the tone curve which I actually like how they set up in Lightroom cc on iPad, because it's unlike the Lightroom classic on the desktop this tone curve, would be in like the bottom right corner of your screen. So you would be half looking at your tone curve and then looking at your image this way it's its nice how they set it up over you just really slight s curve. So I made three points to do an s curve here.
I'm not really thinking it's um, all that necessary. Actually, so we're just going to do that. I also added a bit more exposure, so I think that looks good exposure, wise, we'll go into color, and I'm really hesitant of doing too much to the color, because I really like how Asia treats this blue and this orange just for the sake of showing you I can go into color mix and then, if I wanted to adjust the saturation or of one of these colors, I can click this target thing and then click saturation and then pick a point on the picture or pick a point of which color so say. I want to adjust this blue here and desaturate it. Furthermore, I can click it.
Furthermore, I've selected it, and then I can go up and down on my screen and that will adjust the saturation of the blue color grading. This is basically your split toning. I wonder if we want to add in a bit of green to the shadows, I'll just add a slight uh green tint to the shadows, I will go into effects, not much. I want to add here. Furthermore, I don't want to add any grain, although I do that to some photos we'll do that to one of the other photos.
We'll look at I'll skip this detail, you can boost the sharpening a bit. You can go to optics, and so this is uh. Gonna change the image quite a bit. This is uh, enable lens corrections. You probably all know this already um.
I think it works, so we'll keep it on, and I think we're done with this edit actually want to edit um or crop out this corner some things I just change, and it's a more of a feel thing, something you can't really explain on to the next one or actually before I do that. I'm going to save this as a version, so you can go into this button here, and it's uh your versions, and you can create a version I'll call this uh anti, it's going to autocorrect to Asia. So now I have a version here, and I can go back, and you know switch between different versions. So if I want to have another black and white edit uh say I could go to original, apply, go to my presets, cookies and cream and save this as black and white version, and there you can see, I can switch between the two different versions. I just made pretty cool all right, so last photo um.
This was shot with the x100v uh it's in Boston, and I actually took this in one of my POV videos. You can see. This is a smart preview and that's because I imported this on my desktop computer, so um. The iPad is basically using a low-res file to um edit. This photo through the cloud, so it saves a lot of space when it comes to cloud storage, so we're gonna actually do a crop here, because I want to focus more on this right side of the photo um and because this is really what I want to focus on.
I'm going to make this a punchy black and white contrast edit. I think it's going to really complement all the architecture in this photo and how the light is bouncing off one side, and you have this shadow side as well. So before I do anything, let's just turn it into a black and white there. You go we'll, go into light and do tone curve. I'll.
Do the three points that I usually do so one here, and we'll bring down the blacks, a ton, because that's really what I want to do to bring that strong contrast. Look to this shot just like that. It's really done a lot to this photo. I might bring down the highlights a bit too. Sometimes what I like to do is go a little further than what I want just so I can see how um I'm impacting the photo.
So I'll do that, and you know I can see that there's some cloud detail here, but I think that's good. That way. I can see some detail in this building. One thing I know wish Lightroom on the iPad could do is have the black um background be changeable, so I can make it white because this part of photos, like I, don't know where it starts or ends. So if I could have that feature Lightroom if you're watching this, please do that all right, we're going to go to effects, and I'm going to zoom in a bit just so I can see what I'm going to do here.
I'm going to boost some green, not a lot just a little sharpness, not really a necessity for this image, and I can go back to crop and see if I want to straighten it. Sometimes this works pretty well and in this case I'll keep it all right. I think these edits are done it's time to export them and send them over to Dropbox, where I basically store my web and images ready for Instagram, and all that you click the share button. There's a ton of things you can do it's a bit overwhelming to be honest, so you can easily do the same thing. Multiple different ways, which makes it even more confusing to keep it simple, I just click export to files, and then I can basically choose Dropbox and save directly to a folder that I have for Instagram posts.
If you click the little settings button on the right, it brings up the export settings, and I'm basically using JPEG the largest available dimension and then for Instagram. I find 80 works pretty well and a cool little trick um to do when you're uploading to Instagram is boosting the sharpness uh, I like to add in around 20, so there you go guys, that's pretty much uh overview of my workflow on the iPad. I do use some of my presets as starting points to my editing, so I'm not always starting from scratch um. But you know working on this thing. It's super fun.
It's very hands-on, like I said it's very engaging. You feel like you're, really part of the editing process, you're, not detached um in some instances like when you're looking in the bottom right corner of your tone curve and then looking at your image. The tone curve is just slap onto the image, and you can see how each effect each setting you change, impacts the overall look of your photo, and you know you move at a much slower pace because of that hands-on, analog-like workflow, you know just because I can edit so much faster on Lightroom classic on my desktop with you know, hotkeys and whatnot doesn't mean I'm editing better or really. You know thinking and being thoughtful of my editing process. So much like you know how people shoot film because of how it slows them down.
I think working on an iPad and how it slows my editing process down is very similar in a way all right everyone. I hope you enjoyed this video um. If you have any specific questions about you know my workflow, I'm sure there are some things that I didn't go into great detail on um. So if you do have any questions or a little confused on certain aspects of the workflow, let me know in the comments I'll see you all on the next one love you all peace. You.
Source : Faizal Westcott
Phones In This Article
Related Articles


Comments are disabled
Latest Articles


