LG Velvet Back Glass cover replacement By Mark Bencze
Hey guys so, a few weeks ago, I um somehow managed to break the loudspeaker on this phone, which is the one on the bottom here and um. It was still working, but it was really muffled and distorted, and it drove me insane so anyway um I decided to order one and to do it. You have to take off the back glass, which um a lot of people were really intimidated by um. Not all devices are the same. There's no tutorial for the lg velvet here, so I had to just figure it out my own. I thought I'd make a quick video showing how to do that because um when I changed it I prior to changing it, I thought.
Maybe I would order a replacement back, because I have changed some back covers before, and you can break them when you remove them. I didn't break it, but anyway I picked a different color, because you know this one's okay. It's just kind of your grayish silver, nothing too fancy, but I came across when I was looking a red one, and it's like man that is a nice looking back. So um figured you know what let's do a little video and show people how it's done um, because a little of a tip is um. You see so many people that are selling broken phones online.
You know with a back, that's cracked um a lot of times, it's iPhones for some reason, but anyway um and because of that they sell them for significantly less money. So if you're looking to buy a used phone, don't necessarily be afraid of ones with a back cover, because you can usually change it and get a replacement for really, really cheap. Like this thing cost me maybe 25 bucks, and you just have to do a little of research, because you can typically, you can get them with the camera lenses which is on the inside here, or you can get it without, which is literally just the shell with holes, and you would have to reuse the camera modules from your existing phone, and really it's just a cover. The camera is recessed underneath it, and this is just a cover. It's nothing really too.
Fancy there's you know so anyway. Um so I'll show you how to do it, because it's really not that hard. It takes a little of time and patience to do it. But one thing you have to you'll see is on the back of this here. You see this kind of blue all around here and that's adhesive is what it is I'll end up, peeling this off and that's what causes your phone to? Stick.
It's not actually glue and um this here I'll just pull that off. That's just to cover the camera lenses from um, while the cover from getting, I guess, fingerprints and whatnot um. So that's what makes your phone stick um so the trick to doing this is you got to use heat? You got to use a heat source and some places actually most tutorials. I see they use a heat gun, and they always warn people do not overheat it. You could fry your phone, honestly.
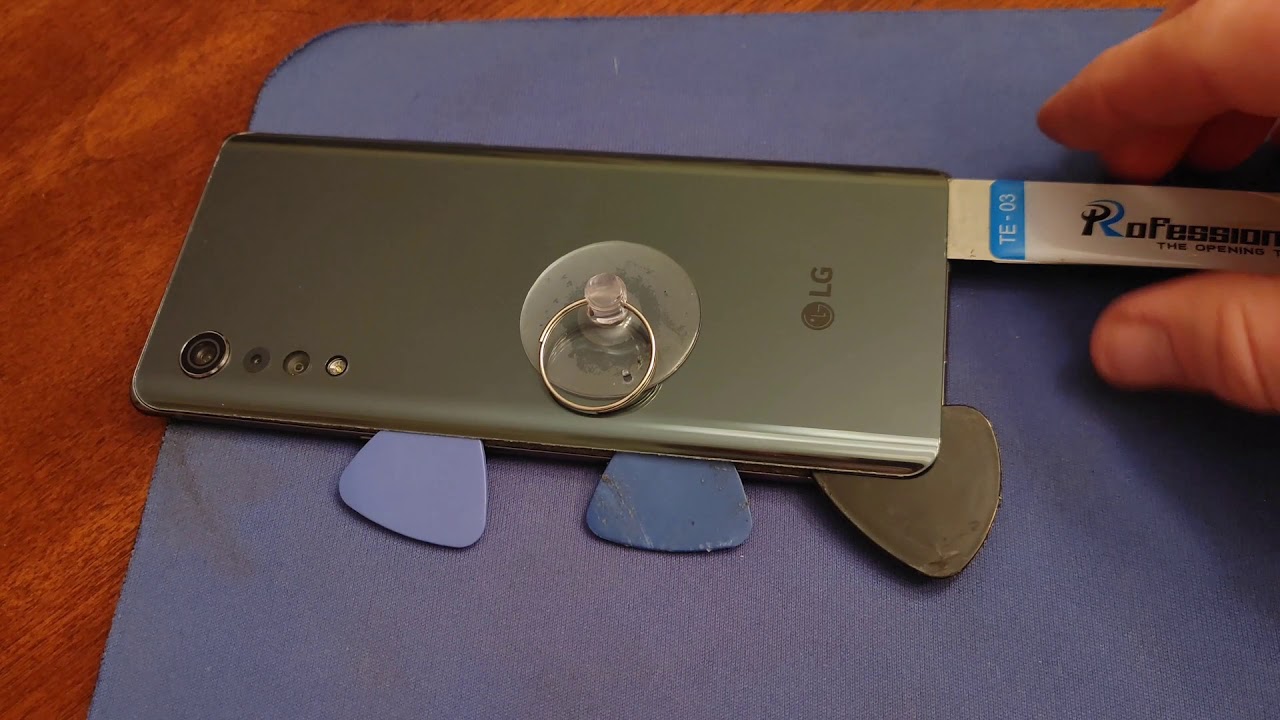
I just use a hair dryer, and it seems to do just fine, so we'll just go ahead and do this. I don't know how long this will actually take, and we'll see how it goes. Um there's a few tools you want to be using. You want to be using your little uh suction cup here and depending on where you start you're just going to put it down and while you're removing it you're. Just you know getting some pressure to help.
Remove the glass a few tools. You'll see these are really common. These I usually use, but you got to be really careful, because these can work really well because, as I was showing you with the adhesive, you know when you're shoving this in you got to really think you don't need to shove it in that far. You know if you look here, all you're looking to do is break the seal, all the way around the phone and the cover comes off because there's no adhesive on the inside here, or at least on most phones. Also, you need to be careful and do your homework that you're not prying too much, or you can crack this even when you're careful it can happen and also be careful, removing the back cover if you're not familiar with the device, because some of them will have a cable attached to either a fingerprint scanner if they have it or something else.
So you have to be cautious of that um and then uh. Another thing is like the little guitar picks they're, not you know quite a guitar pick. Well, they pretty much are, but they're just really, really thick ones, and you use several of those, and they're kind of handy too, as well as these things, which is actually called a spider. You can use this for removing some hardware like when I um had to remove the speaker, think of something like eight or nine screws, and then you just pop it out with this really, really easy. So I guess we'll go ahead and get started here and give this thing some heat and then see what how it goes.
But before we do that make sure you turn off your phone, I mean- I guess you don't really have to, but you probably should so just power this off. Okay and you probably want to eject the um the sim card as well just take out the sim tray uh. You could possibly do some damage to it, which you don't want to do when you're removing it so remove that the phone's off, and now we're going to make some noise by heating this up, and we'll get started. So so so, okay, so that's probably good to get started and uh we'll just stick this here, and you'll have to apply the heat a few times. Probably so, then what you want to do is just find yourself an opening here with this and you just kind of want to shove it in like, like so, and you're, going to get underneath it like that and with the hairdryer.
Sometimes you'll have to break it again. Oh, shoot the camera's falling. Let me fix that sorry about that. Okay. So what you want to do is get this little guy here and you just kind of pull on it to get some pressure, and then you just slide this thing around like, so you don't go too fast and then what I like to do once I have a little of an opening you can see here.
Is I'm going to shove this pick in here too, and that's just going to oops in theory that should help stop it from closing up? So I'm just going to shove that in there it doesn't have to be in much it'll go in now come on, okay, get it in there just work it a little. Okay and as you do that you'll get more of a gap, so I can eventually I'll be able to shove this in a little more like so, okay. So then you just work your way around okay and then what you can do is you can just put another one in like so, and then you're just going to work your way around nice and easy. You don't need to rush this, especially around the corners. You want to really take your time because those corners are very delicate and uh.
The hair dryer blew a few of these little picks around. So I'm missing a couple, so we'll just shove something in the corner, and you can use anything. I have this old um like roger sim card thing, I'm not even with rogers, but I just had, and you can use those pretty much anything to stop the seal from resetting, which it can do, because this adhesive is sticky, and you just go slow and if you feel you're getting a little too much resistance. There is no shame in just turning the hairdryer back on just give it a little of heat. Okay and then this guy here.
What I like to do, is you just pull that up, and we're just going to relocate it here, so we can apply the pressure where we need it, which is here, so we're going to go around this corner, and you just got to be careful, okay and just no reason to rush it go around that corner. Okay, as I say you take your time, especially on the corners, if you and when you have a curved back which this does, that is the recipe for breaking them. So then, we'll just shove. This little guy in here actually we'll use this pick, because this is actually coming off really, really well and then the same thing we're going to spin it around and use this just to give it a little of pressure, and then I'll angle, my device up a little just so I can get a little of an angle, okay and then sometimes I'll, even shove. One of these in there just to give me a little.
Okay, then I'm going to remove. Hopefully you guys can see my hands aren't completely in the way, and then we got to remove this guy, and we'll put him down here. Okay, now I'm going to give it a little more heat. So just let me give me a second here, while I blast this okay, and again we're going to apply the pressure. Okay and as I say, I tilt my phone up a bit off the actual mouse pad that I'm using and shove this guy in here, okay and then work our way across here.
Let's relocate him up in the corner here, because again, I'm going to be going around a corner and, as I say, these corners are always the part that, if you're going to break it, it's usually going to be in the corner. Let's hope that I don't okay, so it's a little more resistance than I'd like in the corner. So again, I'm going to blast it with some heat. Okay. So let's get that pressure.
Let's just see! If I can get around this corner without breaking it, please don't break and again no need to rush. You don't want to have to force this, like I'm just using a little of force with my thumb, but I'm not pushing too hard, because I know how fragile these can be and again, let's find something to shove in there in this case, that little sim card that I was mentioning we'll shove that right in that corner, okay, and we're going to go around near the camera. So again you want to be careful here. You don't want to be pushing too hard, because if you hit a spot with the adhesive, you could send this tool flying, and you could damage something. So, let's blast it with the heat again, okay, so the idea is work smarter, not harder, okay, and then we'll just slide this around here.
Okay and then we'll follow this a bit we'll just shove this in, like that. Okay- and I'm going to move this guy over here, close to the camera lens. Okay, again, it's those corners. You want to be careful, so just go slow, okay, blast it with some heat: okay, okay around that corner, but did you see how like just kind of slid a little? That's why I'm being quite cautious around here, because I do not want to damage the camera okay, so we've made a full lap. So at this point I'm usually done with this, because I've worked my way around.
So at this point, what I usually then do is I just take the pick. First, I moved Mr suction cup here, I'm just going to kind of put this here and I take the pick and I slide it. Okay, it should slide fairly easily now, okay, so you're just going to go around slide, okay, and then you can remove them and, as you can see, the cover is really starting to come off. The one thing I've also learned: is you don't want to force this thing off when it starts to come up like this? Because if you see you know I'm starting to get a nice size gap in there right, because if you get excited like awesome, I got it loose. You know see this big gap like that great you don't want to just pull this thing necessarily off.
I can remove these picks, but this is where you can get yourself into some trouble, and you can break it doing this so again, just take your time. It'll come on its own, just work. This thing around you know, and you can just kind of hold it by that and just kind of work it around again. You know, work it, and then you've got pretty much the back part in here now. So now we just need to get the front, but we don't want to go too hard, so I'm going to use the spider as they call it and just sort of pry just lightly, and then it just came right off okay.
So now this is the inside of the phone. This is the back panel. So these are the cameras I was talking about um, let's see if I can get a good shot of it. So you know what I mean like. If you look the camera itself, they're not quite flush with the phone, but if you look up here where the bezel is it pretty much would actually sit flush with that, so why these phones are coming with these camera bumps.
Some of them are more than others, but you can see the main camera. It's got a pretty good size, camera bump. That's just a cover, though right. So I'm not sure so anyway. That's how you remove that.
So then um we're done with this. I'm going to remove this here and I didn't damage it. You know so, which is good now. One thing you'll see is on the inside all this black stuff. Here that is the adhesive, so you just want to remove that as best you can- and you can use this little guy if you'd like and just kind of oh shoot, there goes the camera again.
Sorry, folks, um, you can just kind of scrape away at it to remove it. A little of heat, if you want I'm actually going to pause the video while I do this because there's no point dragging this on even longer, so you can watch me do that, so I'm just going to clean that up, and I'll be back once I've done that, okay, so I've removed all the adhesive all this crap. That was all around here, and then I grabbed my new cover here and generally. These are what you are. You just find a spot on the adhesive here, and you just pull it and take it all off.
The first thing you want to do is you got to make sure that this guy fits because sometimes you'll order, a part, and it can be just something can be wrong. There could be an imperfection. So before you pull off the adhesive, you want to make sure it's going to fit properly, otherwise it can be difficult to remove. So you know you just line it up pretty much and just see hey, okay! Does that look like it's going to fit? You know down at the edges, and then you'd look here, and it's like. Okay, that's not too bad work, your way around and then what's this what's going on here, this shouldn't have a cutout okay.
This should not my old one did not have a cut-out. It was one smooth piece. This cutout is uh for the power button, so that's kind of a problem and then that looks like it would fit, but it actually doesn't um they've sent me the wrong one. This is for the um us version of the velvet. I have the Canadian, which is also similar to the Korean and the European version.
So not the end of the world. Um just have to wait for them to send me the next one, which probably only took a few days and um. I guess we will uh continue this video, but anyway, or maybe we won't because it's kind of pointless for me to just make a video of how to put this back on it's pretty much the reverse. What you would do is you remove all the adhesive around here. You snap, and you know, set it into place.
Make sure you know all your seals are nice and tight around it, and then you're going to heat it up with your hair, dryer or heat gun, and you're going to apply firm pressure, all around the device, make sure it's smooth, and then you'll probably go around the hair dryer a few times, and again you're applying firm pressure all around the edges, where you would need to apply it and just kind of you know you push down you're almost like massaging the phone. Until you get a really nice tight seal, and you know you can't see cracks and everything, and it looks uh pretty and that's about it and then what you would do after that is um. You know you could leave your device, some people say to put like an elastic or something to hold it tight, but you really shouldn't have to do that. The adhesive should instantly work, and then you're good to go, so that's unfortunate that this doesn't fit. So what I'm just going to have to do, I guess, in the meantime, is put the old one back on, so we um I'd, remove the adhesive all around here and then what I ended up having to do it's just as best, I could put it back around the device and it kind of looks like crap, but whatever, so we'll just set this back in here, and I guess I suppose I can just show you what you would do using the existing one is again.
Let's pretend this is the new one and then again you're just going to get that hair dryer. That really should be enough to heat up the adhesive and again this is hot to the touch, but not too hot that it's going to burn me, and again we're just going to push down, and this honestly should be enough. The adhesive this stuff works really well. So in theory, there shouldn't be really any reason why this won't hold um. You know, especially for a couple more days until the replacement arrives, I'll uh get them to express it to me, which I'm sure they'll do since they sent me the wrong one.
Um there's a company out of uh. I figured they're they're, there's one out of Toronto and um they're, pretty good and there's another one out of Texas that I buy parts from time to time, and they're pretty good to send stuff to you and if they send you the wrong stuff um, they seem to send it to you really quick, and you get it within a couple of days. So that should probably be good. Um, I'm not worried about a super tight seal at the moment. I will just have to be careful not to drop in water or anything, because at this point you know I just put the cover on good enough that it's you know.
I mean it's not going anywhere so whatever and in a couple of days I'll do it right, because I don't want to drop in some water, because, I'm sure with me just kind of half ass, putting the adhesive back on it. It's uh not going to be waterproof or water resistant by any mean anymore. Until I put the correct cover on at which point it'll be perfect, so that's uh, that's how you would change the uh the cover on this pretty simple, to be honest when they send you the right replacement, but things happen so anyway. That's how it's done so um, like I say, don't be afraid if you want to save some money to buy a phone that has a broken back cover, because most people don't realize how easy this actually is to do, and you can save yourself a few hundred dollars very easily um. It's really.
As I say, it was really rare for them to send me the wrong one um. You know just uh, probably someone wasn't paying attention and um just they sent me the wrong one. So, whatever no big deal, new one will arrive, and then we'll be good to go, thanks. Bye now,.
Source : Mark Bencze
Phones In This Article


Related Articles


Comments are disabled
Latest Articles


