iPhone 11 Pro CAMERA Real World Review | from a PROFESSIONAL Photographer's Perspective By Jared Polin
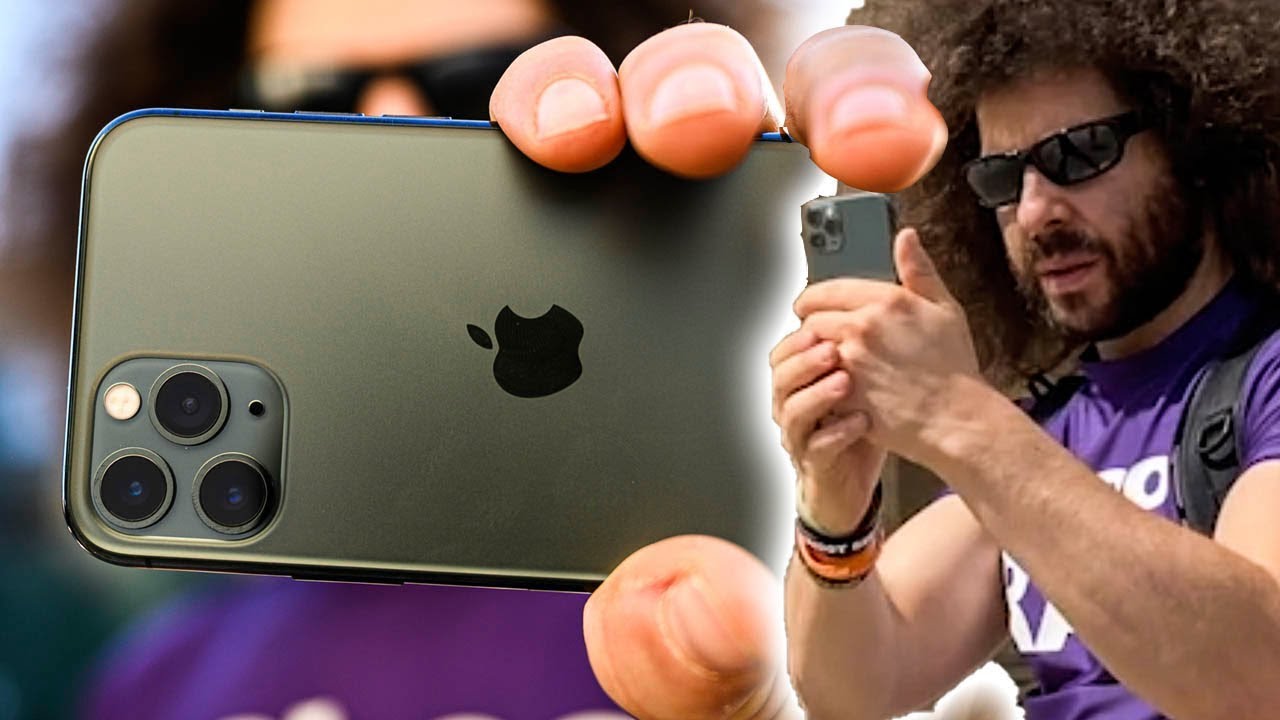
Right before we jump into this video, if you'd like me to send this free guide to capturing motion in low-light situations, just look for this orange box over on the website. Put your name email address in it, hit, send it, and I will send you that guide for free jarred, Colin froknowsphoto. com, and this is a real world review of the iPhone 11 Pro cameras. Now this is not a review of the phone I focused in on no pun intended the cameras it's about. How is the new triple lens system and how well does this triple lens system work in a real world situation in the hands of me, an actual professional photographer, so I took it out into the real world in Philadelphia, starting at Independence. Hall then went on to the Liberty Bell, then, where rocky ran up the stairs at the Art Museum, as well as shooting a skateboarder for portraits and action and finishing off the day, shooting a real-deal concert now before we get into everything.
I do want to let you know that the video on location was all shot with the iPhone 11, because they gave me two phones to test out. I use this one for stills, and this one was used for video I figured. It would be a good test that we have the 11. We have the pro, let's use the 11 for video on a DJI awesome mobile 3, to make it look smooth and see how it all turns out. So for the first shoot of the day we decided to go to Independence Hall now, Independence Hall is in Philadelphia, it's where the Declaration of Independence was signed.
Now this building makes for a perfect opportunity to test out the ultra wide-angle lens of this phone. Now prior to this, I've never had an ultra wide-angle lens on any of my phones. Now I know, people out there who have Android are going to say, but androids already had it they have now. This is a real-world review of the iPhone 11 Pro. That now offers you that feature it does get Super-duper wide and the first thing that I noticed was that my finger ended up in a lot of those pictures.
Now the reason is: is I hold the phone like this to shoot, or I hold it like this to shoot, and I hit the button right here on the shutter button. So I noticed that my pinky my thumb, my finger. Something would end up in the way and I just had to be more careful not to get my finger in the shot when I'm shooting ultra-wide. But it's interesting when you run through the ultra-wide, then you go to the medium and then the telephoto having 4x optical zoom in a phone is pretty cool again. I know it's not original.
It's not the first phone to do that. But having that option in the iPhone, where they're all paired together is a nice feature to have one of the things I like to do when I'm out and about in public and I, see people like families trying to take pictures and somebody's. Never in the shot I like to go over there and ask: would you like me to take your picture, and then I tell them. It would be worth a lot of money, not really true. It's not worth a lot of money, but sometimes people are like now we're good I'm, like are you sure so this family was cool with it.
I took a bunch of pictures, including a selfie, because I always take a selfie after I get their picture, but I like doing that. If I see somebody that needs to get their picture, taken, I walk over and ask what they'd like me to take their picture. One of the harder things to do when you shoot ultra wide-angle is get your lines straight, especially on a phone, because what happens is when you're holding it? If you hold it like this, which isn't the best way to hold a phone, and you go ahead, and you press down on this shutter button up top you're pressing down on the phone which is throwing off your lines. So it's much harder to get your lines straight, especially when the lenses are right. Here and they're, not in the center of the phone, something that I encountered, that I, really wasn't expecting or didn't even think about was that I ended up getting lens flare with the ultra wide-angle lens sure it was around 11 o'clock and the Sun was almost right up above us, but I got some major lens flare, shooting ultra wide-angle.
Now part of that reason is there is no lens hood built into any of these lenses, which means it might be more susceptible to lens flare happening, the biggest upgrade to the iPhone 11 Pro. Are these three cameras on the back? Each one is 12 megapixels. You still have your standard as well as your telephoto, but they added the ultra-wide, which is 0.5, which gives you a 4x optical, zoom I started off with the camera. App that is native to the iPhone. Now part of the reason is I can use the ultra wide-angle lens with that, as well as do portrait mode or take advantage of some other features.
Now, personally, I would like to use something like Lightroom mobile, but Lightroom mobile at this point doesn't take advantage of the third lens, the wide-angle, because the phones aren't out yet at the time of me. Recording this video, but I do suspect that as soon as the phones come out, they will have an update fairly quickly. Also, the Lightroom mobile app lets me shoot RAW, but I'll use that later on, when I shoot a concert after taking a bunch of wide shots of Independence Hall I thought it would be cool to go across the street and try to photograph the statue of George Washington. So I noticed around the back that the artist went ahead and signed the statue as well as put the date there. So I tried to do the close, focusing shot.
I just held the camera up took a couple of pictures, and it looks perfectly fine. Next I moved around to the front of the statue to try out portrait mode now, one of the things you'll have to get used to us. You have to be within 8 feet of the subject in order to activate portrait mode. So I think portrait mode did a great job on this particular image, and it looks perfect to wrap up the Independence Hall section. The images look, fine.
It was beautiful out, perfect, sunlight, nice clouds. It's not going to be hard for a phone to get some pretty good shots in this situation. So the portrait mode stuff looks good. The ultra wide-angle stuff looks pretty good, except for that lens flare, but other than that. It's time to move on to the Liberty Bell.
Now the Liberty Bell used to be housed in Independence Hall. You know like up in the bell tower before it cracked and then they took it out and put it on display and then hid it during the war and all of those things now it's proudly displayed in its own building. If you're looking to visit Philly I, do recommend that you check out the Liberty Bell just try to go during the week during off-peak hours, there's no line to get in, and it's free in order to get a clean shot right in front of the Bell. You tend to have to wait in line. If there's a crowd now, there were only a couple of people there, so I impatiently waited while tapping my foot I didn't tap.
My foot I waited patiently my turn to take the photo of the Bell. The Liberty Bell is out there in the open. It's not behind glass, it's not behind any protective barrier. There's just a couple of park rangers that are ready to beat you up. If you decide to cross the velvet rope and try to do anything to the Liberty belt check out this really cool photo yeah, you see the ultra-wide of it.
You see my finger in the bottom of it yeah that kept happening all day now. I wanted to lay down on the floor on the side where the window is so that I would get the window light on the Bell. So I got down low, tried to get my angles as straight as possible because, with the ultra wide-angle lens, it's much harder to do, and I took some shots. That way. Just because you have an ultra wide-angle lens doesn't mean that's all you should shoot with.
So, while I was laying down on the ground, looking at the Liberty Bell I hit the button on the screen to do a little of an optical zoom in because I saw all the people's feet underneath the Bell. So at the top you have the Bell itself and underneath you can just see the feet of the people, so I chose to go black and white to make it look a little more creative and not look like it was taken on a cell phone. If you're wondering, is it hard to hold a phone without a case because I don't use a case on any of my phones? The answer is: no just don't drop it, which I didn't do all do jeez just kidding it's in my hand, being that the summer is over. It's not peak tourist season in Philly and there's usually a ton of people around the bell, while I noticed for a split. Second, there was a low for about 20-some seconds.
So I went around to the front of the Bell. Put on portrait mode got my line straight and was able to get a really cool portrait of just the Bell with nobody in it. Let me cut in here real quick and say: would you like to take better pictures in only 11 days? Well, if so, I created a free mini video course that you can sign up for it right now at froknowsphoto. com, slash 11 days now, let's get back to the video. So if you're wondering how portrait mode does with something like the Liberty Bell, let me show you how it works so right now you can see that in the top left-hand corner.
It says it's at F 1.4. So if I hit that you can see that I can change the aperture up to F 13 and then Independence Hall in the background, comes into focus. So in this case, I want to go ahead and be at F 1.4, and you can see that the background is out of focus. Is it perfect? No, it's its not perfect, but for the everyday person using this, it's a hell of a lot better than having infinite focus. All in all, I'm happy with the couple of snapshots that I got inside the Liberty Bell pavilion.
There's not much. You can do with the Liberty Bell because it just sits there and has a cracked smile when it looks at you, so the wide-angle did well. The portrait mode did well and other than that, it's time to move on to the Art Museum and what a better way to test out the ultra wide-angle lens on this phone then going to the Art Museum and photographing the stairs aka, what the tourists called the rocky stairs, because that's where rocky ran up when I get wide-angle lenses in the mail to do reviews of I like to photograph the stairs because they are pretty straight across. But when I took the picture with this ultra wide-angle lens of this phone, you can see that the lines are pretty funky all the way across it kind of does something like this. It's kind of like a droopy droop, it's kind of like a mustache.
Now it's subtle! But it's there! It's not perfect! And honestly, it's not a dealbreaker because again it's in a foam! So, whatever they're doing with the ultra wide-angle lens, they get the lines pretty close, but they're not perfectly straight, so I'd rather have an ultra-wide. That's not totally perfect to not be able to get a wide enough shot with just the medium lens. Well, what's that in the bottom left-hand corner of the image? Oh, you know just my finger and ultra-wide four shots like this at the Art Museum. Infinite focus really isn't an issue, because you want to kind of see everything in focus from front to back, so between the ultra-wide and the medium and the telephoto, whether it's vertical or horizontal, the images look perfectly fine, they're sharp they're colorful. They look perfect.
But again, it's perfect lighting and this phone better do a good job in that situation, after choosing not to run to the top of the art museum stairs, we went over to photograph the rocky statue where I had to wait in line again for people to take selfies with Rocky, but when it became my turn to do it. The wide-angle again gave me a really cool horizontal shot as well as vertical, but to show you the different results. This is me standing in front of the Rocky with the widest angle, lens, then I zoom in a little more, and then we end up zooming in on his crotch with the 2x lens. A lot of people love using portrait mode inside this camera. I honestly find myself not really using portrait mode very much when I'm shooting with an iPhone, but they do now have six different modes for you to choose from including the black and white or mono high key, which is supposed to give you that studio.
Look of a high key portrait in black and white, and I'll show you some samples of that later on. To tell you if it worked, guess what I noticed in the bottom of one of my images, two pieces of fingers, but let me show you how you can correct this if you're using live photos with the phone, so if you're using live photos, basically what it's doing is kind of like recording a video sequence that you can go in and pick the proper frame that you want after the fact. So here I hit Edit on the image I hit. This live button on the bottom, and then I can just scroll and find the right moment, and when you do, you say make key photo you hit done, and now the finger is out of the frame. After about ten minutes of photographing Rocky and making a lot of people wait, and by ten minutes I mean it was actually more.
Like thirty-five seconds I turned around to see a fan who was in from Wisconsin, who wanted to say hi and I figured since we're in front of the rocky statue we all might as well show our biceps and flex bigger than Rocky. Let me put something into perspective for you. A photographer who takes a phone like this out into the real world is most likely going to get better shots and better results than an amateur or an everyday person just taking snapshots. So it's not always the quality of the phone. That makes the difference.
It's the understanding of composition and angles that makes an image much better. So my tip to amateurs out there is, if you start to understand the fundamentals of composition, better and angles, and just changing it up. You're going to get better results. You want to get in a shot right next to the Philadelphia Museum of Art. They built a skate park, so I called my friend Blake to come out to do some skating, so I could try and use the phone to get some action photos, but also Blake is perfect for getting portraits and testing out the portrait modes.
One of the things I wanted to test out most with this camera was action photography. How would it handle autofocus when it comes to shooting action? So the first scene that we set up was Blake. Jumping off this ramp over a trash can where I would get super low to the ground using the ultra wide-angle lens. Sorry, skateboard photographers, it wasn't a fish eye lens, it's rectilinear, so I was down low, shooting ultra wide-angle, trying to capture the perfect moment with one shot on the first go around I was a little early to get the perfect timed photo. What happened is I had him right on the ramp.
So I was like wait if I hold my finger down on the shutter button. Won't that take the rapid-fire Secession photos and the truth of the matter is no. They changed that so now, when you hold your finger down on the shutter button, it puts you into quick video mode, which probably comes in handy when people want to get a video on world star, but it certainly wasn't good in this situation, because I was trying to get rapid-fire photos and couldn't figure out how to do it. Since I couldn't figure, it out, I started to look through the phone to see if I could find a function to turn it on or to turn it off, but it was nowhere to be found, so I emailed my contacts over at Apple and waited for a reply, but before I got a reply, I realized wait. Maybe they got rid of that feature because live photos basically lets you do the exact same thing.
You can pick out the perfect shot after the fact. So what you're, seeing on the phone right now is the moment that I press the shutter, which was too soon to get the peak action, but because it's a live photo check this out, I hit the edit button I hit. This live photo icon on the bottom, and then I can slide through and look for the exact moment that I want to frame so right here, wait for way for it. Oh that's, actually pretty good! So something like this right, Oh too far, pull back a little. So something like this boom you hit make key photo you hit done and boom.
You have the perfect action shot then Apple emailed me back, and let me know that you press the shutter button and slide your finger to the left and that's how you take rapid-fire images. Now those rapid-fire images aren't live photos. So if you miss that peak action in that rapid-fire image, then you won't be able to go back and get it, so I'm, not sure if the live photo or rapid-fire image is actually better, which one's better but I personally, rather have the live photo with the option to change it after the fact, then, to take the rapid-fire images. Next I wanted to test out the portrait mode with Blake I, really love how portrait mode looked for the 1x zoom, because on the iPhone 10 s, all you could do is use the 2x for doing portrait mode. In this case, you can shoot a little wider as long as you're within 8 feet of the subject and get portrait mode to work.
Now, I love this shot. I had him looking like he was going to drop in on one of the ramps and the compositions. Well, the composition, spot-on. You know it's a skateboard at the bottom. You know he's about to drop in the focus is tight right on his face, and that looks awesome.
The both looks real in this one, and it doesn't look like it really did a bad job around his hair. But when you go to the next image, you can see that the both of the skateboard is a little weird. It has a little of a haloing effect going on around it, but in my opinion, it's better than it being in infinite focus. Moving on to the next image, I was at that 8 foot limit, but let's zoom in on his shirt, there's some weirdness going on with the both right there, because he's wearing a striped shirt for whatever reason it wants to try and blur it out. Portrait mode isn't perfect! It's going to have issues with certain things like stripes.
It got it wrong, a good amount of the time that I was photographing Blake and on the other hand, it did ok just a handful of times. For example, it didn't have an issue with the shirt this time around, so whatever's, going on with our algorithms throws this thing into fits of rages from time to time. I mean sharpest. It just does a weird job with the hair. Now with that being said, let me tell you what happened when I tried to do the mono high key.
The system was really glitching out. I thought I was watching back to the future and that the Smarty was going to disappear from the photo, and that's just what it looked like. Let me jump in here real quick and say the images that you're seeing on the screen right now, we're edited using for PAK one on the phone in mobile Lightroom to check out the presets go to froknowsphoto. com, slash presets, because over there you can play with the sliders to see the before in the afters, and if you decide that they're for you, you can pick them up right now for 40% off. Now, let's get back to the video.
So you take a look at this look at the shirt, for whatever reason it looks like it's just graying out the middle and then, when you zoom in around his head, you lose some hair. Now this isn't the greatest feature in the world, but if you don't like it being that you are shooting in portrait mode, you can go in after the fact and go ahead and change it back to say natural lighting, but you'll still have that imperfection right in the middle of the shirt app we'll spend a lot of time talking about the apertures of the lenses. Now, of course, when you let in more light, that is a big deal, so the wider, the aperture the better. But what you need to remember is that the sensors, in these cameras are super-duper small, so 2.8 or 2.0 in something like this is much different from if you used a full-frame sensor. Everybody knows that the iPhone has portrait mode, but now you can use portrait mode on the One X, as well as the 2x lenses.
You can't do portrait mode on the 0.5. Wide-Angle I still wanted to push the portrait mode to see how well it does, especially if Blake's gonna hold out the skateboard I want the skateboard in focus and have Blake out of focus. It's fine. It's not great, it's not perfect, but it's better than the alternative. In this case, you can see that it's still having some issues, the opposite of before, where it has no blur on certain parts of the shirt and then blurs on everything else.
One of the cool features of portrait mode is that they try to replicate actual studio lighting, and they do a pretty good job with it. Now look at this one we're on just regular right now. The next one is studio light which is too much, but then the contour light looks really cool here. You can also change it, so it moves the contour light. It either goes up to a hundred in this case we're at 100, or you can dial it down to just give a little of contour light, but the portraits are Super-duper sharp, Super-duper, crunchy, the portrait mode looks good and the reason I didn't shoot.
Raw or DOG with the Lightroom mobile app is the fact that you don't have portrait mode in that app if you're into optical image stabilization. You do have two of these three cameras getting optical image stabilization, the one that doesn't have the stabilization is the ultra-wide. Now, when you're shooting ultra-wide, you don't really need the stabilization as much during Apple's keynote. They pushed the fact that, with the ultra wide-angle lens, you can elongate the subject to get creative I'll. Just say this.
As a photographer, you don't generally want to elongate the subject. If you're elongating somebody's face, it's not gonna, look good or be flattering. The only thing you might want to elongate with your phone is a pic, and finally I was showing Blake some of the images that I captured while I was laying on the ground and I look up, and I'm like oh, oh, that would make for a good portrait. So I took this portrait shot while I was laying on the ground, and it reminded me of that movie mid-90s. Originally.
This is where the real world review was going to end until I got a text message from my buddy Shannon who's on tour with a band called band of skulls. He said they were in Philly, and he asked what I was doing. I told him: I was testing out. The new phone can I, come shoot the show tonight, and he's like. Let me check with the band said sure you can have all access to shoot anything you want to shoot anywhere on the stage do whatever you need to do to test out the phone as soon as I got to the venue.
I rendezvous with my buddy Shannon, who was outside as the Sun, was going down now, because we just had a little of daylight left I, still thought it would be a good opportunity to test out portrait mode and here's some of the best portraits that I was able to get one of the features that Apple spent a lot of time. Promoting was night mode now we know that the pixel had this already in their phone, and it works really well, but Apple now offers it in the iPhone 11, as well as the 11pro that I tested out now. The way that it works is it does anywhere between a 1 to 3 second exposure, taking a ton of different images and then computational photography, wise. It puts them all together to give you a usable image to test it out. I had the band come outside to stand in front of the tour bus to get a band shot doing night photo now what you'll realize is when you're using the night mode it's automatically on, there's actually no option that I could find to officially turn it off.
Now you can slide the slider to turn it off and take a picture, but as soon as it's done taking the picture, the slide turns back on and goes from anywhere from 1 to 3 seconds after the image was done. Processing I was pretty amazed at how bright the image looked now when I zoom in on it, you're like alright, it looks pretty good on the phone, but it incorporates a lot of skin smoothing to get rid of any noise that it might have, but it did a very good job, making an image out of something where there wasn't a lot of light is night mode usable. The answer is yes, as long as you know, to keep still, and as long as your subject is keeping still, then it will work out if your subject moves during the 1 to 3 seconds that it's exposing all the images you're going to get some motion blur, which is gonna, render that image pretty much useless. So it's going to come in handy if you're, putting it on a tripod or if you're shooting objects that aren't moving. Here's an example with night mode off.
You can see that it's pretty dark and then now with night mode on you can see a better exposed image. That's actually usable verse, the other one normally, if I ever saw somebody shooting in the pit with an iPhone I would probably point at them and say not really. I would just think it in my head. I wouldn't actually do it, but I was the guy using an iPhone in the pit and on the stage to shoot the show for those of you who are looking to shoot. Video I will hit on just a few of those specs, because I spent this real-world review focused in on shooting stills, but if you're somebody who likes 4k at 60 frames a second, you get that with this phone.
Also, two of the three lenses are optically stabilized for when you're shooting video again there is no optical image stabilization for the ultra-wide lens, just like when you're shooting stills. Now, when it comes to slow motion video, you can do 120 frames, a second in 1080 or 240 frames. A second in 1080, now I'll tell you. I did do a sample of 240 at 1080 on the phone. It looks pretty good, but as soon as you get it onto something like the computer, it kind of falls apart just a little, and we did notice some flickering up in the clouds before I jump into a photo montage of the best images that I captured during the concert.
I want to say what apps I used to take. The photos I started off using the Apple app built-in, because it's just much easier to use, but the issue that I ran into is that the images start to look blotchy, because the noise reduction gets added, and I have no manual controls over my images. So it's JPG, it's a compressed file, and it's not raw. Now for the second half of the show, I decided to use Lightroom Mobile, even though I didn't have the option for the ultra wide-angle lens I still had the ability to set my exposure as well as shoot, RAW DOG files and the images from the RAW files look much cleaner and much better. So, basically, I had all access to go on stage.
Go in the pit go behind the drum riser. Do whatever I needed to do to get photos with a freaking iPhone during a real-deal concert, so I have to say: I had a great time photographing the show, even though all I had was an iPhone I, wanted to show that you could actually do it. Could you get good results and the answer is: is yes? Do I think that an everyday person who's standing in the crowd at a concert who wasn't allowed to bring in a quote-unquote real camera would be able to get similar results, and the answer is probably not because they're not in the pit they're, not onstage and most likely, don't know how to set the camera properly to get the best exposure? Now with that being said, the only way to determine if the images are good out of this phone is to take it back to my desk, which I'm already sitting at and analyze the best images from the day. Let me jump in here real quick and say that this video is brought to you by Squarespace. If you're looking to build your very own online website.
I recommend that you go to Squarespace comm, slash froknowsphoto, to get your 14-day free trial. If you decide that it's for you use the code froknowsphoto at checkout to get 10% off your first order. So now, I want to take a closer look at some of my favorite images from this real world review, as well as tell you some final thoughts and if I think it would be a worthy camera in your hands now before I do that I do want to let you know that you can download sample files over on the website. There's portrait mode files, JPEG files, as well as a couple of the raw files from the concert so that you can download them and see how they turned out for yourself now. I was pretty amazed with some of the images that I was able to capture with this camera and what I did is I printed out my favorite ones, because what was happening is I would look at the picture on the phone and be like hmm I'm, not sure that that quality looks good or if it looks bad.
But the truth of the matter is when I printed it out on the 13 by 19 paper on the Canon Pro 1000 and just looked at the print sitting on the printer I was like these things: look fantastic, whether it was shot raw or whether it was JPEG or it was the portrait mode. The prints that I printed out really look great and that's one of the things that determines how a photo good a photograph actually is because it's one thing to look: okay on a tiny, tiny screen, but it's another thing to go ahead and print it out and see it if you're going to hold it out like this and look at it and go wow. This actually looks like it was taken with quote and quote a real camera, which is a good thing for this phone that you are capable of getting images that nobody would look at and go well. That was taken with a cell phone verse, a quote: unquote real camera. So let's take a look at this first image right here.
It's nice having the ultra wide-angle lens, but, as I pointed out a couple of times, you have the lens flare in the bottom corner and also look at the lines you can see. They are not straight, but I prefer having this, then not having it all. So one thing to keep in mind is that it's an F 2.4 lens. So if you are in a low light situation, it may give you a little of trouble, and we're going to see that in some of the images that I took at the concert later in the day now, this is one of my favorite shots of Blake jumping over this trashcan. Just the fact that I could go in and select the image made all the difference in the world that I could change the point where I press the shutter button to actually get the best shot, because it was recording all the way through the quality doesn't look as great on here.
We notice that, with the wide-angle lens, the quality isn't as good compared to the 1 X and the 2 X. But when I printed this out, and you get close to the print, the print looks perfectly fine, especially knowing that it came from the phone now I'm, not a big fan of the mono portrait or the mono Hake that they have, because it doesn't do a tremendous job of really need to cut back on this blurring, because it just doesn't. Look that great, but the reason I picked. This is when you zoom in his eyes, are so crystal sharp and crystal clear now. Part of that is because the algorithm is throwing a lot of sharpening on it, but the print looks fantastic and again, that's one of the determining factors on how good hammer is how good are the prints, because a lot of people sit there all day.
They look at pictures on their phone where they look at pictures on the screen, and they zoom in and pixel peep, but they don't ever actually print an image out there's a big difference to when you print out a print versus looking at it on a phone or a screen if it can hold up well in a print. That means that something is being done right. This is one of my favorite pictures of Blake I love. This portrait, I used portrait mode and I, went ahead after the fact and changed it to the contour lighting, and this print looks fantastic as well now, in lower light situations, I used portrait mode here to get a photo of my buddy Shannon as you zoom in on it. It's not Super-duper sharp on the eye, but if I had printed this out, it would have looked fine personally, I would love if Apple would give us the ability to shoot raw portrait mode.
Have a raw file and/or turn portrait on turn portrait off, but give us the option inside the camera app to take more control. You call this. A pro camera will give us some pro features and functions in the camera, app like manual control like being able to shoot raw DOG now I get it there are third-party apps that do that! That's why I used Lightroom Mobile, but that only let me use currently the two lenses, the One X and the two X, and not the ultra-wide, but the RAW files look tremendous, so I get it. They want amateurs to just feel like they can pick up the camera and take a picture, and it's going to be amazing, because that's what they're trying to sell is that the case maybe you'll get some good results, but at the end of the day, if you don't know what you're doing as a photographer, and you're just taking snapshots, you're going to end up with snapshot. Ii photos that just don't look like good quality portrait mode nailed this.
This was great, being able to focus on Shannon lighting up his I guess it's a joint lighting that up to go ahead and smoke that, before the show, the colors are good. The clarity is great. The tones are fine. It's a really nice job right there again with portrait mode now night mode is one of the things that Apple is pushing tremendously the quality on it, as we zoom in I mean it smooths out the skin, because it's doing massive amounts of noise reduction I wish that it didn't do the noise reduction as heavy or, if I could control that, but, like I, said earlier, I'm, not a big fan of not having the ability to turn this mode off or change some settings or the intensity that it has. I want more control over that.
But, with that being said, look at this image right now and look at the colors there's actually colors, and you can see it verse, the next one which is with it off where I forced it off, and this is what it looks like, so there's a big difference. You can get a photo versus not now going through the concert situations or the concert setting with this phone with portrait mode for the most part, did a very good job and I just wanted to point this out, as we zoom in on the guitar head right here it looks fantastic, nobody would sit there and be like. Oh, you did this with an iPhone if they were just looking at it. If they looked at the print on the wall, they wouldn't be like. Oh, that was an iPhone I mean unless we can find the imperfections which I'm sure there are imperfections here somewhere, but this one nailed it really well, and I have to give mad props to the lighting director for this photo right here, because it's a whitewash in the front with beautiful, streaked lighting.
In the background, that's an awesome color. This makes shooting concert so much easier and made this photo so much better. This one I couldn't tell you was shot with an iPhone I just couldn't. If I saw this image printed somewhere or posted somewhere, my first instinct would not be holy. You used a cell phone.
This was done with Lightroom mobile shot raw, then processed with Lightroom mobile in the phone then printed out with the pro 100. Sorry, the pro 1000 and this print, the colors the tones and the clarity of it are amazing. Do you see what I mean, though, when you zoom in when you zoom in you're like well, you know I'm not really sure if it's perfect or not, but when you print out a 13 by 19, it looks perfectly fine? I could go bigger with this without a problem. The next image is one of my favorite images from this entire shoot. A got down low angle didn't have the option of using the ultra-wide in Lightroom mobile, but you've got the one light on the left: ?, sorry, ? lights, on the left, ? lights on the right, the composition is just spot-on.
That's what separates honestly a snare shot from a photograph and that's why, when you put a camera in a professional, hand there's a chance that they're going to get better results than if I gave this to an amateur and said: hey, go shoot this concert they would probably be shooting it just inside if the Apple, app, and you're going to see in a second, why that's not fully recommended for me for shooting a show? Oh, but let's zoom in it looks great. There is grain, but when you print it out, it basically goes away. This is what I'm talking about this is the ultra wide-angle lens shooting with the Apple camera, app look. What happens when you zoom in look at the input see this is noisy. This is grain, but what's happening is the noise reduction is really working in overdrive here, and you can see that I didn't print this out, because I would see those blotches and blocks of the noise reduction and I knew that it wouldn't be good.
It's a great moment captured, but if I could have shot this raw manual, it would have been much better, and you wouldn't end up with this bitchiness, but for the majority of the people out there posting this online. They would be happy with the results of that image. So who is this phone aka camera phone for? If you have an iPhone 10s? Should you upgrade to this? If you're looking for better photos, you are going to get better results out of this trial end system, then you would out of your 10s. If you don't really care too much about the photography aspect of it, then no don't go out and get this phone. If you're looking for something, that's going to give you some of the best images from any mobile phones out there, then! Yes, this is a very nice option.
To look at will I shoot a lot of photos with it will I shoot other concerts with it? Probably not if I'm going to shoot something I'm generally taking one of my mirrorless cameras out to do it because I could switch through all the different lenses which are gonna. Give me the results that I want to capture, but with that being said, if I was forced to shoot a wedding or to shoot on the campaign trail or even a concert behind the scenes once Lightroom mobile gets updated and all the other third-party apps get updated to. Allow me to shoot RAW with the ultra wide-angle lens I. Think I would be able to get some pretty good results and be happy with shooting with it not fully happy, because I still want to use a bigger camera. So at the end of the day, was I happy with the results that I got with this camera phone, and the answer is: is yes, I'm glad I printed them out, because when I saw, the prints I was like wow colors tones sharpness of this concert.
Photos were spot-on, and I'm really happy with those results, but, as I've said numerous times and I will always say it. If you understand the fundamentals of photography, if you understand composition and framing, you are gonna, get better results with this camera phone than other people who pick up this phone and have no clue what they're doing Apple can't do anything about people not knowing how to take better pictures. Other than hiring me to make some content to help people take better pictures with their phone call me Apple will make it happen. So that's it! That's the real-world review of the iPhone 11 Pro I, hope you enjoyed it. Let me know if you have any questions down below, don't forget to Like, share, comment and subscribe, and that's where I'll leave it jarred Colin, froknowsphoto.
com Zika. You.
Source : Jared Polin
Phones In This Article
Related Articles


Comments are disabled
Latest Articles


