iPad Pro & New 2018 iPad - Awesome TIPS & TRICKS! (That You Aren't Using) By sakitech
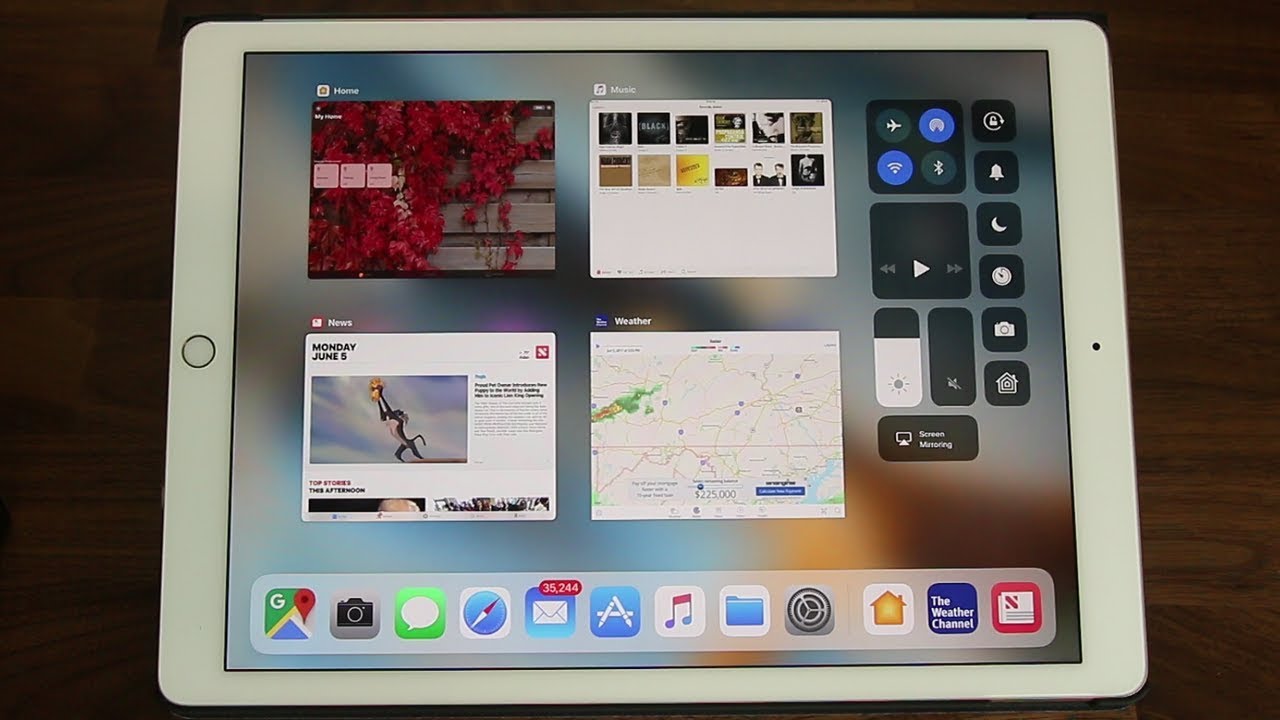
Hey there, our sake here from sake check it in today's video I want to share some amazing multitasking features for your new 2018 iPad and, of course, any version of the iPad Pro that you might own. This is an absolutely great product, but if you don't know how to use it properly, you're not getting maximum owner satisfaction. So, let's dive in and discover all the amazing multitasking features and tips to enhance your iPad ownership before we do dive in. If you do use, Twitter, Instagram or Facebook, make sure to follow me on all at sake. Tech online for the latest updates, or as the first thing I want to have you guys understand, is before we dive into the details is about this dock at the bottom here, so this dock can have a maximum of 16 apps on it. Now the one thing you have to realize is: there's a divider over here on the right side of the divider.
You have three apps these apps, you don't have a control over. These are just the apps. That's going to show up here, the more you use them. So all the frequently used apps are going to show on this side of the actual dock. Now, if you look at the divider and look on the left side, you have the other apps that you do have a control over meaning you can drag and drop apps into this dock, to have them available to you on a priority basis.
And again, one thing to understand is the maximum number of apps you can have on the left. Side of this divider is 13, so you can have 13 apps here and 3 apps here, making the total apps you can have on the dock 16 and, of course, obviously, if you pull it up like this from bottom to top, it brings up the app switcher, which is also a part of multitasking. You can switch between apps from here seamlessly as you desire okay. So if you want to bring up the duck when an application is actually launched, if you pull it up, the dock comes up, but if you continue pulling up the app switcher and I show up, so I can switch between active apps. If you have any other active, apps they're going to show up right here, and you can of course alright, so let me just remove this real quick and the first thing I want to talk about is the slide over multitasking tactic.
So, let's launch an application really quickly. So lets all launch Safari real, quick and let's say that, while you're reading, Safari or you're browsing in Safari, you wanted to quickly check the news to see if anything special is happening at the moment. What you would have to do is you have to bring up the dock just like this and then grab the news application or any app that you want to be honest: music application, mails, app, drawer messages, whatever you want, you just drag it, and you just dump it right there. It's going to go to the lot right side, and it's going to launch the actual application. Now this is called a slide overview.
There's a couple of things you can do here: you can grab this slide over. You can put it over here. If you want to right, I mean left justified or if you want to write justified, you can have it on this side. You just use this top bar to drag it wherever you want now. In this view, you can continue using Safari if you desired, like you, can just go browse other places.
If you want that's, not a problem at all, but the point with the slide over is to take a quick glance at an application and just get rid of it. So if you are done looking at the news, you're done with your quick glance, all you do. Are you grab this, and you swipe it away, and it's gone so that ends the slide over view and, of course, the next more important thing is the split-screen multitasking, which is true multitasking without the slide over? So it starts the same way. Let's not do a split screen multitasking using the news application like we just did, so again you bring up the dock. You grab the news application, you dump it right here and then to activate split-screen multitasking he's set up sliding this away again tap the bar and slide it down like this and let go and that activates real split-screen multitasking with side by side view, and you can use this divider line here- to change the size of the actual windows for a realistic multitasking experience.
So I can do whatever I want over here, and I can do the same thing over here. Okay, so let's say you are doing multitasking, and you want to end your multitasking view. Let's say you want to keep the news, and you want to get rid of Safari. All you do. Are you grab this slider, and you just slide the one you don't want away? Okay, so watch this slide away, it's gone and with the same token, if I wanted to keep Safari.
So let's not slide over now a split-screen multitasking and if I wanted to keep Safari I can simply drag that away and the Safari stays with me. So that is the split-screen multitasking. Now, there's one more thing you can do with the split-screen multitasking Apple has been presenting this option as a PC like experience, so with the split-screen multitasking, you actually have the option to drag and drop files. Let me launch my mails' application over here and, as you can see, I'm about to type a new message in this message in the body of the actual message. I want to add some pictures and I want to add the pictures from my Photos app.
So all I have to do is I will bring up the dock I'll grab the photos' folder over here. I recommend that you have all the apps you want to multitask with on this side of the dock. I'm lucky! That's here, right now, but again, I grab this guy I dump it right here and let me activate split-screen multitasking real quick just like that, and let me just make it even and now, unless I want to send this picture to whomever I'm sending that message to all I do is drag and drop. This photo right here and boom. Now that picture is available to be sent to whomever I'm going to be sending this message to okay, so that's drag-and-drop feature in split-screen multitasking, and it's definitely available with most of the apps that Apple creates and more and more third-party apps are also supporting this fantastic feature.
The next multitasking feature on the iPad is the picture in picture view. Basically, when you're using a video viewing application such as Netflix, what you can do is you can minimize the window and continue watching it while you're doing other things on the side. So let me launch Netflix to show you this example, so you just launched Netflix and let's just start to play a video here. Let's just play this video right here and as this video is playing. Let's say that I want to do something.
Okay, you could be watching a movie. Your favorite TV show, whatever all you do, is when picture and picture is enabled, and it is enabled by default. You press the home button and, as you can see, the window goes to the side, and then I can continue working on Safari as I'm, watching the video or the movie. What you can do with these guys, you can move it around. You can put it on this side.
You can put it over here. Furthermore, you can put it over here, but you cannot put in the middle okay if you put it somewhere here, it defaults to the closest corner, and then you can also make it a little bigger. So that's actually a very good feature easier to see and as I'm doing, this I can continue working on another application for a couple seconds before I go back into the Netflix application or any other video application that supports this feature. So when you're done watching I mean looking at this stuff, you can tap this guy and all you do is tap this button, and it goes back to the full screen format. So that's picture-in-picture, absolutely fantastic and then, if you want to just continue working on the Safari or whatever app you're looking at- and you just want to cancel this- you just tap on X boom that closes the application, and the final thing I want to talk about in regard to multitasking is the options you can enable or disable in regard to multitasking on the iPad.
So what you want to do is you want to go to the settings? Then you want to go to general and then go to multitasking and dock from here you can infect disable multitasking. So when you disable this first option, you cannot do a slide over or split screen multitasking. If you disable this guy, you cannot do picture-in-picture of view. These are just a bunch of gestures. You can actually look into, but that's not what I'm covered in this video.
But these gestures are things like this. You can pinch the screen to go to the home, screen and stuff like that. It lists them right here. You can read them and just play with them, but this one here has to do with the dock. So if I disable this option, that says show suggested and recent apps.
So if I disable this and if I pull up the dock, those three recently used, apps or commonly used apps are not going to show up anymore, so you're going to have a basic doc over here, I like to keep it just in case, so I make sure that that is enabled now one thing when you disable this and re-enable this. The recent apps do reset. Okay, so they're not gonna, show up right away until you start to use applications again. So if I start to use Safari several times' news application several times again and again, it's gonna start to show up slowly on my dock over here, alright. But that brings us to the end of this multitasking video for your new iPad 2018.
It's certainly a fantastic iPad, and if you learn how to use it, you can maximize your ownership of this product now, I make sure to subscribe, to sake, tech and give this video a thumbs up and also, if you do use, Twitter, Instagram or Facebook, make sure to follow me on all at sake. Tech online. For the latest updates and of course you have any questions, comments or concerns, just drop them down below and have a fantastic day, guys.
Source : sakitech
Phones In This Article
Related Articles


Comments are disabled
Latest Articles


