iMovie on iPad Tutorial By Technology for Teachers and Students
When the iPad first came out. It was widely looked at as a media consumption device. It was a tool that you could go to watch movies and to listen to podcasts, listen to music and to read internet web pages, and it was a place to go, to play, games and consume content and things through apps. Well, today, the iPad is much more than that. The iPad is definitely in addition to all of those things. It's a media production tool, it's something that you can use to create and to produce media, whether it be you as a teacher or your students, making projects and media.
So we're going to look in this presentation at an app called iMovie. This is iMovie for iPad. Of course, iMovie has existed for many years for Macs MacBook Pros IMAX things like that, but it is also available as an app on the iPad and for those of you that bought an iPad on or after September 1st 2013 iMovie is free for you. Now you may need to upgrade or update your iPad to iOS 8, but once you've done that you should be able to go to the App, Store and download iMovie for free. If you have an older iPad, then you'll probably have to buy iMovie.
If you want to use it, but let's take a look at how you could use iMovie to create a narrated, slideshow type project. Now this could be used for many things. It could be used. As a book report, you could use iMovie to create several student produce projects, but in this presentation, we're going to focus on making a narrated slideshow using iMovie for iPad now I'm already in iMovie- and you can see here in the upper left corner I- have a plus sign I'm, just going to tap that plus sign to start it up and there are two types of projects I can make. I can make a movie project or a trailer.
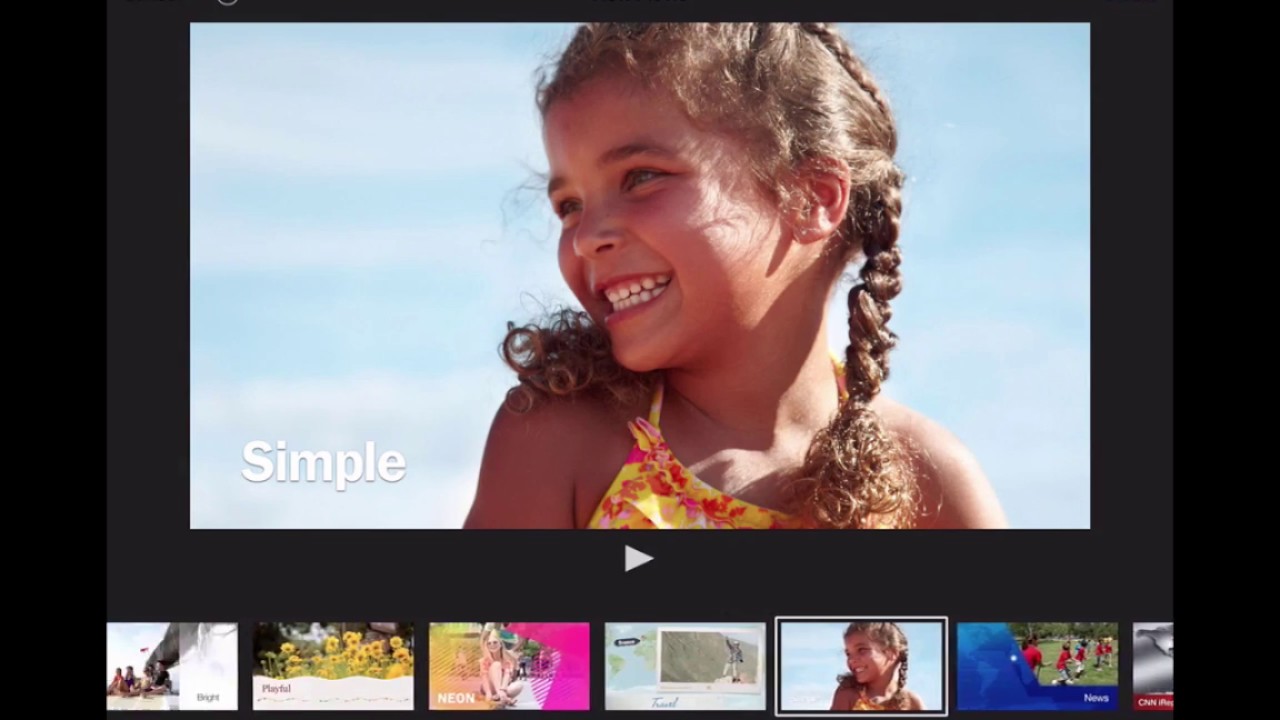
Now the trailers are a lot of fun, and you should definitely check those out if you're interested, they would be perfect for a book report or a book review or creating basically an advertisement for something, but for today, I'm going to focus on movie, so I'll just tap on movie, and it brings up several styles that I can choose from do. I want a modern style in my movie. Do I want a playful style, travel style, simple, there's all of these different styles? Now the last two are news, so this would be great for making a pretend newscast like a nightly newscast kind of thing and then CNN I report same kind of thing like a TV news program, so that's kind of fun, I'm going to go with this travel theme or style, and I'll just tap on it to select it, and then I'll go in the upper right corner and tap create, and it loads up my workspace. Now you can see in the upper left corner, we have a rectangle, and it says, select media to insert in the video photos or audio browsers. Okay and that's referring to what you see on the right side of the screen, we have a rectangle there and there are videos that I can access, there are photos, I can access and audio, and I'll get into that a little later notice that it does give some other instructions in the upper left corner.
It says: tap the camera button to record from the camera. That's referring to this camera at the left middle side of the screen and when I tap on that it activates my camera and I could tap the record button and record some video that would be able to be pulled in to my project so in the upper left. That's basically what you get is some instructions on the in the upper right area like I referred to earlier. I can tap on video and access all the videos on my iPad or favorites, or iMovie media. Okay.
If I tap on iMovie media, it brings up other media that I've used in iMovie in the past. You can also go to iCloud Drive and this would tap in to content. That's on my iCloud drive on the internet, I'm just going to go to all, and you can see it's pulling in some videos that are on my camera roll on my iPad, and so I could select one of these okay and pull it in, and in this case these are videos that I have made now. There are also photos, so I could tap on photos and I could go into recently. Added and I could double tap on a particular photo to add it to my timeline.
I could go in and choose photos from different folders, and you know different sources on my iPad. Now the other option is to take photos or videos using my iPad. So here at the left center part of the screen, I can tap that camera, and it pops up, and I can just press record to record a video and then press stop to stop the video and then tap use video in the lower right, ok or if I'd prefer I could tap camera and instead of taking a video I could swipe up and just take a photo. So I will take a quick photo of my mouse tap use photo and that is now added as a photo that I can use in my narrated slideshow now, as I've been adding these items to my slideshow notice that it's basically creating a timeline here at the bottom of the screen, and if any of this comes in the wrong order and I regret, the order that it came in I can just tap and hold on a particular clip or picture, and then I can drag it where I would. Rather it is now.
If you want to completely remove something you can tap on it and then tap the delete button in the lower right corner, and it should delete it a couple other things that you should be aware of when you're creating a narrated slideshow. If you tap on a particular image or video in your project notice across the bottom, you get some tools that are here. You also get some tools that appear on the preview image in the upper left area. So this preview of my mouse is there notice what it says. It says pinch to reposition the start and then, if I tap the button underneath that it says pinch to position the end, and then it says Ken Burns enabled.
So what in the world is this talking about? Basically, this is talking about the Ken Burns effect. Ken Burns effect is where a still image is given some motion by using zooming and panning, just kind of subtle, zooming and panning, so to create a Ken Burns effect. I have to first make sure that it's enabled, and then I would start where it says pinch to position. The start and I would just pinch with my fingers. You can make it either bigger or smaller, so I'm going to start out with the Ken Burns effect zoomed in on that part of the mouse, then I'll tap the button to pinch to position the end, and I'll move it to the side a little, maybe, and then I make sure that Ken Burns is enabled, and now, if I go back, let's see if it works.
When I press play there's my Ken Burns effect that I set up, and I told it where to start and where to end okay. So that's a little kind of simple editing that you can do using iMovie for iPad. Now, some other basic edits that you can do. You can tap on a clip or a photo. That's part of your iMovie narrated slideshow, and you just tap on it and at the bottom of the screen notice that there are some things you can do with it and one of those things is to add titles, so I'm going to go to this first scene, this first image or video, that's part of my narrated slideshow, and I'll tap on it, and then I'll tap titles.
Next I can choose the kind of title, basically what it will look like on the screen. What style do I want it to be a little animated? Okay, so I'm going to go with this style called focus, and then I will tap on it where it says title text here, and then I can just tap and highlight and delete. What's there, and I'm going to put in my great title for my video here: okay, tap Done. Now, when I play the video I'm just going to tap and drag to the right, you know with my finger to basically rewind this slideshow, that I'm working on, and then I'll tap, play and there's my title. There's my Ken Burns effect.
Ok, so there's some nice things that you can do some basic edits now, there's also the ability to add transitions, you'll notice between that first title, video and then this still image, there's a little symbol there that looks kind of like a Bowie and what that is, that's the transitions symbol. If you tap on it, it gives you the ability to go in and add a transition, so I could have it be a dissolve transition. I could have it be a slide transition or a wipe, I'm going to go with wipe, and then I'll just tap play, and you can see what it's like. It's a different transition now. Okay! So that's something to be aware of now, once you're, ready, and you've added video, maybe you've added still images, and they're in the right order or the right position, and all that, oh and one other thing about that is you can make an image stay on the screen longer or shorter, just by tapping on the image notice.
What happens you get these yellow bars on the sides? You can then tap on one of those bars and drag it to make the image stay on the screen longer or shorter. So I should have mentioned that earlier, but that's definitely an important thing to know. Once you've got the video and the images the way you want them to be, what you need to do is add in the narration and so just touch on your content and drag to side to side until you get to the place where you want to start narrating. So I would like to start narrating about here and then on the left side of the screen just tap on the microphone symbol, and it pops up with basically an audio test. This is testing to see if it can hear me and of course the iPad has a little tiny microphone built into it, and you'll have to look at your iPad to see where that is located.
For me, it's toward the top right, and it's just this little tiny dot. Basically, and if I put my mouse closer to it, you can see that it's going to hear me a lot better than if I have my mouth, and I'm speaking toward a different part of the iPad, so definitely look around for that little hole that little dot in the side of your iPad, most likely with older iPads. It was on the top, and you know it's kind of jumped around a little, but for me, it's in the top right corner. If I'm, looking at my iPad in portrait mode, okay, once you're convinced that it's hearing you well, you can just tap the record button that you see there. This is practice of making an iMovie and I hope that it's good okay, so I just tapped, stop, and it put in my audio.
You can see my audio track. Is there at the bottom, that's called recording number one: I can review it by tapping that review button and if I'm satisfied with the sound and of course you can't hear that sound, but I'll just tap accept if I am satisfied with it now, my audio recording is right there. Now if it needs to be adjusted, maybe it didn't come in perfectly I can just tap and hold on it, and then it frees it so that I can click and drag to put it exactly where I want it to be. Okay, so that's a nice feature to get the audio in the right place for my narrated slideshow. Finally, you can also add some background music.
If you want- and it doesn't have to be music, it could be an audio recording that you do or that the students do, but on the right side of the screen, I just tap on audio and there's some built-in sound effects. There's some theme, music and there are songs that are on your iPad that you could use I'm going to go to theme, music, and I'll. Just pick neon tap play to try it out if I, like it, I just tap that arrow to drop it down into my project and by default it should get quieter. When I play the video, the sound, the music should get quieter. When my recording pops up that's called ducking, so the music will duck so that my voice can be heard.
Okay, so those are the basics of using iMovie on the iPad to create a narrated slideshow, there's so much more that you can do with this. But those are the basics. When you're done, you can tap the done button in the upper left corner, and it takes you to a page that is dedicated just to your movie. You can then tap where it says my movie and give it a name, and later I could go in and edit this more if I want to. But if I'm satisfied with it, I can just tap the share button.
That's there at the bottom center and that lets me share this to various locations. I could save it to YouTube or Facebook, but the one that's most useful for most teachers is that save video button in the lower left corner. You can just tap it decide how big you want it to be, and it will save it and export it to your camera roll so that you can do something with it. You might be able to edit it in another program. Furthermore, you might be able to upload it through Dropbox or OneDrive, or something like that.
But this is a great way to make really what is a real movie, a real video that could be played on any computer once it's gotten off the iPad, but it's great for narrated slideshows reports, projects and things like that for the students to make so have fun using iMovie.
Source : Technology for Teachers and Students
Phones In This Article
Related Articles


Comments are disabled
Latest Articles


