HTC U Play Teardown Repair Guide - Fixez.com By Fixez.com
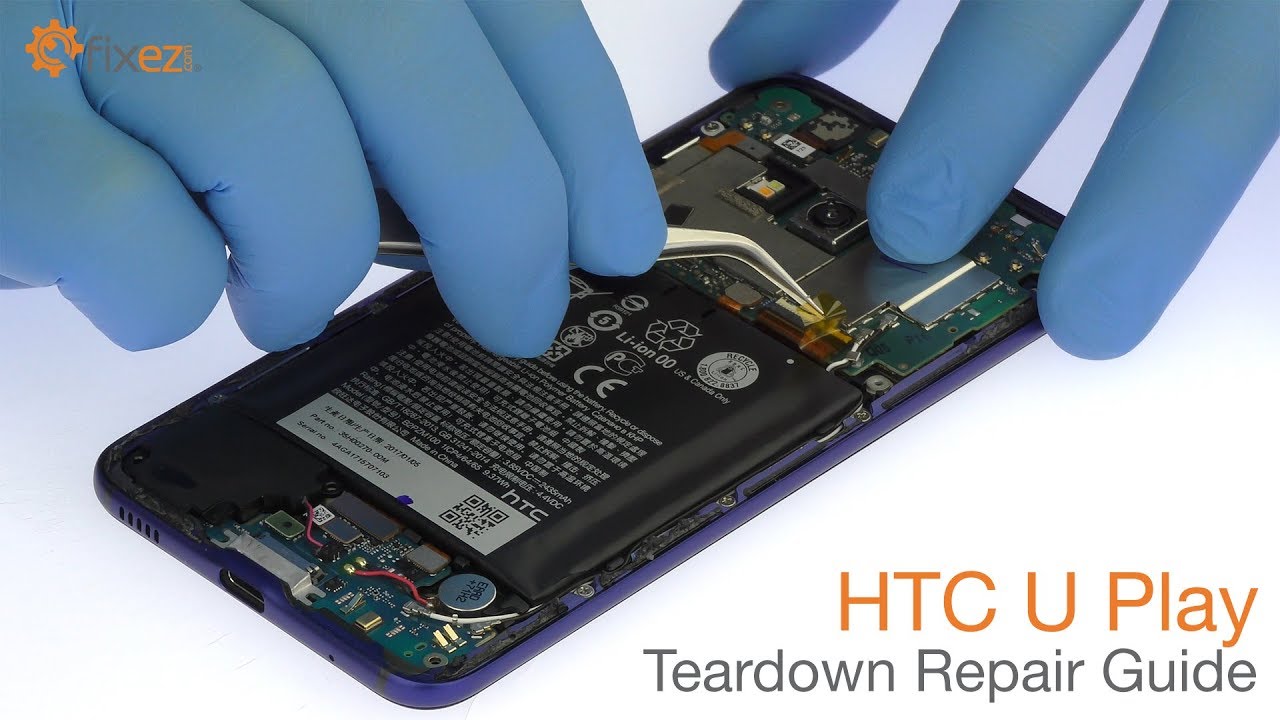
HTC Play teardown repair, guide, warning you're performing this repair at your own risk. We claim no responsibility for any damages that might occur to perform this DIY repair. You will need a plastic triangle: opening tool, nylon, spider, SIM card ejection tool, fine tip curved tweezers precision, knife set premium, two millimeter red adhesive, roll multipurpose heat gun, t5, Torn, screwdriver, Phillips, screwdriver, playing cards, power down your HTC Play phone eject the SIM card and micros card tray. The HTC Play rear glass panel is glued on solidly apply heat to soften the adhesive, use the triangle opening tool to attack the adhesive and dislodge the rear panel from the phone remove the following: seven t5 torn screws in three Phillips screws use the flat end of the spider to pry up the plastic shields that cover the motherboard and daughter board sludge. The HTC you play battery connector up from the board. Remove the falling Phillips screw attach the bevy of cables from the HCC Play motherboard, carefully, pry, the motherboard up and out of the phone Pop off, the small board that includes the proximity sensor and ambient light extricate.
The 16 megapixel HTC. You play rear-facing camera from the motherboard, remove the impressive 16 megapixel HTC Play front-facing selfie camera easily lift the loudspeaker out of the smartphone, remove the small metal bracket and then use the spider to disconnect the flock of cables from the daughter board, use the tweezers to free the vibrator from the adhesive securing it in place. Pry the HTC you play daughter board up from the mid-frame. It includes the USB connector vibrator, a microphone spring contacts and some control hardware. The HTC battery is well wedged and adhered in place, use a spider to help free it from the adhesive securing it to the mid-frame, lift out the 3.85 volt 24:35 William per hour. HD you play battery tweezer, the HCC you play earpiece speaker out of the chassis, remove the following: eight Phillips screws extract the HCC you play metal frame, remove the signal cables and then use the tweezers to remove the fragile power and volume buttons ribbon.
Cable from the side of the mid-frame. Peel the tape and interconnect cables off the frame. The 5.2 inch HTC Play display assemblies food solidly to the frame apply heat to soften adhesive. Use the precision knife to create enough space or insert a playing card, use the playing card to slicer the sticky adhesive, take your time and apply additional heat as needed once you've sliced through the adhesive be mindful of the display cable. When decoupling, the HTC Play screen from the mid-frame carefully remove the cables for the bottom buttons extract, the HTC, Play capacitive home button and fingerprint sensor from the mid-frame you all the replacement, parts and repair tools used in the video are available at www.
fixez. com. Don't forget to subscribe to our YouTube channel like us on Facebook and follow us on Twitter, make sure to take a look at our other DIY smartphone and tablet repair tutorials. You.
Source : Fixez.com
Phones In This Article

Related Articles

![Samsung Galaxy S21 – Battery replacement [including reassembly]](https://img.youtube.com/vi/fbG5eMyrPuY/maxresdefault.jpg )


Comments are disabled
Latest Articles


