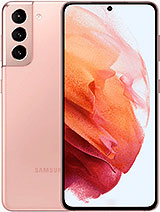
Samsung Galaxy S21 – Battery replacement [including reassembly] By iDoc EN
![Samsung Galaxy S21 – Battery replacement [including reassembly]](https://img.youtube.com/vi/fbG5eMyrPuY/maxresdefault.jpg)
Your samsung galaxy s215g discharges way too fast? are you generally unhappy with your battery's performance? in this repair video we show you how you can easily replace it yourself the battery replacement is a bit more difficult on the s21, because both the back cover and the battery itself are heavily glued therefore you should allow about 60 to 75 minutes for the repair for the repair of the galaxy s21 5g you need the following tools. in addition these tools can be helpful. all tools and an original samsung replacement battery can be found in our online store at idoc. eu. you can find the links in the video description. if you get stuck at any point feel free to post your question in the comments.
our support team is always happy to help. switch off your galaxy s21 5g to avoid potential short circuits during the repair. the smartphone is opened via the heavily glued plastic back cover. please note that your phone is no longer 100 waterproof after opening it. to open it you first have to heat the adhesive frame of the back cover.
we use a heat gun for this but a normal hair dryer also works fine. run the hot air gun evenly over the edge of the back cover for a few minutes. heat especially the part where you want to start opening. once the back cover is sufficiently heated use a flat sturdy tool to remove it piece by piece from the case unit. we can recommend the iflex for this purpose.
it is made of flexible very flat metal and has sharp edges that are particularly easy to insert. attach a suction cup to the lower edge of the back cover and pull it upwards to create a narrow gap. be careful not to burn your fingers on the heated back cover. then carefully insert the iFlex between the back cover and the case frame. do not insert it too deeply so it's not to damage anything inside the device.
since you can quickly scratch something with the sharp edges of the iFlex we recommend switching to a plastic tool like the iPlastix as soon as possible. run the tool along the edge of the back cover and detach it piece by piece from the rest of the case. put flat plastic picks on the loosened areas so that the glue cannot bond again. heat the edge from time to time and work your way forward. be especially careful on the sensitive camera module.
we recommend that you work with a hard plastic pick at this point as its shape ensures that it cannot be inserted too deeply. the back cover is glued around the flashlight as well, so you should heat again there once the back cover is completely detached you can remove all flat picks and take it off. on the inner side of the back cover you can now see the adhesive frame that we heated up and loosened. as mentioned it is glued separately around the flashlight. put the back cover aside.
then take a phillips screwdriver and a screw storage such as a magnetic pad to loosen the screws of the nfc antenna and store them safely. the nfc antenna contains the coil for wireless charging. its metal cover protects the motherboard. carefully fold the cover upwards. underneath it the orange connector of the battery and the black connector of the nfc antenna are located directly next to each other.
separate both connectors by carefully levering them off the motherboard for the plastics spudger. to avoid short circuits during the repair you should separate the battery connector first. small parts on the motherboard can easily be damaged. so make sure you lever from a free side if possible. once the connectors are separated you can remove the nfc antenna.
the lower end is glued. on the bottom of the antenna you can easily see the connector that you have separated. to be able to separate the cables above the battery the speaker has to be removed next. first unscrew it six phillips screws. then you can lever it out of the screen unit.
a small arrow in the upper left corner marks the recess where you can place your tool. in the following step remove the two connecting cables between the motherboard and the usb board by separating their connectors. for the first time the screen cable is not enclosed in the screen unit. thanks to a separate slot it can be completely removed and thus also be replaced if necessary. detach the two connectors here as well and put the cable aside.
the battery is heavily glued. therefore you should use hot air again to loosen the glue. never heat the battery directly but only from the screen side. since the battery lies well protected in its guide removing it is a bit tricky and requires some patience. use the suction cap to lift the battery a bit.
at the same time use a plastic lever tool on the lower edge of the battery and carefully lift it upwards. the battery spudger provides the greatest leverage. once you have lifted the battery a bit, you can slide a flat plastic tool such as the iPlastix, under the battery. when removing the battery secure the first loosened corner with a flat plastic pick so that the glue does not bond again. work your way with the iPlastix bit by bit by pushing the tool further and further under the battery with a knife motion.
when the glue is loosened you can lift the battery and remove it from the device. as you can see it has been glued over a large area. if the adhesive residues and the screen unit form larger lumps, you should remove them, so that the new battery sits level. otherwise you can just leave them as they are. you can find an original samsung replacement battery and tools for this repair in our online store at idoc.
eu. check it out! before you insert the replacement battery you have to adjust the battery connector and remove the protective films. then place it into its guide in the screen unit and press it firmly. position the screen cable over the battery again and attach its two connectors. you should hear and feel them click into place.
be especially careful when attaching connectors and never use force to tighten them. damage can lead to the failure of an entire component. also reattach the two connecting cables. the labeling on the cables will help you to align them correctly. reinstall the speaker.
it has three small locks. you have to hook them into the frame of the screen unit so that it sits evenly. you can then screw the speaker back into place. now attach the nfc antenna again. press the lower sticky end of the module back on and remember to reattach both: the antenna and the battery connector.
the battery connector last. finally screw the metal cover back on. before you finally close your s21, we recommend you to first test the replacement battery. connect the charging cable to see if your galaxy charges. if you have a wireless charger you should also check the function of the nfc antenna.
our checklist can give you a good orientation for testing. we'll link it to you in the infobox. call up the samsung test menu via +#0+# to test other basic functions such as the speaker. this way you can make sure that your repair was successful. if something does not work properly check again if all components are attached and screwed correctly.
align the back cover over the screen unit and press it firmly along the frame so that it sits evenly everywhere. to ensure that the adhesive bonds properly you should heat the edge of the back cover for a few minutes and then weigh it down with a couple of books or press it together with a help of clips as in our example. i hope the battery of your galaxy s21 5g has now full power again. if this tutorial has helped you then give us a thumbs up and subscribe to our channel to never miss any of our tutorials and videos about smartphones. high quality tools, spare parts and accessories can be found in our online store.
iDoc: everything for your smartphone. find more helpful videos here. see you next time.
Source : iDoc EN
Phones In This Article

Related Articles


Comments are disabled
Latest Articles


