How to use screen magnification on your Chromebook By Chromebook
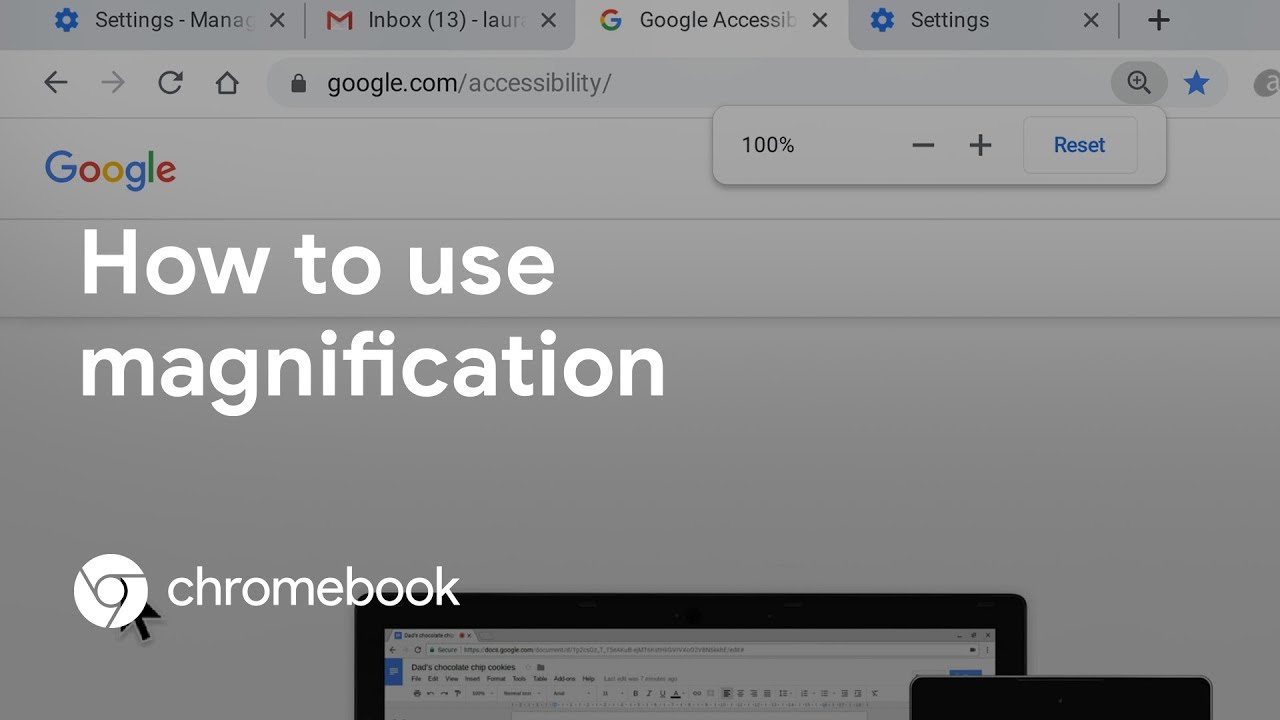
Hi, my name is Laura and I'm on the Chrome Accessibility team at Google. Back in 2016, we released a video in this series called "Making your Chromebook easier to see" which walks through a number of different features for increased visibility. Since then, our team has made some improvements to magnification, so we wanted to make another video to go over the updates. Let's dive in. There are a few different ways to make content on your screen larger. The first way is to increase the size of the browser content.
To do this, I hold down "Ctrl" and press the "Plus" key. I can keep pressing it to find the level of zoom that works best for me. If I want to make the browser content smaller, I hold "Ctrl" and press "Minus". Once your browser zoom is set to something other than default, a magnifying glass appears on the right side of the omnibox. You can also click on that button then click the onscreen plus or minus buttons to adjust the zoom level.
To reset back to default, either press the onscreen "Reset" button or press the keyboard command "Ctrl" + "0". When adjusting the browser zoom, you may have noticed that only the content within the browser itself got larger. If you want to make everything on the screen larger, including your Chrome tabs and app icon on the shelf, just add Shift to the mix. So, I hold "Ctrl" + "Shift" and pressed the "+" button to make everything larger. I can press "Ctrl" + "Shift" + "-" to decrease the size, or "Ctrl" +"Shift" + "0" to reset.
For many users adjusting the size of the browser content or even making everything slightly larger might still not be large enough. So Chromebooks have two different types of screen magnification available that enable you to view the screen up to 20x the default size. First, let's take a look at the full-screen magnifier. I can access this in a few ways - Either through Accessibility Settings or through pressing a keyboard shortcut "Ctrl" + "Search" + "m" as in magnifier. I'll head to Chromebook Settings then type "Accessibility" in the search field, then click on "Manage Accessibility Features", then navigate to the display section.
This is where I can explore and turn on different magnification features. I'll select "Enable Fullscreen magnifier" now the whole screen zooms in and I can use my mouse cursor to pan around the screen and control what I see. If using a touchscreen, I can use two fingers together on the screen to pan around. As I tab through the page, the visual focus follows along as well which can be helpful if I am looking for a specific button, link, or text field. I can adjust the zoom level a few different ways.
First, I can use the drop-down menu in the accessibility setting to adjust the zoom level to a specific level all the way up to 20x. I happen to like the following ways even better though. Since you can adjust it at any time and don't have to be in the settings page. First, I can hold down "Ctrl" + "Alt" keys on the keyboard and use two fingers on the touchpad to scroll up and down. Second, I can hold "Ctrl" + "Alt" and press the "Brightness Up" key to increase zoom level or "Brightness Down" to decrease the zoom level.
Third, if I'm using a touch screen Chromebook, I can use the pinch-zoom gesture on the screen to adjust the zoom level. To turn the full-screen magnifier off, I can either click the toggle in Settings or press the keyboard shortcut "Ctrl" + "Search" + "m". Next, let's take a look docked magnifier instead of the fullscreen magnifier. The docked magnifier is a bit different than the fullscreen magnifier in that it takes the top one third of the screen as a magnified region, then it resizes what's on your screen to fit into the bottom two thirds. For context, we heard feedback from some low vision users that the fullscreen magnifier does require a lot of panning around.
Especially if you're using high-zoom level. Also, it can be easy to lose track of where you are on the page. For example, if you're toward the bottom right or at the top center of the content, the docked magnifier is meant to address some of that feedback. Depending on your vision, one magnifier may better suit your needs so give them both a try. I can turn this on either through Accessibility settings or through pressing the keyboard shortcut "Ctrl" + "Search" + "d" as in docked.
Note that the first time you use that shortcut or "Ctrl" + "Search" + "m" to turn on the fullscreen magnifier, you'll see a dialogue asking you to confirm that you do want to turn these features on. The dialogues are simply there to prevent false triggers of the features. Now that I have the docked magnifier on, I move my mouse cursor around the screen to control what's being displayed in the docked region. Similarly, as I press "Tab" the visual focus follows keyboard focus as I jump through the buttons and links. Also, as I type in an edit field, the text remains centered in the docked region.
I can adjust the zoom level the same ways as mentioned for the fullscreen magnifier. When using the docked magnifier, I personally prefer to hold "Ctrl" +"Alt" and press the Brightness Up key to adjust the zoom level as it's a bit easier to control versus scrolling two fingers on the touchpad, but you can use whatever you prefer. That's all for today, thanks so much for watching. If you have any questions or feedback about accessibility, find more out at google. com/accessibility.
To sign up for user studies, to explore new features, and help shape Google products, go to google. com/usability. For general feedback or questions on the topics you've heard today, consider joining the Google group chromebook-accessibility@googlegroups. com and participate in the conversation with other community members, or reach out to our support team by sending an email to disability-support@google. com.
Also, look out for more videos on ways to make Chrome and Chromebooks easier to use. Again, I'm Laura, and on behalf of myself and the Chrome Accessibility team, thanks for watching.
Source : Chromebook
Phones In This Article
Related Articles


Comments are disabled
Latest Articles


