How to Replace the Battery on a Samsung Galaxy S7 By Serg Tech
Hello everyone in this video I'm going to be showing you how to replace the battery on your Samsung Galaxy S7. If you want to do this yourself or if you haven't done it before, and you know how to do it um, this video will help you to change the battery correctly. Okay, so first thing you're going to want to do is remove your SIM card tray and SD card tray and so power the phone off first and then let's remove the UM the tray alright, once the phone is powered off, we're going to need to give it some heat on the back glass with a hairdryer or heat gun or put on a hot plate in order to lift the back glass up with this suction cup, so you're going to need a suction cup to start um pulling up on the back cover, pull on it carefully. You don't want to crack it. You don't want to break it, you're going to need to do this, keep pulling up on it until you start seeing that it starts separating just enough so that you can put an open prying tool in between the glass and the frame of the phone see I'm getting it open, just a little. Okay, so, as you can see there, I got it lifted just a little just enough to squeeze a guitar pick in there.
Sorry for moving the phone out of the camera for a second there, I wasn't uh, wasn't paying too much attention to the camera. I was trying to UM get the guitar pick in there correctly. Okay, so I finally got it in there once you have it in there you're good to go just make sure it doesn't come out um. You can start, you can take the suction cup off and start prying around slowly. If you see that it's still really hard to pry around it, give it some more heat so that the adhesive consulting up even more you, okay, so the next step we're going to need a small Phillips head screwdriver, and we're going to be removing all of these screws that are holding the back assembly of the phone on.
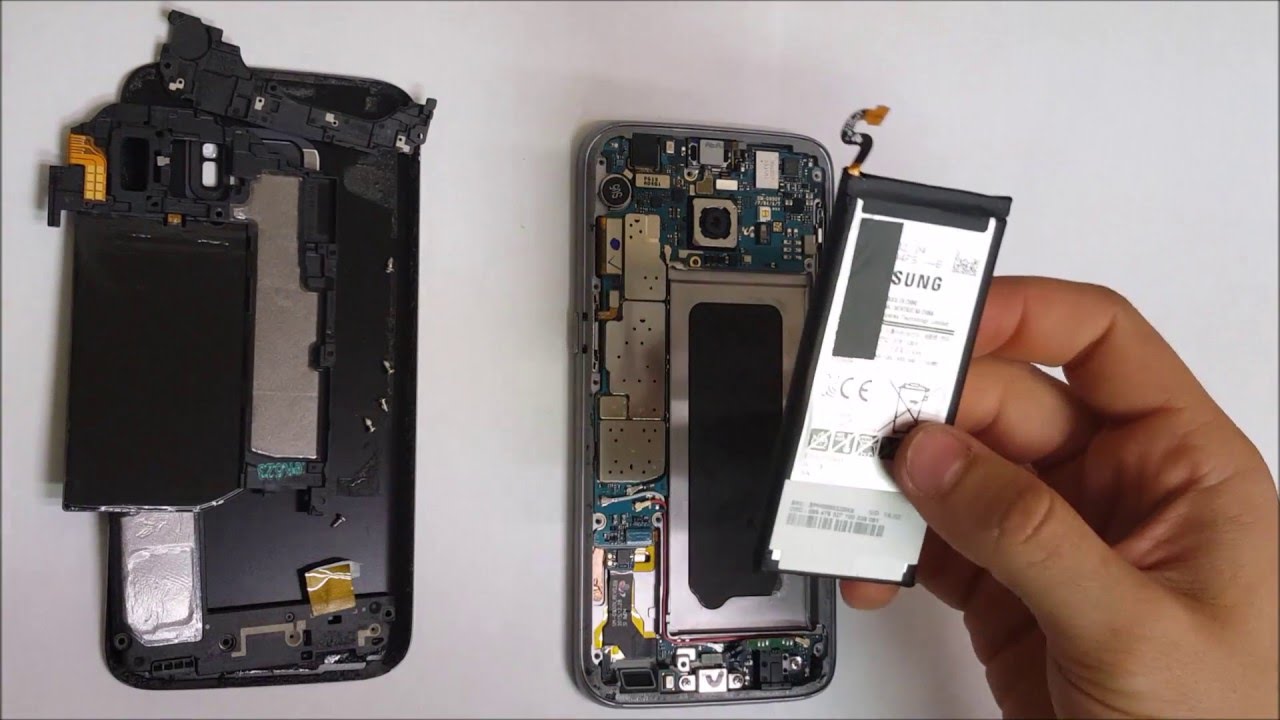
So we're going to be removing all of these screws all right. So after you have all the screws removed we're going to pry up on this plastic piece up here once the screws are moved, it comes right out just pull on it carefully. So we're going to pull this one out and also the plastic piece on the bottom comes out as well, and the one in the middle um comes out as well. The same way you all right so now to replace the battery. Let's disconnect the battery flakes, cable and next thing we're going to do- is we're going to have to give it some heat on the screen with a hairdryer or heat gun or put it on a hot plate.
Once it's hot enough, then we're going to begin to pry up with a prying tool on the battery pry up carefully all right. So once you remove the old battery, then you're ready to go ahead and place the new battery back on. It's really simple. All you have to do is just place it back in just the spot there, where it goes put it in carefully make sure it's its fitted correctly, so that the phone closes I'm good after everything's put back together, so connect the battery flex, cable back on and let's go ahead and place the back housing pieces again and in this video I actually did it backwards. The first back piece that you're so the first back housing piece that you're supposed to install is the bottom one.
So I recommend installing the bottom one. First, then, the one in the middle, which is this one that I just installed and then the top one I did it backwards because I didn't know, since this was the first at 7:00 repair, I was doing you so here I had to fix it up. I had to lift it up so that I can place the bottom um piece on first, like I mentioned, then I placed the middle one, and now I'm putting the top one all right. So once you have the three plastic back housing pieces back on we're going to go ahead and get the Philips head screwdriver and place all the Philips head screws back on Oh all right. So once all the Philips head screws are back on, you are almost done.
All you got to do is just place. The back covers the back glass back on, make sure that there's adhesive on there so that the back cover sticks on correctly, and it doesn't fall off so just place. The back um cover on correctly and the repair is done. You all right, so I hope this video helped you out on replacing your Galaxy S seven battery. If it did, please give it a like and subscribe for more videos like this.
Thanks for watching bye, bye.
Source : Serg Tech
Phones In This Article

Related Articles


Comments are disabled
Latest Articles


