How To: Replace the Battery in your iPhone SE By iFixit
If your battery is giving you trouble in your phone you're in luck, because today, I'm going to show you how to replace the battery in your iPhone SE for this repair you're going to need an eye-opener the ice Clack, a P two pantalone screwdriver, a Philips, triple zero screwdriver, some plastic cards, a plastic opening tool, a small suction cup, a spider and some tweezers I have most of the tools. I need in my protect tool. Kit and I also have my magnetic mat. It helps keep me organized along the way. This is just an overview so be sure to check out our step-by-step guide on ifixit. com when you do your repair.
The first step is to open the phone, and it's as simple as removing the two pantalone screws on either side of the lightning connector. Once those are out and organized on. Your mat use your ice clock to pop open the phone slide, the iPhone between both suction cups and press, firmly right above the home button. Then just pop it open, don't open the phone too far, or you risk damaging the home button, cable or the socket it plugs into keep the cable loose. If it's stretched taut it's too far, if you don't have an ice Clack, you can open your phone with a suction cup and an opening tool.
We outline this alternative in steps 5 through 7 on our guide. Once the phone is cracked open, we can get to work on the home button. Cable that is tethering it to the rear case. First use your spider to pry the bracket then use your spider to disconnect the cable. When the connector has been released, you can pull the home button end of the assembly away from the rear case, using the top of the phone as a hinge open the display to about a 90-degree angle and lean it against something to keep it propped up, while you're working on the phone add a rubber band to keep the display securely in place.
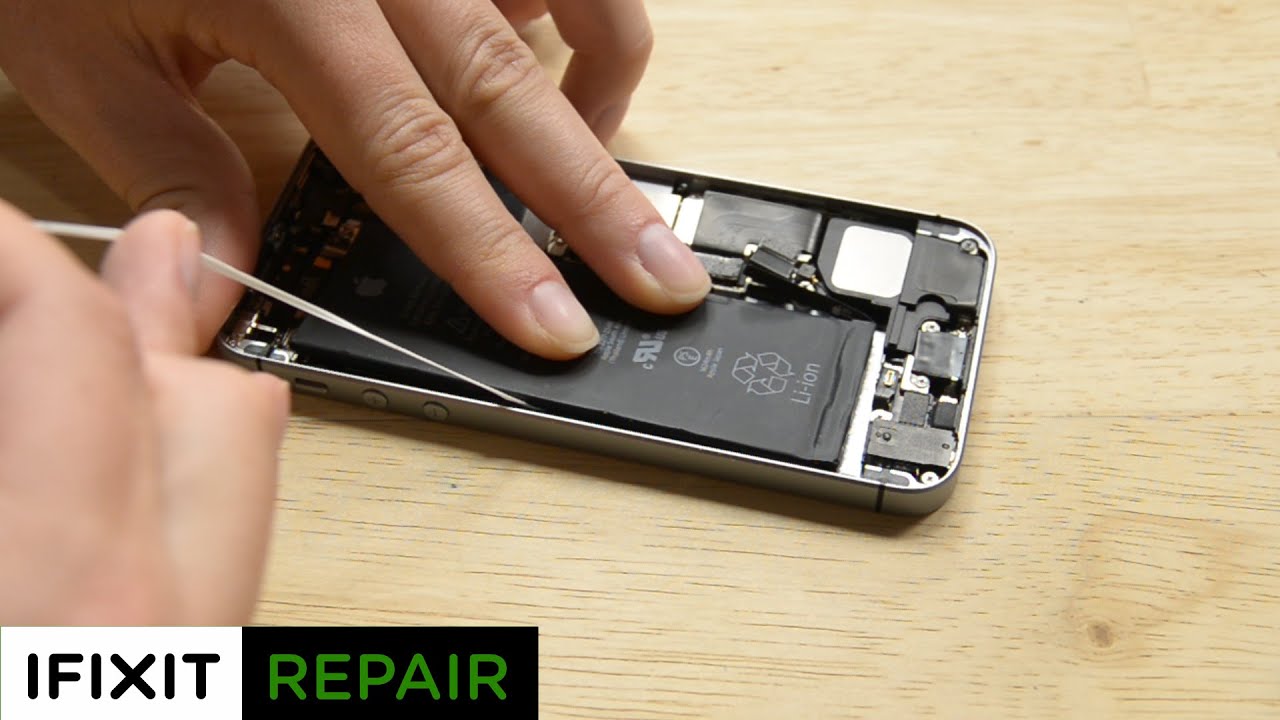
While you work, this prevents undue strain on the display cables time to disconnect the battery. To do that, we just need to remove the two screws holding the bracket in place, remove the bracket and then disconnect the battery with your opening tool. Now that there's absolutely no power to the phone, we're going to work on disconnecting the display from the logic board, there's a bracket protecting all the cables we need to disconnect it's held in place by several screws of differing size. So make sure you take notes on your magnetic mat where this came out, or you could damage your logic board if you reassemble them in the wrong order. Now you can take the bracket out of the phone and get to work on disconnecting all those cables holding the display in place to remove the battery use the tip of your spider to lift the battery adhesive tabs, lift the tabs just enough to cut the black tab with scissors between the two white adhesive strips just be careful to cut up not down, so you don't puncture the battery, try to keep the strip's flat and unwrinkled during the next procedure.
Wrinkled strips will stick together and break instead of pulling out cleanly slowly pull one of the battery strips away from the battery towards the bottom of the iPhone guide, the strip carefully around the corner and up the side of the battery, be careful not to snag it on any of the other internal components. Repeat this procedure with the last strip. If you were able to remove the battery strip successfully, you can just lift the battery out of the phone. That's it for this repair for reassembly. We recommend you work backwards on a step-by-step guide.
When you do your repair, you can find all the parts and tools you need for this and many other repairs at ifixit. com. Good luck and let me know how it goes. You can find me on Twitter at Wendell and gay and follow I fix it at I fix it while you there don't forget to subscribe to our Channel and give us a like on Facebook at facebook. com/, slash, fixity,.
Source : iFixit
Phones In This Article

Related Articles

![Redmi Note 10 Pro Max vs Xiaomi Mi10i Speedtest [SD732G vs SD750G]](https://img.youtube.com/vi/IGf200NItwY/maxresdefault.jpg )


Comments are disabled
Latest Articles


