How To Replace Samsung Galaxy Note 20 Ultra 5G Screen | VERY EASY WAY By Thepcphone
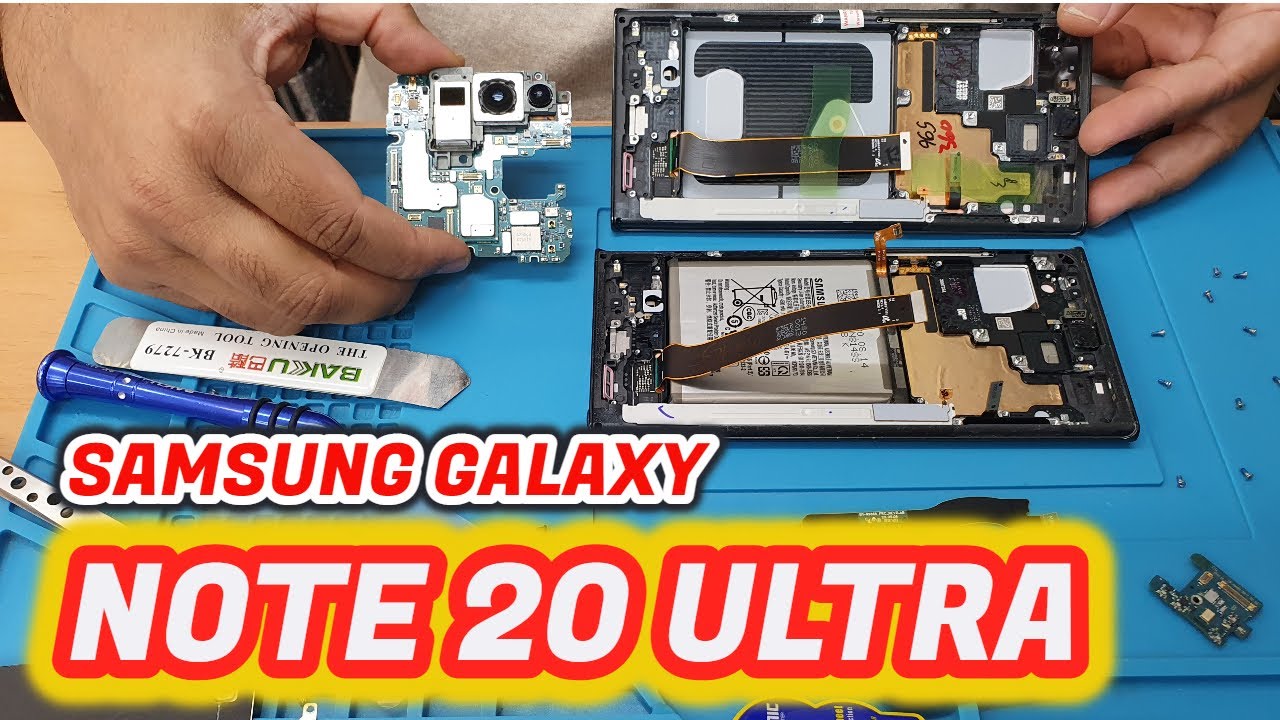
Welcome back to my channel, as you can see, this is almost new Samsung Galaxy note 20 ultra 5g. This is not 20. Ultra 5g problem is the screen heated in here, and completely it's uh out of work now, okay, so we must need to change it. Okay, so we've got the replacement part. I'm going to show you. So that's the actual replacement part.
The screen comes with the body, the whole housing, so that's mean we have to pull out every single component from here and put it back in here and the back cover on put the battery in back cover on and the job would be done. Okay, so this job, it seems like very hard to do, but it's so simple! It just takes time. You know you, you should have patient with it and slowly. You can do that. Okay.
So, let's start first, I'm going to put it in here. So first, what we're going to do we're going to take out the sim tray? That is the first thing good and now, with this hair dryer, I'm going to apply heat right. So it seems this is hot enough. So now, what are you gonna? Do we're going to make a gap with the flat opening tool like this very easy to damage, so be gentle and be careful to put the paper in and just try to cut the glue so right? So that's the back camera. I'm going to leave it inside the pack just to keep it dust free, yeah, so now slowly.
We must need to disconnect all of them one by one, okay by removing the screws one uh all right. So this side is done gently pull this out before we do that, disconnect it first. It is disconnected and try to take this out. While you do that, make sure you disconnect the connector result. It's very fine! Where need to be very careful gently, pull this out right.
What I'm going to do I'm going to take this screw off so now take this out yeah. This one came out, as you can see, put it on the side. Now first thing is disconnect the battery. Then the main one by one never touch these uh lamps, otherwise you're gonna, you're going to damage the actual quality of the camera, because you can clean it. The way it is right now disconnect all of them don't forget about these legs.
Also, this one as well. Absolutely fine. Now, let's check how we can take this out that part as well. Now we need to check if there is any screw and stuff. I don't see any more screws here.
I think this one should come out with the. It is now much more difficult. Can just take this out like that, as you can see, that's the main board, leave it on the side. Okay! So now this part already been clear. Now we need to work out in this side disconnect it doesn't pull this because this one attached to the uh actual charging port? Okay, don't forget! There are two screws, one screw on the board, which is right here and then two screws into the pole super simple.
So now from here, we must need to remove the board first. This is the primary cable and try to take this out. As you can see, this is super simple. Now we're going to take out this flex, okay, you need to be very careful. Go underneath the flex.
Can you see that so I push this one? If you use any metal tool, you need to be very careful, I'm doing it for so long. So that's why I know how to control. You know in your case, if this is first time, it's always best to use the plastic one okay, so that is down to now. We need to remove from here the battery and the vibrator, thanks. So the battery attached with very strong adhesive, underneath I'm going to show you how difficult it is to remove it's, not easy, as you can see, so the best way is to apply some PCB cleaner.
Okay, so add in here give a little of time a lot of tutorials. It shows like this is so easy. They put it and open it. Definitely those videos are posed video, you know most of them, so be careful. Don't feel like it's going to be super easy because just to make the video shorter or to make it more professional might be some people they cut it.
They don't show the actual real time how much it takes to remove the battery from the old phone and to put it back into the new one. Okay, so make sure you have passion, and you do spend sometimes with it. It's coming out. Slowly, yep it's become so easy, slowly and gently yeah. We did not pause the video as you can see.
Okay, so it seems like that has already melted down. Okay, don't forget to make it flat with this flat part. You know if there is any bubble, it's going to make a disturbance for the reapplication okay. So I can see this is absolutely fine. Compared to such a big phone, this is kind of very small battery.
You know they could make the battery little bigger, because this one it shows 4370 million okay. This is quite small if they wanted, they could make it much bigger to save. You know more energy in there, okay, so that is also removed. Now, if you compare the new replacement, we can't see there is anything different because the volume button comes with it. Your speaker also comes with it, but still I don't know about year, one you must need to check what is included.
What is now okay, so I'm going to observe it from top to bottom. I can see your speaker, your speaker here, volume up and down volume up and down touch. Then the fan panel- yes pen panel, also in here, okay. So almost that's all you know, okay, so now it's fine! We can remove this. We don't see anything else to take out from here.
Okay, so now what you can do you need to peel this off? There are a lot of stickers and stuff peel this off. I don't know why they use this sort of sticker. Let me double-check if there is anything missing. No, it's absolutely fine! Yeah! It's absolutely fine! Now it's okay! Take this warranty sticker! Okay! Now first is, what are you gonna? Do we're going to put the motherboard in okay? That's the motherboard, don't touch the camera. The first thing is push that side in first, okay, don't forget all the flex.
I don't see any more flex in here. As you can see, this one went in straight away without any trouble. Absolutely brilliant connect, all of them one by one good. Yes, so absolutely fine! Now the actual charging port, and before you do that, make sure you put this one back. Second, one is the battery.
We don't need to reapply the glue because it seems that is fine. Now we need to put this back tonight. Absolutely fine! Super simple! You know just take a little of time and understanding like you know what you are doing so now. If you close that one, it's going to block the way of the battery as well, so we must need to connect the battery. So simple good.
If you want you can put back all the screws in here, it doesn't go in. We must need to check. Where is the problem? Definitely there is a problem. Let me check if there is anything any gap now so don't over, tighten the screw, because that way it might damage your main boat, see how simple it is, what he can do. We can give it a check by turning on the power.
As you can see, the power is coming on. That's mean everything connected properly. Now we're going to check the touch. If the touch is fine, then the job will be done by the way. I'm trying to add some double-sided tape just for the back cover.
Okay. So before we peel this off we're going to double check. We're going to go to emergency because we don't know the password vibration. Everything seems fine. So now I'm going to peel this off.
That is the advantage of keeping the bathtub protected without any dirt and stuff. You know, and as you can see, this is a little messy. What we can do, we can just cut it because we reapplied anyway, okay and this side is on. We can put this back and everything should be back to normal. As you can see, yeah it's a kind of brand-new phone.
Don't forget like me: it's fine now we're going to test the charge, because that is most important because we remove the charging board, and we pull it out. So we just want to make sure there is no damage happen. That's the charging port! It's charging fast charging! Everything seems fine. So now, if you remove it, we can check it's the brand-new phone s20 ultra 5g. So that's how you change the complete screen panel for Samsung, no 20 ultra 5g.
It's super simple. It seems very easy, a lot of tasks in there. You need to change this and that you know you need to pull this out. But it's not too hard. As I told you very you know patiently if you do it, it's super simple.
Let me tell you some clue for this first thing: never touch the camera lens. The actual camera lens, never touch it. When you take out the back cover, put it in a safe place, don't contact with too much dust because later on, you have to clean it, and you never can clean like a factory, you know, and then, when you pull out the all the flexes, be gentle- and you know the actual wireless panel NFC panel when you pull this out, there are two three connectors so two connectors. Definitely you need to be careful first, you need to pull this down. So when I open the NFC part, I mean wireless uh charging pot.
I just took the front panel fast and the back okay. When I pull the back, I just pull out the actual you know inside mid-frame, because then I don't have to remove the glue tape and stuff like that, follow step by step and do it if you have any difficulty. If you have any question, let me know in the comment section and this video will be. You know it's not only for the screen replacement. That will be enough for replacing the battery whatever you want to do, because this is a kind of heart surgery.
You know. So. Thank you so much for watching guys. I hope I will see you in the next video and don't forget to like and subscribe see you again bye for now. Thank you.
You.
Source : Thepcphone
Phones In This Article


Related Articles


Comments are disabled
Latest Articles


