How to fix iphone 8/8 plus cracked camera lense By infohut
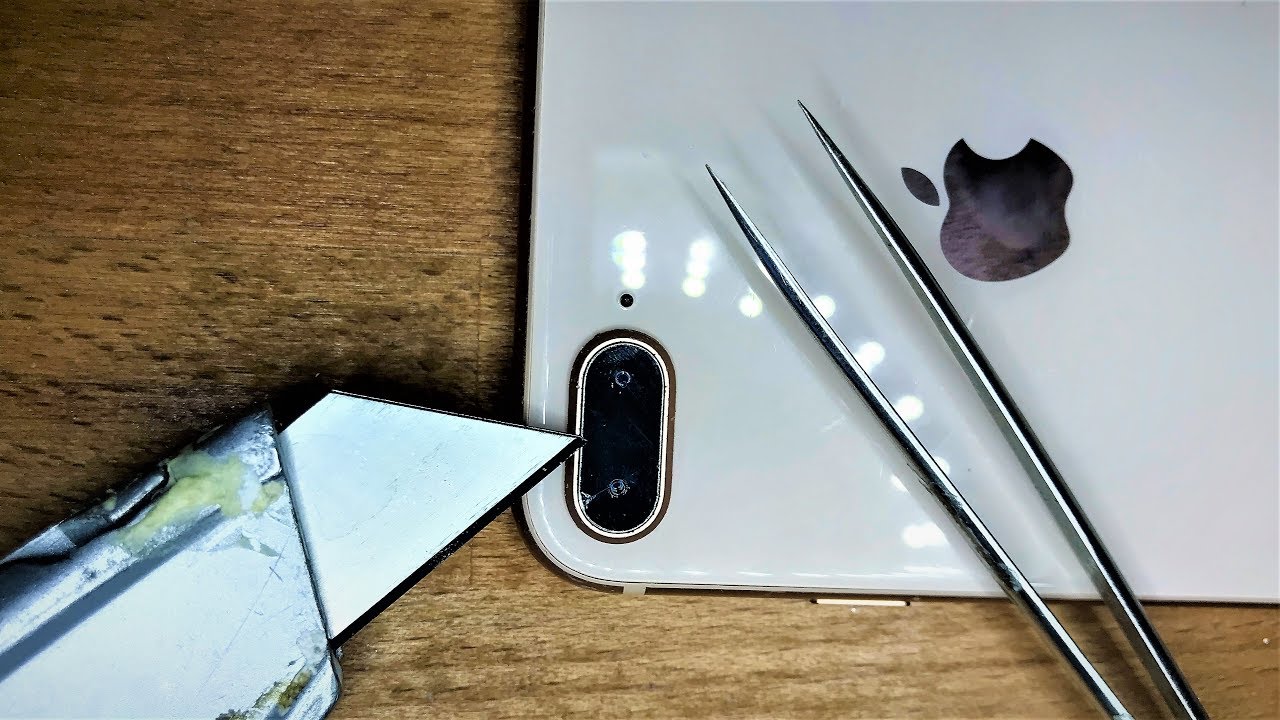
You guys today's tutorial is on an iPhone, 8 plus or iPhone 8 rear camera lens replacement, you'll need a hairdryer heat gun, exact knife safety, glasses and tweezers. Now the first thing to do is get a heat gun and make sure you heat the back camera lens just enough, so it's fairly hot to touch, but it doesn't burn your hair and, as you can see, I'm using the like an exact knife or a Stanley knife to just pry up the weakest point where the crack is- and you just need to spend a bit of time on that, and eventually it'll crack away. Now what you don't see in this video is that I'm always constantly putting heat on the actual rear camera lens. Now, when you do expose the actual camera, make sure you do not put too much heat to actually destroy, or it would damage the camera so just slowly pry up the broken bits. Now, if you do keep heat to it, it makes it a lot easier. So remember that try to avoid getting glass in the middle there, where the actual camera is pick it out with tweezers.
Now, for tools and stuff, like that in the description below I, do have a link. I also have a link on where to purchase the actual replacement lens, they're, very cheap- and you know they actually are pretty small pieces of you know are part so that the chipping will be fairly cheap. Now continue to slowly remove that glass and when you do, it'll get easier. As with the actual iPhone 8 plus, there are two cameras, so the actual lens is a bit bigger than the eight. But this process is the same.
You just need to be patient and then slowly keep the heat on the real lens and then pry up the glass, as you can see, I just used a coin, and now that coin was to cover the actual camera, while I was putting heat on there just to protect the camera, I mean the amount of heat that you're putting on there. It's not excessive, but a hairdryer he'd done. If you hold it there too much, it can get a bit too hot and, as you can see, I'm slowly being patient with prying up that lens, and they're weak I'll, just zoom in a bit I've just covered the actual camera. Again now generally, when you get to this part here and there's the last half of it to lift off, it is fairly easy, and it tends to come off a bit better. Now, the actual, probably the second last step in this is removing the old adhesive you slowly just scratch it away with a pair of tweezers or anything that you find easy to.
Take it off. It's its very soft. It's very easy to take off. You just need to make sure you take it all off, so the actual new lens does sit flush and secure on the actual, the actual iPhone and, as you can see, I'm just scratching away around the sides. It is a bit awkward while doing this under the actual camera, as, as my view is a bit blocked, but the whole process is generally easy.
Once I've got as much as I can off I tried to see if there's any bits or adhesive stuck where the camera is, and now I usually could give it a quick rubdown with nail polish remover or methylated spirits get some glue, v7000, which I like to use. The link in the description below is where you can get if it's great glue it. It does set in a good way, where there's a bit of flex underneath, and you just use a toothpick or something really, really small, to apply that that glue. You get the new lens and there we go. It really.
Is that easy? You just place it on there. You might see a bit of glue oozing on the actual side of the actual lens, as long as it doesn't obstruct the actual camera lens itself. Furthermore, you should be fine. Remember wipe off the excessive adhesive. The glue does set fairly quick, usually fully sets in about four hours or so I'm, just using a cotton tip with a bit of rubbing alcohol just to move away the actual, excessive adhesive and then cleaning the lens a bit, and that's it guys.
It's really that simple you've got a replacement lens without a crack, and you can take photos now just ensure that it is secure. So finally, please like this video please subscribe and remember in the description below is where you can buy the tools and the part.
Source : infohut
Phones In This Article

Related Articles


Comments are disabled
Latest Articles


