How to Edit Better with Lens Distortions By Hayden's Photography
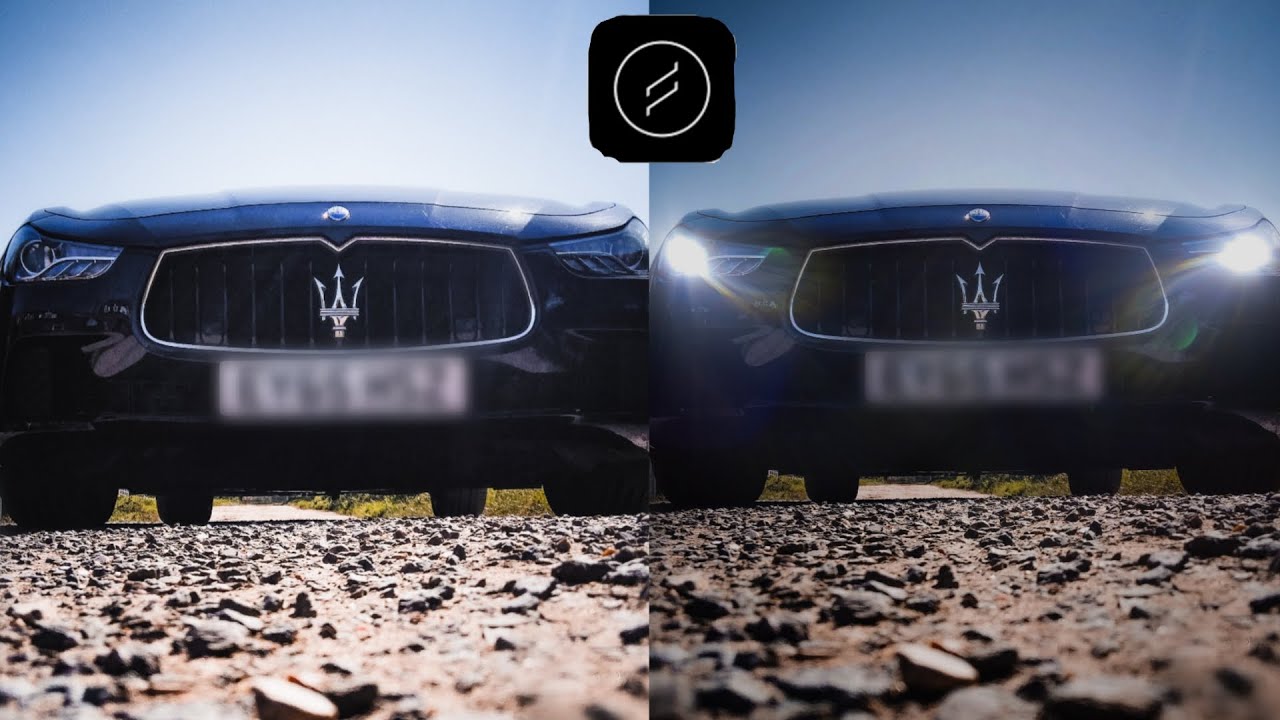
Today, as you can see by the title down there, I'm going to show you how to make and improve your photos on your mobile phone better by using an app called lens distortions, so without further ado, let's get into it. So, first, if you don't know what lens distributions is which I'm assuming you do um, because you clicked on this video, it's that app um, probably like photoshop or something where you can add. I don't know what it's called but ads. I'm going to say unnatural, like that lighting. That was not in the photo, so, for example, in this video, I'm going to be using a car to light up the headlights um. Also, you can use it for stuff, like um lighting in the corner of the screen, um, which is really cool.
You can also add nice. Snow drops and have water drops on that. That's basically what it is. So, let's get into the main part of the video now first, what we're going to do we're going to head over into lens distortions and as you can see, this is the page click choose image. Then you can select any image from here, I'm going to click this car, our image, that if you haven't already checked out the video uh you can do so up here.
I've got some really cool shots in it, but anyway down here we're going to click one of these lights here, and you can see it comes up on the screen, and I'm just going to pinch down um and drag it into the right place, I'm going to actually drag it there onto the headlight and then at the bottom, there's a little plus we're going to click that click the same light because I don't want to be- I don't want to be. I don't want it to be different um, so we're going to go like that. We're going to shape it um and like get it the right size in the right place. I'm going to put it on the head like there and the good thing is about this. As you can see at the bottom, we have got I'm lighting a little square images.
We have the car image and then two light images, and once you select one of the light images, you can only do certain things to get like that you've selected. If you have more than one light um that you're editing with, so I think that that is in the right place, just going to check other one as well um. So that's all fine with me. Actually let me just do that and then what we can do. We can uh swipe down, and we can pick on softness, and it will make a light soft um and dimmer.
So you won't be able to see it. I'm going to leave that look there. I might turn up the brightness a bit, so it has my own editing features in the app um. So that's really cool, and I'm going to put the contrast down up a bit just above the red line on that which shows her middle and then opacity is all the way up saturation. I think I'm going to go a tiny bit up, and then we're going to go to color um, and we're going to go for our orange.
Look, I mean yeah, we're going to come near here, going to get that look round about there anyway. Going to click a tick mark and you can also like to flip the images in that. But we're not going to do that. As you can see there, we've done that now. I'm going to do the same well, roughly the same to the other light as well up rare burned about rare, and I'm trying to make it similar as well, so like that we're gonna, actually we're gonna, leave good temperature and not tint it at the moment, and then opacity is always up saturation.
I'm going to bring that up um a tiny bit just um above the line um, and then I think I'm going to go um to the color bit and try and match the colors that we did. We've got other one, it's around orange, is, tint or whatever there we go, we're going to click the tick mark and then gas done there. That is like a finished image right there, but um I mean this is only using a free version. Um, it does come with an um, another pay version, but you have to pay monthly um. You can see.
So that's how I'm after on screen now I mean, as you can see, we've added lights. Um, it's made it more realistic. Let's say it's made it more realistic, um in terms of the um life. It makes it more lively. I think, with the lights coming on again, once you're finished, with all like that, what you can then do is at the top right.
You can click this little arrow, and then it will say if you want JPEG uh PNG max JPEG 85, we're gonna um, just uh stick with the default one JPEG max so, and then we're going to click, export image, and it's saved into the gallery for us. So that's really helpful. Um yeah image exported there. We go that was um pretty much it. So that was a quick tutorial on how to use lens distortions to make um what I call it unnatural light um.
I don't know if it has a proper name leave it in the comments down below if it has a proper name, but I'm going to use it. I'm going to call it unnatural light, so you can add that to your photos and then that brings it more like detail and uh brings it more detail, makes it more lively. It makes them more lively and yeah. You can just add really cool touches to your images. Um.
I think you can do raindrops on here and also raindrop snow drops and a couple of other things um, and I'm just scrolling through these things. At the moment, um you can do eclipse, I mean they have loads of selections of different patterns, and that I mean the snow is actually amazing. I might have to do another tutorial on this if you want it. So if you do want it make sure to leave that down in the comments but yeah, that's it for today, as you saw the before and after images did enjoy this video. Let me know by hitting this big thumbs up button and also maybe leaving some comments and feedback down below, but with that said, thank you for watching, and I think I'm out.
Source : Hayden's Photography
Phones In This Article

Related Articles


Comments are disabled
Latest Articles


