Galaxy Z Fold 2 Teardown! -- Where is the 'Folding Glass'? By JerryRigEverything
Today we're going to take apart the new Samsung Galaxy Z Fold 2 – one of the most over-engineered smartphones of all time. I'm not complaining though. It just means there's more for us to look at inside. We'll start by turning it off and then turning it right back on again, cuz today we're going in live. Let's get started. Any responsible phone repair technician or manufacturer would advise against what we are about to do, but if we want to learn more about the limits of Samsung's flexible screen technology, we have to know at what point the screen will, you know, pass on from this mortal existence.
We'll start by removing the plastic border around the interior display. This is a buffer to keep out dust, as well as keep the phone halves from clicking together when it's folding shut. It's got a bead of copper wire inside to help with the structure, as well as little clips and glue holding it to the phone frame. Definitely stronger than last year's afterthought of a border. At the center crease there is a little buffer of foam that slips in the crack between the two halves.
This might be what helped keep the dust out during the durability test. I hear there are new bristles inside the hinge, so we'll have to find those once we're done with the screen. The screen is still alive at this point. So far, so good. If it's anything like last year's Fold 1, we know that there is a bunch of adhesive underneath.
So we'll warm that up with the heat gun. And then I'll use my razor blade to lift up on the metal plates supporting each half. You'll notice that if my razor is underneath that metal plate, nothing happens. But if my razor accidentally goes through the plastic layers into the screen, the pixels instantly die. So we'll avoid stabbing the pixels.
And everything stays pretty much intact until we start lifting up the half of the screen that's unglued. The center spine of the Z Fold has started to freak out a bit. This is definitely not indicative of a potential flaw or overly fragile device. Removing that plastic edge piece is like removing an arm or a leg. It's a very vital piece of the screen, and I'm already impressed with how long it's lasted without it.
You can see the front facing camera picking up through the display as it gets lifted up and down. Kind of fun. Thumbs up for that. I'll warm up the other half of the display and then use my same razor blade trick underneath the metal plate to pry it off in working condition. It's a flexible folding display so we should be able to bend it up as long as we don't touch the edge too much... you know... since we removed that edge protection.
And, well, we touched the edge. See where my thumb is? Without that edge protection, the whole line of pixels is now toast because I squeezed the edge of the screen. With a few more carefully placed slices we are able to remove the rest of the adhesive holding the screen to the body, and all we're left with is the ribbon cable that connects the display to the internal motherboard. As a side note, about 1 in 4,000 people suffer from photosensitive epilepsy, so just a heads up to those guys that this next bit might get a bit flashy. The flexible display does have a limit to how much it can fold.
You'll notice that every folding screen has a wide curve at the point where it folds, like the Flex Pi or the Z-Flip. It does not tightly double over on top of itself because when it is doubled over it kills the pixels. Too tight of a fold also should break the ultra thin glass layer underneath the top plastic. And indeed, that's exactly what we're seeing. Obviously the screen is super excited about this new development.
But if we look closely, we can see super tiny cracks all along the tight fold I made in the folding display. These hairline fractures are definitely underneath the top soft plastic layer. To get to them I can slide my razor blade very carefully between the clear top plastic layer and the pixels so we can get a better look at that thin glass underneath. Gotta admit it looks pretty cool. The pixels die like a runaway ink stain.
The top camera is still working by the way. It's just the screen that's kind of having a moment. The folding glass is very much more visible at this point since it's all shattered and busted a bit. It definitely is ultra thin. Kind of cool.
As much fun as that was though, I think it's time we turn off the phone and open it up like a normal person so we can get a better look at the internal hinge and those new bristles. First things first, the Teardown Skin's gotta come off. Link in the description. Then we can use the old heat gun/razor blade combo to remove the screen. Just for the record, repair shops usually have large hot plates and suction machines do this a bit safer and more efficiently.
So if your phone ever does break, don't think every repair guy is running around with a hair dryer. There are real tools for this kind of thing. Once the adhesive is cut around the outside I'll just turn it on real quick to make sure I didn't break anything... since, you know, the rest of the phone is in such pristine condition. Looks great.
Once it's off again I can pop out the rubber stopper over the screen ribbon, remove the screen and head over to the only place on this phone without a screen. A little more heat and slicing removes the back glass. It comes away in one piece. It's got a small little microphone on the back camera lens. This is either for better video audio or just for noise canceling.
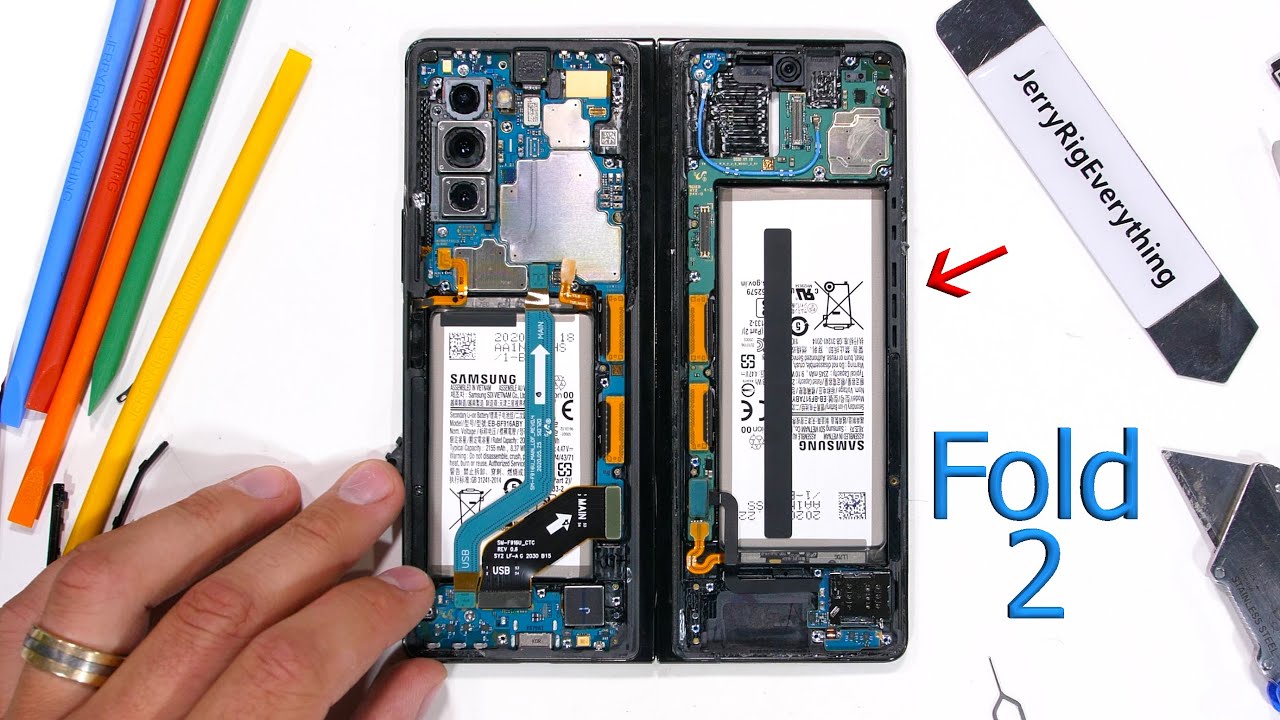
With the exteriors removed we can now see the 24 visible Phillips head screws. And the additional 2 screws hidden up underneath the wireless charger. With the screws all gone, we get the wireless and reverse wireless charger removed. It communicates through the little circle pads that just rest on top of the motherboard. And we can unplug the battery.
If you notice up here, my Z Fold 2 5G is missing the internal 5G millimeter wave antennas, cuz not every version of the Z Fold 2 5G will ship with those installed. Samsung is a pro though at giving different versions of their phones to different markets without disclaimers. So nothing super new here. The other half has a cavity for the top loudspeaker. You can see the earpiece is also built into the same piece of plastic.
Even though the phone is not water resistant, we still see the water proofing mesh over the top of the speaker opening, and the foam balls as well are still inside underneath the red sticker. The bottom piece of plastic has the other stereo speaker and is also full of those same sound dampening balls we see in higher end speakers. I'll disconnect the right battery. And if we take a look at the internal folding screen we can see it pops up through the frame right here above the battery and plugs in just like a little Lego. With the large screen removed, we get our first look at the silver metal structural side supports and the copper layer which I imagine helps keep the whole screen cool.
The coolest thing besides that though is the center portion. Since a solid piece of metal would be too stiff to bend, Samsung has used little sticks of aluminum like a fence, or one of those roll up bamboo yoga mats. This gives the flexible screen support and only lets it bend in one direction. These little details on the inside are pretty cool. We still haven't found the internal bristles yet, so let's disconnect the side button ribbons and the 4 larger extension ribbons that connect the circuit boards all to each other.
After removing one more screw at the bottom, the charging port board can come away from the phone. The USB-C port can fast charge at 25 watts and has its own water damage indicator sticker on the back. This will turn pink if the phone ever gets wet. The Z-Fold 2 has no ip rating. Now we can remove the right motherboard, the green one, with its top inside front facing camera, which is identical... which is identical in size and shape to the 10 megapixel camera that points out the exterior front screen.
It's interesting that their Lego style connectors are also both blue and green, but don't match up with the blue and green boards they are plugged into. They are probably interchangeable though. There are two more screws holding in the blue main board, and once that's lifted off, we see the graphite cooling pad. We'll talk about that more in a second. All of the rear cameras on the Z Fold 2 are 12 megapixels.
The ultra wide camera up top, the regular camera with OIS in the center, and the 12 megapixel telephoto camera down at the bottom, which also has the optical image stabilization. Now for the graphite pad. Samsung doesn't talk about this much, or at all. But we found during my cooling system swap between the Exynos and the Qualcomm processors, that the type of cooling doesn't have much of a difference on the heat transfer. The copper vapor chamber behaved pretty similarly to these layers of paper thin graphite so it's not too big of a deal.
Interestingly enough though, reports are that every single one of the Z Fold 2's will be equipped with the more powerful Qualcomm processors instead of the Exynos chips. So at least that performance dip isn't something you'll need to worry about with this $2,000 phone. It's just the $1300 phones you gotta watch out for. The SIM card tray has its own cute little board. An SD card would have been cool too, but it is what it is.
Now the part that I hate most about Samsung phones are the batteries. While every other phone manufacturer is using normal adhesive, or magic pull tabs, Samsung likes to show off the world's strongest glue. One piece of this stuff would have kept the Titanic from sinking. I'd like to ask, where is this battery going to go, Samsung? If you were strapping the battery to a Mars Rover, this amount of glue would make sense. But the phone is already sealed shut and the most velocity it's ever going to encounter is falling on someone's face after an hour of sleep scrolling.
The glue is definitely overkill. I'll add some isopropyl alcohol underneath the battery to dissolve the adhesive now that it's exposed. But still, I shouldn't need to invoke a chemical reaction to remove my battery. The larger battery is 2,345 milliamp hours. And the smaller battery is 2,155 milliamp hours.
I'm just going to leave that one in the frame. Finally, the hinge. Some hinges are simple, like the Microsoft Duo, or the Motorola Razr, but Samsung likes to show off some engineering prowess and I'm not complaining. There are 5 screws holding on a center plate, which once removed exposes the underside of the two flexible ribbons running through each half. These ribbons only have to flex 180 degrees, so they are just the regular ribbons.
Interesting to note though that the Microsoft Duo also had two ribbons connecting the halves. And it's ribbons were made from the stringy metal that flexes 360 degrees. It's interesting to see the ways different companies can solve the same issue. I'll remove three more screws from the bottom, and another three at the top. And once those extension ribbons are unstuck from the frame, we get our first look at the hinge cavity and the long line of bristles that sit just inside the hinge.
It's a super fine line of short little brushes that allow enough space for the hinge to flex while still keeping a pretty decent seal against dust, as we saw from the durability test video. It's impressive that such a little and probably inexpensive addition can solve such a large problem. The rest of the hinge is relatively similar to last year's. It still has it's long metal spine whose color is customizable this time around. And still has a bunch of those super tiny gears.
And internal coils that regulate the force required to open and close the halves. I'm impressed. Between this and the LG Wing, and the Microsoft Duo, 2020 has been a pretty great year for uniquely built phones. Yeah, my Z Fold 2 might not be alive anymore, but at least we got to see how it worked from the inside. So rest in peace.
A much less expensive and less catastrophic way to see the inside of your phone of course, would be to just grab one of my Teardown Skins from dbrand. It's a fraction of the cost with all of the pleasure. We have skins for over 50 different devices now, so I'll leave a link down in the description. What's your favorite phone that we've taken apart this year? Let me know down in the comments. Come hang out with me on Instagram and Twitter.
And thanks a ton for watching, I'll see you around.
Source : JerryRigEverything
Phones In This Article

Related Articles


Comments are disabled
Latest Articles


