Galaxy Note 20 Ultra Tips and Tricks | Pro Mode Tutorial By Jonathan Casey
Hey, what's up everybody, I hope you guys are good. Today we're going to be talking about the Galaxy Note, 20 ultra camerae in specific the pro photo mode and the pro video mode. This has been a very requested video. I dropped one for the note 10 a while back, and I figured that it would be sufficient for the note 20 as well, but you guys still hit me up, and you want me to do one for this phone, so I'm going to go ahead and drop one before we get into the video. I want to do a quick shameless plug if you're not following me on Instagram, please be sure to check me out. You know, connect with me over there give me a follow.
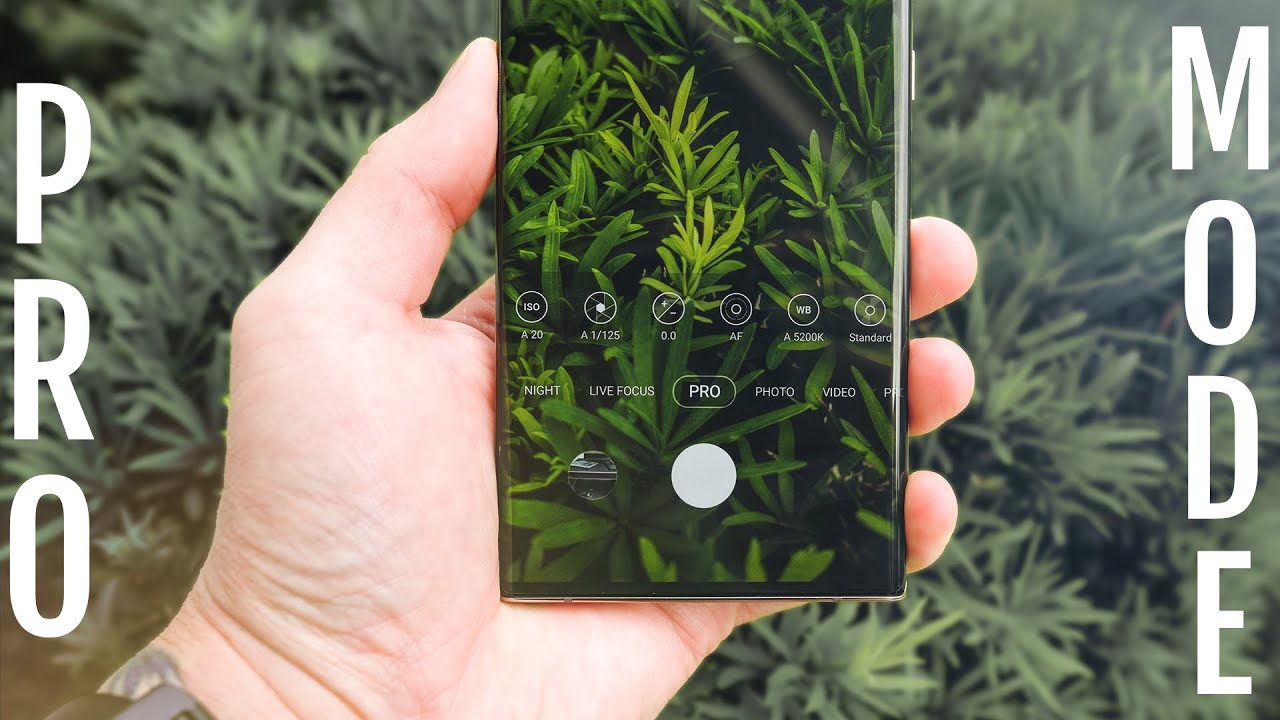
I'm trying to step up my IG game and the best way to do that is to have followers like you guys so go ahead and give me a follow and uh yeah. I really appreciate it. Okay, so with that shameless plug out of the way, let's go ahead and dive into the note 20 ultra camerae. So I got the camera app pulled up here. I'm under pro, not pro video, it's pretty important that you're under the same camera mode as me, especially if you're trying to follow along I'm going to give you a quick breakdown of the interface here on the bottom.
We have ISO, we have our shutter speed. We have our exposure compensation. Our autofocus and manual focus our white balance, and then we have settings that you can tweak prior to taking a photo such as tint contrast, saturation highlights and shadows. If we go back, if you were to change any of these settings, and then you want to default to the settings as they were, when you first booted up the camera app, you could swipe over and then just tap on reset, and it will reset everything back to its default state. So if we dive into the shutter speed here a means it's on auto, which means the camera is automatically going to be controlled by the phone.
If you want to manually control, it just slides the slider here, or you can tap where it said auto, and then you'll be instantly put into manual mode whenever shutter is in manual mode. So is ISO you can't have them separate. I really don't know why that is, but it's pretty much across the board on all Samsung devices. So it's nothing. That's specific to the note 20 series.
Next to our shutter speed and our ISO, we have our exposure compensation which only works in auto. So if we go back into auto mode by tapping the shutter and then tapping on auto, we can go under exposure compensation, and this is another way that you can adjust your exposure without having to manually adjust it. So if you go into the positives, that means you're increasing the brightness and if you go into the negatives you're decreasing the brightness, if you're doing quick shots like street photography, maybe even some shots of your family, or you know amateur portrait shots you really don't even need to control the shutter speed or the ISO as long as you use exposure compensation in conjunction with a few other tools like metering and raw capture which we'll get into here in a minute. So next to the exposure compensation, we have our focus control right now. It's set to autofocus, but if I tap auto or swipe the slider, it's going to instantly put me into manual focus and what's really nice is with manual focus.
You do get focus peaking. So as I swipe my finger from the flower, all the way to the mountain you'll see little green lines appear around my subject, letting me know what's in focus by the way in case you're wondering the flower means close, focusing distance, whereas the mountain is far focusing distance and also infinity. So if you're, taking a landscape, shot, and you're, pretty far away from like your setting like a beach or a mountain, something like that, you're probably going to want to go all the way over to where the little mountain is for the furthest focusing distance, as well as infinity to try to keep everything in focus. So next to our focusing we have our white balance and, in my personal opinion, white balance is more important than exposure control on a smartphone, because smartphones can mess up white balance really easily. So controlling white balance is very important and, with the pro mode on the note 20 ultra, you have different kelvin temperatures that you can dial in, or you can go to auto.
Let it automatically pick a white balance and then just tap it again to lock it honestly letting the phone control the white balance initially is perfectly okay, just make sure you lock it off like. I just showed you so if we bounce up to the top here, we have a few more options. This is going to be your metering. If we start over here, we have center weighted metering, which means it's going to be a large circle in the center, and it's going to take that information and expose for that information. If we go to the next one, which is matrix, it's going to utilize the entire frame to determine the exposure that it needs to be at for the most part, matrix metering is what I personally use.
It gives you a good balance between the background, your subject and the foreground. But if you want the most control, the next one is spot metering. This allows you to use a very small spot meter in the center of the frame that you can point out and expose for exactly what you want to expose for, for example, if you want to expose for the sky or for the bright background, instead of having a balanced shot that way, it creates a dark silhouette of your subject. You can do so by pointing your phone at the light source and as long as that light source is in the center of the frame, you can meter for that portion next to metering. We have our aspect ratios 3x4, 9x16, one by one and full now, depending on the aspect ratio, you pick depends on the size of your photo because, as you adjust the aspect, ratio you're also changing the megapixel count and, as you change from 3x4 to like one by one, you're going to get a smaller photo altogether.
So it's probably going to be like 10 megapixels. I don't know I'll put whatever the resolutions are on the screen, as you change the aspect ratio that way you know now. Next to that, we have our timer, which is set for two seconds. Five seconds or ten seconds, or you can just leave it off. This is going to be great.
If you're trying to take a family photo, and you want to be in the shot um, then we have our flash control and if we dive into the settings, there's one setting in particular that really makes pro mode worth it and that's under save options and that's safe raw copies. Whenever you have saved raw copies turned on you're going to save a raw image. If you want the most flexibility when it comes to editing and really getting the most information in your photo, you want to make sure that it's turned on. It really takes the camera experience to the next level, and it also adds a lot of value in the pro mode on Samsung devices, so make sure to turn that on it's one of the biggest reasons to even use pro mode, so really other than that. There's nothing else for me to tell you about pro photo mode, so we're going to go ahead and switch over to pro video.
Now, just like profit, we have a bunch of controls down here, and we have a reset button on the far left. You just gotta swipe to the right and then tap reset that you can set everything back to their default states, so the first setting we have is for the microphone. If I tap it, we have OFNI, which is going to equally capture sound from all sides of the phone. Then we have fronted it's going to prioritize the audio coming from the front of the phone. Then we have rear, which is going to prioritize the audio coming from the rear of the phone.
We can hook up an USB mic, which I don't have one hooked up. That's why it's grayed out, or we can use a Bluetooth mic. But again I don't have one hooked up right now, or I'm not using one, which is why it's grayed out. So you have a lot of options in terms of audio input for pro video mode. Now, if we go back, we have option to control our ISO and by tapping auto will put you into manual mode, or you can simply just swipe the slider.
Unlike DSLR and mirrorless cameras that feature aperture priority and shutter priority. Smartphones only can use shutter priority, since most of them don't have a variable aperture. Some have a dual aperture, but that's about it. If we look right next to our exposure compensation, we have our focus, control and again just like in pro photo mode. We have focus peaking to help.
You really get a nice sharp focus on your subject. Next, to our focus controls, we have our white balance controls these are identical to pro photo mode, and then we have the option to control the tint. The shadows highlight all of that, the same stuff that we could control in profit mode and the last option we have on the bottom here is zoom, and this allows you to control the zoom with a slider versus having to pinch in. So it gives you a nice, steady zoom, so you can do a slow zoom. You can do a fast zoom.
It allows you to control the speed that you're zooming in up top. We have the histogram here that you can toggle on and off, and it also displays whatever resolution you're shooting in and the frame rate. Next to that, we have our aspect ratios, as I just showed you. I'm going to go ahead and put it back in 8k, because I think shooting manual 8k video on a smartphone is just it's kind of mind-blowing still can't believe that it's on there I know lg did it, but it doesn't matter. It doesn't matter what phone that it's on to me.
It's just mind-blowing that you can shoot manual, 8k video on a smartphone. So next to our resolutions and aspect ratios, we have our flash control, which you can turn on as like a steady light source. As you can see, it's very harsh, though I don't recommend doing it. You can invest in like a ten dollar smartphone light that just clips onto the front of your phone or the back of your phone, and it's a much softer light. I would uh suggest going that route.
I'll add one that I recommend down in the description so just check there, and you can check it out for yourself. So next to flash control, we have our settings. Of course, inside here there is quite a bit to cover. We have pro video sizes, so these are going to be resolutions and frame rates that are specific to pro video mode, and it's really, really cool. So up top, we have our 16 by nine 8k video.
But if we go down, we have 16 by nine 4k video, which goes up to 4k 60 frames per second, and you're, controlling it manually, just like pro photo mode, but for video, and you can go all the way down to 720p and 30 frames per second. You can even do 1080p 120 frames per second, while retaining all of that manual control below that we have 21x9, which is a cinematic aspect, ratio, something that you're used to seeing in movie theaters, and you can shoot in 8k at 24 frames per second in that aspect ratio. But if you want to your know, save some space on your phone. You can also record 21x9 in 4k up to 60 frames per second, it's unreal. The amount of control you have inside of pro video mode on modern Samsung flagships like it's really crazy.
So let's go ahead and back out of pro video size and go back to the main screen here. One thing I forgot to show you in pro photo mode that also works in pro video mode is controlling your exposure and your focus points separately. So if I touch anywhere on the screen and then just hold you're going to see, I can drag the yellow exposure lock out of the autofocus lock. So wherever I put the autofocus lock it's going to focus on that specific spot and wherever I put the eye lock or the automatic exposure, lock um it's going to expose for that place. So let's say this was a bright area here I could drag my exposure compensation lock over to that bright area, while dragging the autofocus lock to wherever my subject is on the frame.
This is pretty much like an advanced version of spot metering, except instead of being isolated to just the center focal point. You have control to move that spot meter anywhere on the frame and, unfortunately, if you go to the auto photo mode or the auto video mode, you can see you cannot separate the two. So this is specific to the pro modes that are found on the Samsung note 20 ultra, you know. Ultimately, this is probably the biggest reason I suggest using pro photo mode or pro video mode and that's to fine tune your skills to make you a better content creator and ultimately, it allows you to control the turnout of your image and that's really important. So I hope you guys enjoyed this video if you did consider giving it a thumbs up subscribe for more videos.
Just like this stay tuned, I have a lot of videos coming, and they're going to be really cool and other than that. I will see you beautiful people in the next video um.
Source : Jonathan Casey
Phones In This Article

Related Articles


![XIAOMI Mi 10 Ultra Full Review: The best all-round Xiaomi Phone ever [Transparent Edition]](https://img.youtube.com/vi/H4ujRHjze_w/maxresdefault.jpg )

Comments are disabled
Latest Articles


