Canon Rebel SL3 (250D) User's Guide By Jared Polin
Right before we jump into this video, if you haven't signed up for the froknowsphoto email list, just look for this orange box over on the website. Put your name email address in it hit, send it and I will send you a free guide to capturing motion in low light situations, jarred Colin froknowsphoto. com, and this is a user guide for how to set up your brand-new Canon SL 3 camera. Now, if you just picked one up, congratulations on picking up this DSLR. If you're looking to purchase one well down in the links below, we have a link if you'd like to go, buy one at Drama or you can check out a 5-minute portrait which is 50 some minutes long, where I take this camera out into the real world and test it out. So in this video I'm going to start off by running through the outside of the camera, and then we're going to move into the menu system to show you how I personally would set it up if I was using it, but first, let's start with the outside of the camera.
First things first on the bottom. This is where your battery is going to go. Of course, you need some power in order to use your camera, so just look on the bottom boom open it up. I already have the battery in here. So here we go.
This is the battery I always recommend that you have at least two batteries if you're traveling, because what happens? If something happens to one, or you run out of juice, you really can't shoot without a battery, so to put it into the camera. If you look inside, you will see a spring. So obviously you don't want the contacts which are right here going towards the spring, so just reverse it the other way. There's only one way you can put it in slide this little gray tab out of the way push it that way, push it down, and it clicks right in, and that is where you put the battery now right on top of the battery is where your memory card goes, so I'm going to pop it out right now this is the memory card. This is an SD card.
Remember don't buy cheap SD cards because you just spent all this money on a camera. You went on a cool trip. You took a bunch of pictures and if you use some Chinese knockoff memory card that you got for three-and-a-half dollars, you could lose everything, so there are brands out there like pro grade Sony, makes cards led or makes cards. SanDisk makes cards just look for the more professional end of the cards, they're not terribly too expensive anymore, and just remember that so to put it in there's only one way to do it. In this case, this notch right here is going to be facing outside the camera.
We pop it down here, press it in you'll, hear the click, because it's spring-loaded it's in shut the door, and now you're good to go flipping back to the top. Now that we have a battery in a card in there. This is your on and off switch. I know. Some of this stuff is simple, so bear with me, it's its always good.
To get this run-through, it does get a little more advanced as we go through the menu system, but this is for anybody just starting out who doesn't know some basics on and off. Obviously you get it, you know how to turn it on. You go on now it's on now. What is this little movie camera right here when you go into that mode, that is movie mode. It flips up the mirror, which is inside the camera, which I'll show you in just a minute and exposes the image sensor.
So you have a live view on the back of your camera, which is right here now. I'm going to turn it back to on for now back into the camera mode, because I want to show you this now that I talked about the screen. This is your flip out and rotatable variable screen when you're not using it. You could turn it like this. So if it's in your bag, it won't get scratched, and it won't get broken as easy, and when you want to use it, you just take it out, and I flip it like this.
This is a touchscreen, so when you touch it, it's going to allow you to control the operations you can flip it out like this, rotate it backwards and down. So if you need to hold it up, you can hold it up or if you want to shoot from down lower, you can shoot from down lower, but the one thing you don't want to do is force it beyond where it wants to go, because if you break this, it's going to be a pretty expensive repair. Now, next to the on/off switch, we've got a dial on the dial. You see the an in green with plus. This is full auto mode.
A lot of you guys are going to start off in full, auto and just let the camera do what the cameras going to do to help you take the pictures now, if you want to get out of auto, there are other options: we've got P stands for program, it's basically full auto, but you have a little more control. It also unlocks other things inside the menu that otherwise wouldn't be there. If you were just on auto I'll show you that a little later TV is shutter priority, meaning you set the shutter speed the cameras going to set the aperture in the ISO automatically. If you go to AV, that is your aperture priority. You set the aperture, which is how much light you're letting in and how you control your depth of field and then the cameras going to do the rest, and in manual you set the shutter speed.
You set the aperture if you're in auto ISO, the ISO is gonna, set it by itself or if you're in manual ISO, you will set the ISO. This right here is a creative mode. So when you go into the creative mode, you're going to see on the back of the camera, there are other options like monochrome. Think of it as like Instagram mode. It's going to bake in these interesting looking, sometimes not good.
Looking types of filters, they're built-in filters in the camera, which I personally don't recommend you using because once you shoot with one of those filters, and you're shooting in JPEG mode, you can't go back and change it. So if you shot it in monochrome, you can't get that color back. If you wanted to get color back, and then you've got scene mode, which is how you find portrait mode, you find the moon mode. You find low-light the tire you find a bunch of different sports mode, that's where you would go into here and then on the back of the camera, select the mode that you want to use for now. I'm, actually going to turn the camera back off, because there's no reason to let the battery burn while I'm, just showing you the outside of the camera right here.
This button is the ISO button. So if you press that, on the back of the screen, it's going to show you your different choices for ISO and you could either touch it on the screen or turn this top command dial right here, which controls that when you press that button, you also have a Display button which will turn off the display on the back or run through some different display options and choices that you have. This is a command dial, so when you're in manual mode, this is going to control your shutter speed. So as you turn it to the right, your shutter speed goes up as you turn it to the left. Your shutter speed is going to go down if you're in aperture priority mode, which is a're going to change your aperture by turning this dial.
So now that we've seen the command dial, let's move on to the shutter button, would you like to show the world? Did you shoot Rail will head on over to store dot froknowsphoto. com, where you will find a bunch of different I shoot raw shirts from Star Wars ? back to the future, ? stranger things as well as different color options: hats, beanies, air, fresheners, wristbands and camera bags so head on over to store dot froknowsphoto. com? If you'd like to pick up some I shoot we're all swag. Now, let's move on to the all-important shutter button. This is your shutter button.
This is how you're going to activate autofocus as well as take the picture. So if you press it halfway down gently you'll feel it move slightly. That's going to activate the autofocus now, if you press it fully, you'll feel a little click, and you'll also hear it like this. When you take a picture here, we go I just took some pictures. Look I'm, not even looking I'm, not even looking best pictures ever, but you hear that the beep is saying that it's in focus because I'm in single focus mode and then when I press the button I'm taking the picture, so now I'm going to go ahead and turn it back off again now right here.
This is your lens. If you bought it as a kit, it's coming with the 18 to 55 lens. Now, how do we take it off, and how do we put it on right here on the side of the camera? Is your lens release button? You go ahead and press that, and you rotate the lens in this case, because it's in the cameras in my left hand towards me, and you can take the lens off now when we look inside the camera, we see some contacts down at the bottom. Those are contact pins. They talk to the contacts on the lens, which is right here and that's how the camera knows what to do with the lens.
That's how autofocus happens. That's how basically everything happens inside the lens. That's how the lens talks to the camera, but right here is a mirror. You never want to touch this mirror. If it gets dusty, don't worry about it! It's not going to affect your image.
What happens when you take a picture? Let's see if I can show you right now, is that the mirror flips out of the way and exposes the sensor and exposes the shutter, which is behind it, never lift the mirror and never touch what is behind there. You will damage your camera now to put the lens back on. You see how there's a white square right here, there's also a white square on the camera. Now canon has a few different types of lenses. This is what's called an EFS lens.
It's designed for crop sensor, cameras, which is exactly what this camera is. Crop sensor means it's a smaller than full-frame sensor. It also is generally less expensive. There's pros and cons to having both, but in this camera, you're perfectly fine with the sensor. That's in here, so with the EFS lens, you go ahead and line it up square to square like this boom and then turn it away from you this time, and you hear the click now it's locked in.
So that is how you put the lens on this camera. Now I mentioned EF lenses. They have a red dot. So if you have an EF lens, which is a full frame lens that will work on this camera, that's a perfect thing to remember. So if you pick up an EF lens with the red dot on it, you line it up with the red dot right here, just the same way that we did with this square, you lock it in, and you're good to go.
Now. Let me show you some buttons and dials on the lens, obviously to zoom it. You just sit here, and you turn it. Like said, I said, like said, but because I wanted to actually show you something how to hold the camera when you're shooting is super important when you're starting out you see people do this stuff all the time. This is not stable.
The proper way, in my opinion, because everybody has a different opinion. We all know that the proper way is you tuck, your elbows in like this, it creates instant stability. You put your eye whether it's your left eye or your right eye. I personally shoot with my left eye up to the viewfinder, and this is how I zoom I just rotate my thumb and forefinger, and it's much more stable. That's how you hold the camera.
That's super important to remember now here on the side of the lens we've got AF and manual, most likely you're going to stay in AF the whole time. You also have stabilization on for stabilization off. That means you've got image stabilization in the lens. Its called is personally I'm going to leave that on all the time. With a lens like this, it's going to help counteract any movement or motion you have from shaking the camera, but remember it's not going to make a subject.
That's moving fast stay in focus, or still it's just counteracting your movements. So this camera does have a built-in flash now, in some cameras it automatically pops up in this camera. You are the automatic popper upper right here. There are some tabs. You pop the flash up like this.
If you need the flash you pop it up, if you don't need the flash you just leave it down now, if you're going to add an external flash to this camera, there's a hot shoe on top. You can see a bunch of contacts in here. This is where a flash would slide in the reason you would have an external flash or a flash to put on top of the camera is to give you more power, because this flash that is built into the camera is good for maybe 10 to 12 feet. So, if you're, at a baseball game or at a stadium or something, and you're trying to use the flash, you're going to get a great picture of perfect lighting of the subject, that's 10 feet or right in front of you, you're not gonna, be able to light somebody at a distance. I made that mistake when I just started out as a photographer I'm like I use the flash and somebody's like yeah.
If they're past 10 feet that flash is meaningless. So just remember that if they're far away the flash is not going to do very much now on the back of the camera, we already showed you're, tilting articulating touchscreen, so I just generally leave it out like this. The whole time that I'm shooting, because if you want to see the image that you just shot well, you're going to have to have it out like this down here at the bottom. This is your play button. So if you're going to review your images, you press that to review your images, there's a trash can, where Oscar the Grouch pops out, hi I'm Oscar, the Grouch I.
Don't even remember what Oscar the Grouch sounds like, but I was Oscar the Grouch for Halloween one year my mom made me a very nice trash can to carry around when I was in school. I was actually it was pretty cool. She made some very good costumes for me, but this is your trash can button to delete images, I recommend, never deleting images on the camera. Just in kid, you've got so much room with today's SD cards that don't delete images in the camera. What if you delete the one that you actually wanted? So really don't worry about that.
This is your d-pad. The up down left right, left right, B, a VA select, start contra code. I know, thankfully I've said it a million times, but this is probably the first time you're watching my videos, which now is a good time to tell you if you're enjoying this video, please hit the subscribe button. There's also a bell next to it, which is the notification Bell hit that so, when I put up a new video, you never miss it. I've got three thousand videos.
So, there's a lot of videos in the past for you to check out, if you're looking to learn them, including the best of playlist, which will run you through some of the best videos that we have on the channel, but please subscribe. It helps us to continue to do what we're doing that. Lets us know that you like it well actually what lets you know that lets us know that you like it is hit that thumbs up button to. Let us know that you do like it. Alright, so continuing back here! This is the d-pad.
This is how you change different menu settings or change different options when you're moving through the camera. You've got the set button, as well as the cue button. Canon does something pretty cool. With the cue button where, when you hit the cue button, it brings up a bunch of different options on the back of the camera so that you don't have to dive into the menu as deep right above the d-pad. You see something that says AV as well as plus/minus.
The plus/minus is for exposure compensation, I, never change my exposure compensation, but the AV is important. Remember on the top of the camera, where we showed you a V for aperture priority. Well, how do you change aperture when you only have one command dial up here? Are you will press this button and as you're pressing and holding you will turn the top command dial and that will change your aperture as soon as you take your finger off of it? It's going to allow you to change your shutter speed. Moving over to this part of the camera. You've got a star and whenever you see something printed next to it, that means that it also has a sub command option of doing whatever this one is, which is that's the ?, so when you're zooming in on an image using the top button, because that's where you have a magnifying glass to zoom in to get back out, you go ahead and hit this button with the star on it.
The star is also an exposure lock, it's not something I personally use, so most likely, you won't be using it either. But this button right here with the it's a bunch of dots and a bunch of crosshairs. That's how you activate your focusing points in the camera when you're doing autofocus, so you could either have the camera, select all the points or when you tap on it, just tap it in when you tap it in it's going to activate those focusing points, and then you can manually select the one that you want to use. I'll show you that more when we get inside the camera, then moving over here this button of a camera when the camera is on. We hit this.
That turns on live view. So if you want to shoot with the camera holding it out like this, as if it's like your cell phone, you can do that. Just remember that it's not as stable when your hands are out like this, it's going to be a little more shaky, so is, is going to come in handy I, don't personally recommend shooting live view, one, it kind of looks amateurish. If that's, that's up to you, if you want to look like that, ?, it's just more stable and easier to look through the camera. But if you do need to use live view, you do have that option right there.
This also works as your record button, because you see next to it, there's a red dot when you press it in while in video mode up here, it's going to start recording video next to that you've got Plus ? with this little dial. That is your diopter. So if you wear glasses, you can go ahead and just control the diopter. Until you see that everything is in focus inside the camera, it's really easy to do just focus on a wall or focus on something and then turn the diopter until everything is nice and sharp for you, this is you're optical. Viewfinder optical means, when you look through it, you're, seeing through the lens, because how this works is light comes in through that lens, it bounces off that mirror up through a prism and then out through the viewfinder, which is right up against your eye.
So what you see is what you're going to capture it's the same light that you're seeing through the camera moving further to the left. We've got an info button, so if you want to see different info, if you're reviewing an image, it will bring up the info right here is the menu button. The menu button will do just that. It brings up the menu you press it, the menu pops up. That's how you can control different settings inside the camera and set up your camera, which we're going to do in just a few minutes.
We're going to show you how to set up the camera moving around to this side. We have a mic input as well as a remote input. You just move these tabs out of the way, it's pretty good that you can put a microphone input in here. So if you picked up say a rode microphone, you can go ahead, plug it into here now, you're going to record audio directly in to your video. That's a perfect feature that Canon put in here that some other entry-level cameras don't have now flipping it all the way around.
To the other side, you have a USB port for transferring images if you would like, as well as an HDMI port. If you want to show the images on a TV, you just move the tab right there, HDMI as well as USB, moving around to the very bottom of the camera, that's where the tripod plate goes or where you attach the tripod to this camera. So that is a run-through of the outside of the camera. Now it's time to move into the menu settings and how I personally would set it up. Are you new to shooting RAW files, or are you interested in learning how to edit your RAW files? Well, we created 14 custom Lightroom presets that are gonna.
Give you a great starting point as well as in some cases with one click, give you an amazing-looking edit. Now you can head on over to froknowsphoto. com, slash presets, where you can play with the sliders to see the before and afters and decide if they're, for you right now, they're on sale for 40% off. So if you'd like to take advantage of that, go ahead and add it to the car to take advantage of 40% off now, let's get back to the video before I jump into the menu settings. I want to call attention to the elephant in the room and by elephant I mean this red box.
This is an ADD most recorder. What this is allowing me to do is plug in to the HDMI, which is taking the video signal from the menu and everything I'm going to show you and putting it into this box. So we can record it, so you can see exactly what I'm doing, and you can also follow through or follow along while I'm doing it. So now we are in the full, auto mode watch what happens when I hit the menu button? You have your menu choice options, I'm going to go ahead and hit OK, but look at this I only have two different things to choose from menu 1 and menu. ? I'm going to go through the full manual setup, so I'm going to turn this up here to manual bypassing all this other graphical stuff.
Now we're in manual I'm going to hit the menu button again I'm going to hit OK and now look. It opened up 6 different menu options for us to go through to set up this camera. That's how you unlock the power of your camera, it's kind of like Castle Gray skull when Adam turns from Adam into he-man, and it goes on your kind of now have the power, so you want to take advantage of your camera. So, let's run through here. First things.
First, we have image quality where it is currently set to large JPEG. Now, let's quickly explain raw verse, JPEG being that I'm wearing a shirt that says, I shoot we're all. Can you guess what setting I would set this on raw, because that's how I shoot, but when you're first starting out a JPEG is part, is perfectly fine? The difference is that JPEG is a compressed file where a raw file is uncompressed. You get all this data, and it means that you need to tweak and edit each individual file in the computer. After the fact, that's why some people start off shooting raw plus JPEG so that they have both options.
That's up to you to determine, but as you progress as a photographer, you want to have more control of your images. Just think about it. Remember earlier, when I said, if you shot in monochrome black and white, when you are shooting a JPEG, it's always going to be black and white, but if you were shooting raw, it keeps all the raw data. The preview on the back of the camera will still show you black and white monochrome, but you have the raw file. You can go back and make it color again, so I'm a big fan of personally shooting raw.
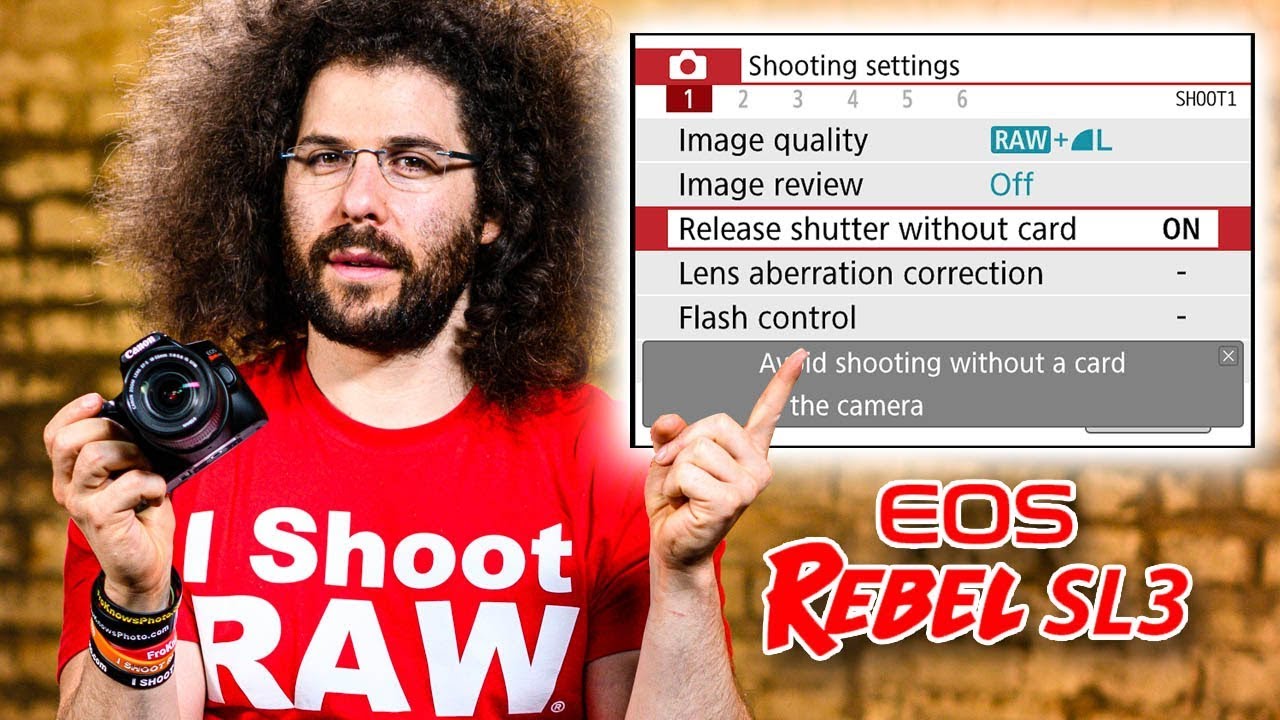
So in order to change this I'm using the left and right dials here, the left and right buttons, that's how we can change it personally. I would leave raw sorry JPEG on large and then to change the raw you can see on the screen. The indicator of the top command dial I can turn that to raw, and it's showing me raw plus JPEG and with the memory card that I have in the camera, I'm going to get twelve hundred and eighty-six pictures I go ahead and hit the OK button to set it in oh and by the way you can do all of this, using the touchscreen on the back of the camera. Being that I'm plugged in to this Atoms I can't use the touchscreen image review is something that I personally turn off now what it is. You can actually see it popping up on the screen right here.
It tells me that choose how long images are displayed on the screen after you capture I, don't like the images popping up on the screen after I. Take the pictures, so I go ahead and turn that to off release shudder without card. You can see this by the way it's going to and give you any information. Basically, it's your users manual built into the camera. So, if you're not sure about something just hover over it, and it's going to go ahead and say avoid shooting without a card in camera.
Well that kind of makes sense, release shutter without card no I want to disable that I do not want to be able to shoot pictures if a card isn't in the camera. Because, what's the point of that, you won't actually be getting pictures lens, aberration, correction, peripheral, look! You could leave all this stuff exactly as it is. This is only going to affect the JPEG, it's probably for the better. If you're shooting it's going to do some little Corrections that you would otherwise not even notice, so I would probably just go ahead and leave that on. If that's what you're going to do I'm going to go ahead and hit menu again, flash control configure functions of built-in flash and external flash.
You really don't have to go in here. Very often so I'm just going to skip past and go to number two under this. Oh, look at that one option drive mode. So here we go, we've got single shooting mode. We've got continuous shooting earlier when I was taking a bunch of amazing pictures of this light over here without looking I was in continuous mode, so it was gonna long as you hold your finger down on the button.
Click, click, click, click, click, click, it's gonna, keep shooting that's good for action sports or where you're trying to capture the subject running across the field. It's great for action, silent single shooting, probably never need to go in there. The camera is pretty quiet already, but this is gonna. Make it slightly a little more quiet, silent, continuous shooting is gonna, be slower, shooting sort of silent, but not really fully silent. You've got self-timer of ten seconds self-timer of two seconds.
This mode is pretty cool self, timer continuous. Where, when you press the button, you can take something like what nine up to nine images nine 1000 up to ten now so when you would set it on a tripod, you could hit a button, and it's going to take ten pictures in a row. So that's pretty cool. If you're doing a group shot, like everybody, hey, say cheese. Do you know what we actually said? His kids, my dad was always like he'd smile, and he'd, be like this say.
That's all I, remember as being a five-year-old is say personally you're going to be either in single shooting or continuous shooting, most likely continuous for most of the time hits set to get okay. Now, moving on to number three, the reason I laughed right there and chuckled a little is because, when you get into the pro cameras, there's eight trillion more modes to play with, so it was kind of funny just to see one different option. Exposure compensation set that to zero at all times, ISO speed settings we're going to go in here. ISO speed is currently set to auto I. Don't like auto I want to make all the changes myself, so I like to control this I'll go to 100.
Now let me give you a quick crash course on ISO 100 ISO is for super-bright areas if you're inside, and it's dark you're not going to be using 100 ISO if you're, outside or shooting action sports, 400 ISO might be a good starting point. When it's low light situations, 1600 and Beyond, but I may not recommend going past 6400 as you go higher in ISO, the noise and grain in the camera starts to become more prevalent, so you'll see more noise, you'll see more grain kind of like an old film grain, so I wouldn't really go past 6400. If I were you now, this is a good place to say that if you'd like to take better pictures in only 11 days, I created a free mini video course that you can sign up for right now at froknowsphoto. com, slash 11 days, you're going to get 11 emails across 11 days with 11 three videos. It's a pretty good crash course in photography, so go ahead and sign up for that.
It is also linked down below moving on I hit set and okay max for auto is sixty-four hundreds. So if you're in you could change this to say, don't go past. Twelve thousand eight hundred in this case it's at 6400 now to change ISO. Remember, there's that ISO button on top of the camera right here, you're going to hit that, and then you can go ahead and change ISO when you're outside the camera, so we're going to go back and hit menu again, we've got Auto lighting, optimizers off I. Leave this off highlight tone.
Priority is off I, leave that off metering mode, I'm, just going to show you these. You got evaluative metering, partial metering, spot metering and center weight metering, 9999 million times out of 100 million times or whatever I just said, one less than that I'm in evaluative metering. At this point, moving on to number four white balance for most part for most shooting you're going to leave it on auto. It's going to go ahead and do a pretty good job of selecting the proper white balance. Now, if you're shooting raw, you can easily more easily change white balance.
After the fact you are able to change white balance when you shoot JPEG, you just have more control with the raw file custom white balance. If you ever wanted to set a custom number, you can go in there and go ahead and do that white balance shift I, leave that on zero, color space, s, RGB and then picture style picture Styles interesting. This is where you can see Auto standard. If you're going to do portraits landscapes, fine detail, neutral, faithful, old, faithful monochrome, and then you can create up to three of your own most of the time, I leave it in Auto or standard now. Remember: picture styles are only going to affect your JPEGs and your video.
So if you set it to monochrome for video you're, only shooting black and white video aka monochrome you're, never going to get the color back if you're in that mode. So keep that in mind that if you are going to shoot just JPEG and you over sharpen something you can't go back after the fact and under sharpen it, because it's baked in and by baked in I mean it's literally just that's how it's going to be the more changes you make to a JPEG after the fact, the more it's going to lose quality! That's why I love RAW files? Because! You can constantly go back to the original raw file time and time again, 10-15 years later, and make tweaks and changes moving on to the fifth menu long exposure, noise reduction. I personally leave this off high ISO speed. Noise reduction. I am going to go ahead and turn this off as well.
I don't want the camera, what it's doing with noise reduction? Remember how I said at higher ISO. Are you get some noise or grain? The cameras going to go ahead and run a process where it's gonna, smooth it out now, smoothing out tends to take away sharpness and clarity. I rather have a rather see the grain structure then have a smooth out looking fake image. That's not sharp my personal preference dust delete data, something I, don't ever touch live view. Shooting is currently enabled.
This is super simple guys. This is. This is a simple camera to use, but it's good to go through these sections. Now number 6 AF operations. This is important, one shot.
That means that when you press the button halfway down, you're going to hear a beep, and as long as your fingers press halfway down on the button, the focus is locked on whatever you were locked on, but that doesn't mean if the subject moves that it's going to track them, you will need to refocus. When the subject moves. If you move forward, you move back, you're going to send it out of focus. So you need to press the button halfway down, hear that beep lets. You know that it's in focus now AI focus is where the camera is gonna automatically choose between one shot or AI.
Servo I, don't like that mode. Ai servo is continuous focus. So as long as your fingers pressed halfway down on the button, it's going to continuously autofocus on whatever subject it is that it's auto, focusing on this mode is great for sports. Great for subjects that are moving and one shot is great for inanimate objects that aren't going anywhere where you lock the focus in compose recompose and go ahead and shoot hit. The set button Oh again, we've got lens.
Electronic manually focus takes effect with lenses that have electronic focusing rings. Ok I mean it's currently off, but that's pretty simple that if you want to change it, you can do that AF assist beam. Firing is on that's that annoying light. I didn't know this had that. Actually, where is that me? Don't know why they sit I, don't even see where that AF light would be Steven you have any clue.
I didn't even see, there's a beam. Where would that be me even come from, or maybe it would come from when you pop the flash up to have the s? Let's see what it says, because I can't even find it flash fires if needed, I was right, I was right. Ok, so I would recommend. Turning that off. That is, oh, my god, I'm.
Turning that off now I know what it is. So, basically, what that is doing is when the flash is popped up in the air it's going to in low-light situations. It's gonna pulse like mm, which is gonna, give the camera enough time to try and autofocus on you yeah. It's super annoying and distracting, so I personally turned that off, and we're going to go back to the menu. Let's go back in here.
That's it! That's it for this section back to the menu and next we can move on to playback settings, so it says, configure still movie playback settings and edit stills and movies. Ok I hit OK protect, oh my god, most of this stuff we're not even going to touch protect images, rotate images, erase images print or no we're not even doing any of this stuff. So I don't do this stuff. Creative assist, redye reduction, create album snip nope, don't do any of this stuff either inside of the camera. Moving on to this slideshow set image search conditions, image jump, that's so that if you're reviewing images- and you turn this top command dial, it's going to skip ten images.
At a time. Histogram display choose the type of image. Histogram, brightness I'll show you what this looks like in just a second AF point display who is disabled AF pointed achieved. Ah, I'm going to show you this also, so I'm going to enable this. This is gonna, say in playback.
It's going to show you where or which focus point. You were using view from last seen: I, don't even know what that means set the initial image position on the playback screen. Oh okay, yeah! We'll do that now. Let me go into the playback mode, so I can show you some of this stuff in action. I go ahead and hit the play button down here.
Whew! Look at that the because it was on auto that, though, all those focusing points right there, that's what it's showing you so to move images I'm hitting right when I hit right that rotates through. Oh that's, one of those amazing pictures Wow the camera did a great job of Auto exposing for that light right there. Just imagine if that was the moon. It's not the moon, because we don't have a full moon here in the factory, but it's going through each one of those, so I'm going to go through alright hold on bad in ok, that's the Atoms back to this one! Now, if I hit up it should rotate through something which if it's not now in Nikon cameras, if I hit up that, actually transitions. The info, but on this camera you've got that info button, don't forget, and if I hit info look at that, it's showing me what the picture was taken at 180th of a second at f4 ISO, 800 JPG large hit it again.
That's the histogram top right corner. It also shows you what all of your picture styles were set at. Then you hit it again, and we're back to the main screen for viewing your images super simple stuff right there again. This is a very into it. It's a simple but smart camera.
It I know it's super inexpensive, but it's its capable of doing some good things, so we just went through all the playback menu. I know that was super easy, so we're gonna then go on to wireless settings. Let me cut in here real quick and say if you're looking to purchase new or used camera gear head on over to adorama. com slash for, because when you use that link, it helps us to continue to make free videos just like this one. Now, let's get back into the video now we're in Wireless settings, I'm going to go ahead and hit OK I actually use this on a photo shoot where I put this camera up on a monopod and used my phone with the Canon Connect app, which I highly recommend that you download we've got Wi-Fi Bluetooth connection, you click on it.
I would tell it that I'm going to use my iPhone, which I did so. It's really easy to set up. Wi-Fi settings are enabled Bluetooth is enabled. This is the nickname of the camera. GPS settings devices see configured GPS, ?, settings, device, settings and clear wireless settings.
It's really easy to set up Wi-Fi, it's actually pretty cool, because what you could do is you could set this camera up on a tripod. You can then use your phone with the Canon Connect app. If you're doing a group shot, and you can tap to focus, you can change the settings, and you can shoot the pictures and make sure everything is good. That's a really great function that you wouldn't have found in cameras five years ago. You do have that feature in this camera.
Right here now, we've got function: settings configure, camera settings, adjust screen, brightness or format cards. They make this so easy for. You select folder, don't change that file numbering continuous. So when you take ten pictures, take the card out put another card in it's going to pick up at file number 11. So that way you don't have repeating numbers like you, don't have ten pictures that are number ten, and it becomes confusing in the computer auto-rotate.
This means on the camera and the computer. I turn this to on the computer. Now. The reason I personally do that is that when I shoot a vertical picture, if I was to which I don't have a sample right now, it would only show up on just it will turn vertical on the horizontal display. So it's not showing me full screen I want to see it full screen when I rotate the camera this way, so that I can see the full vertical image, but in this setting it's still rotating it on the computer, which I highly recommend that you do so that the images come up either horizontal I call it horizontal.
That's horizontal and then vertical is the other way it will auto rotate it for the computer formatting a card which we're not actually going to do right now. This is where you will go. When you put a new card into the camera, you will reformat it, or you will format it inside the camera, so that the card and the camera can talk better together, and this also clears and erases everything on that card. So before you reformat a card make sure everything is backed up on a computer and in a second place it's always good to have at least two backups, not just one external hard drive and nowhere else get it on a hard drive, get it up into the cloud somewhere, Amazon or Google. They give like pretty inexpensive storage, because it's very important that you don't lose your images, because you have a hard drive crash so make sure they're backed up in multiple places and uploading them to Facebook doesn't count as one of those places because it changes your settings, so I'm not going to go ahead, and actually it takes away the quality.
That's what I mean by changing the settings? This is where you would go to do that. This is a 64 gig card. We're using 80 megabytes on it so far and back to the menu number to auto power off is currently disabled so that the camera doesn't reset. While we're recording and mess up our recording I would change auto power to be like a minute or five minutes so that the camera will turn off display brightness. This is if you're outside you can make it extra bright, or you could turn it down.
Screen off on button is the shutter button, so that turns off the back of the screen when you're shooting date and time. You will set that right here in the language you will set right here, depending on what language you would like to read in the camera. I have it set to English, because that's all I know video system is right now, an NTSC. If you get into PAL, that's if you're in Europe we've got touch control, it's currently on standard disable touch operation or set the screen sensitivity. So if you're one of those sensitive people, you will want to go ahead and tell the camera that you're sensitive, and it will not tell you that your pictures suck well, that's not true I leave it on standard personally beep is enabled I like hearing the focus beep when I'm in single focus mode, but if you're in a silent, place or a place, you need to be quiet.
You're, gonna, disable that beep right here, you would go ahead and hit disable battery info is going to show us how much is remaining, though it's not going to give us an exact representation of it. It's going to be pretty close, so once it gets to half power just know, it's probably going to die a heck of a lot quicker than it took you to get to half power sensor. Cleaning is where you can go in. If you have dust on the sensor, the cameras gonna automatically clean the sensor for you. So let the camera do that when you feel like it needs to do that switch buttons.
Currently, disabled I want it to be exactly what it was. HDMI resolution which we are using right now is 1080p. We've got number five custom function buttons. This is where you go. Oh my god.
Oh my gosh lots of different custom options. I highly recommend you go through here and read them to see what you would set, but really where it's set right now is pretty much where I would have it set exposure expansion, I, nope I, leave that on off safety shift, that's for if you're. If the safety is in football, you want to make sure that he shifts yeah go through here. Most of this stuff is, is already set for you, but if you want to dive in a little deeper, you can of course read what each thing means in here, but they have it pretty, set right off the bat one. What did I change right here? Oh, nothing! Oh! It's! Ten huh, it's ten and eleven, so I honestly didn't change anything for my shoots in the custom function, mode hitting menu one more time, Oh, let's hit it again.
Because it takes us all. The way out are you looking for a place to showcase your photos and online portfolio? Well, I personally, use Squarespace for jarred Colin comm and, if you'd like to get a 14-day free trial to try it out for yourself head on over to Squarespace comm, slash for, and if you decide that it's for you use the code for at checkout to get 10% off your first order display level settings customized information display for your ability or preference now. So this is where you would go to change out of this beautiful white screen and shooting screen. I, don't I want it on standard menu settings I want it on standard this, this standard setting you see the difference now on the back end it just this is how their professional cameras look, so I highly recommend that you set it in these settings, so mode got yeah I, don't want any of this enabled, but if you're a beginner, and you're in auto mode, you won't even have these options to change, and also it gave me this right here, my menu tab. So now you can add different things that you want to quickly get to say you want to add battery in life indicator.
You can add that, right to this section and finally, back out to the menu one more time. Well, that is our menu. Now that we got rid of the guide. That is how we set up the menu for taking Stills, and now I'm going to show you how you set it up for shooting video. So here we are in video mode.
I went ahead and switched the dial right here from on to video mode, which activates video mode flips the mirror up, like I, said earlier, and now I hit menu. Now. The first thing you will notice is that the menu is set more professionally, because that's the mode that I ended up using because I like this look better. So let's go into movie record size right here at the top. You can see that it says 4k at 24 frames.
A second Max record time is 29 minutes and 59 seconds now, keep in mind. If you're going to shoot 4k, you are losing the ability to do dual pixel, an F which is one of the greatest modes ever invented in cameras for doing autofocus, so you'll have a not as good autofocus mode. Also, an extreme crop will be implemented inside this camera when you are shooting 4k, so your 18 to 55 will no longer act like an 18 to 55. It will be much longer, so the widest won't be 18. Keep that in mind.
I, don't really recommend shooting in 4k unless you're shooting an interview of somebody, and it's locked off means you're, just sitting in one spot and doing an interview, so I'd recommend being in 1920 by 1080 at 30 frames. A second, that's, probably the best place where you're going to be digital, zoom disabled I never enable anything. Digital zoom sound reporting is currently set to auto. If you do want to go in and control your own levels, you can go ahead and do that. But for the most part, Auto is where you're going to live movie.
Digital is, is currently enabled. That's another form of image stabilization that will work in conjunction with you. Having is on the lens I, don't know that you really need to have digital activated as much if you have it in the lens. But if you do it, it crops in just a little because it has to get rid of the shake that you're doing it's actually not terrible when you use it, but in most cases I would probably leave it on disabled lens aberration correction: let's see correct for the effects of lens optical characteristics. No, that's up to you! I personally, don't change it from where it's set right now.
In the camera time-lapse, movie mode is currently disabled. Now the reason it's disabled is that we are plugged in to HDMI. So you would just go ahead and hit enabled to do time-lapse movie mode, remote control and video snapshot are also both disabled exposure. Comp I leave that exactly where it is ISO speed, settings. You're going to set this to taste, you could do auto, or you could set it yourself to get the desired effect.
That you're looking for optimizer Auto light off, highlight tone. Priority off and metering. Timer is currently set to 8 seconds I'm, not even sure why this matters when it comes to shooting video, but it's there. Eight seconds is perfectly fine white balance for video. You can set that also kite custom white balance, white balance, corrections picture style is set to auto.
This is where you could go in and say: if you want to shoot it in monochrome, you could shoot it in monochrome, which I personally don't recommend, because then you can never have color, you can go. You know, get rid of the color in post-processing and still be able to go back to it. AF method, here's some different options: you've got lock-on tracking you've got spot AF, one-point AF as well as own AF. The lock-on tracking is fantastic in this camera, so I recommend being there for most of the shots that you're on moving on movie servo AF is currently enabled. Of course, you want that to be in continuous, that's why it's currently enabled when you're shooting video eye detection AF is a new mode that will detect the eye.
Currently, it's disabled. You can try it out to see how well it works for you. It's not gonna, be the greatest. It's not gonna, be the worst. So honestly, just try it out to see if you like the option that it gives you lens electronic manual focus again.
This is set to OFF manual, focus, peaking settings it's off as well, and then we've basically gone through all of this stuff already so because we're in video mode, you get the options to set the video mode for menu. So if you're digging around you're like, why can't I find this make sure you're set to video? If you can't find those specific menu settings now we're in video mode, because I want to show you one how to shoot video and to explain what is on the screen. So first I'm going to hit the record button, which is right here. You see the red blink blink in the top right hand, corner and then up here on the left. There is the battery indicator as well as the timer, which is counting up to 29 minutes and 59 seconds now before I go too far.
I do want to show you. We've got Steven, Q, step to the side. A little so I can get your face. There. You see, the autofocus is tracking his face.
That is fantastic, that it can just find him put a box around his face and go from there. So what I'm going to do is I'm, going to stop recording I'm going to put the lens cap on to make it easier for you guys to see everything, and now, let's start at the top left, you can see that we're in manual mode right below there is the AF lock on. That was the box that you just saw around his face. It's in HD at 29, basically 30 frames. A second below there is what I think is the digital zoom, but I'm going to hit the cue button on the back of the camera, and I'm going to scroll down here and yep.
That's right, it's digital zoom, and that's where you can see the different options. You've got the hand waving at you, because the digital image stabilization is currently off. Then under there's, video snapshot is off top right-hand corner. That's where you have your white balance, your picture style, then Auto lighting optimizer is off as well as creative filters. We have all of those off as well and that's about it for changing the settings.
If you want to quickly hit the Q button, which basically stands for quickly you get into there, but down here at the bottom of the screen, you can see the indicator, that's showing how to change your shutter speed and then, if I press the AV on the back the aperture switches so that lights up, and then you can go ahead and change the aperture, while you're shooting your video and to the right of that is ISO, which is currently on auto. But if I hit the ISO button on top right, there, I could switch out of it from 100 to 200 all the way up to twelve thousand eight hundred. So you can go ahead and make those changes and that's pretty much it. It's pretty simple guys. You just go out.
There shoot follow the instructions on the screen, but this is how I would set the camera if I was shooting video since I just showed you the back of the camera for video mode. Let's show you the back of the cameras for still mode. So this is what you will see when you make the changes that I showed you earlier, you will see on the back of the screen. You've got manual at the top, then you've got where you change your shutter speed. Like I said earlier, you hit the AV button that allows you to go ahead and press and then change the aperture.
Of course, you could go over to ISO as well. Let me hit the cue button see now everything is active. I can go in here and make changes to everything that is on the screen. From picture style to white balance to the custom white balance, setting the autocorrect image: brightness is off: choose the metering modes, one shot this. This is more important.
You go into one shot versus going into ooh servo. To go into continuous right. Here is where you will change your focusing points. So if this is, if you want to change it on the back of the camera, I go ahead and hit the okay button. That takes me in I, hit the okay button again, and that allows me to select between these nine different, autofocusing points or, if I want to get it for the camera, to select the focusing points.
I hit the Q button again back out to menu we've got. This is where your timer is, and raw plus JPEG. That's where you can go in and make those changes. So that's pretty simple and that's it for what's on the back of the camera, when you are shooting stills, so now you're an expert right now you can set up this camera. You can do whatever you want with the camera.
It's not that difficult, and hopefully this video helped. You out and like I said earlier: please hit subscribe if it helped you and definitely hit that thumbs up and leave some comments down below now, all I have to say is: go out there and shoot have fun. If you want to shoot raw, that's what I do and that's it jarred Colin froknowsphoto. com see ya you.
Source : Jared Polin
Phones In This Article

Related Articles


![Mi10 Lite 5G[Review] Still a Best Buy in 2021?](https://img.youtube.com/vi/QVNL2lGS8Hw/maxresdefault.jpg )


Comments are disabled
Latest Articles


