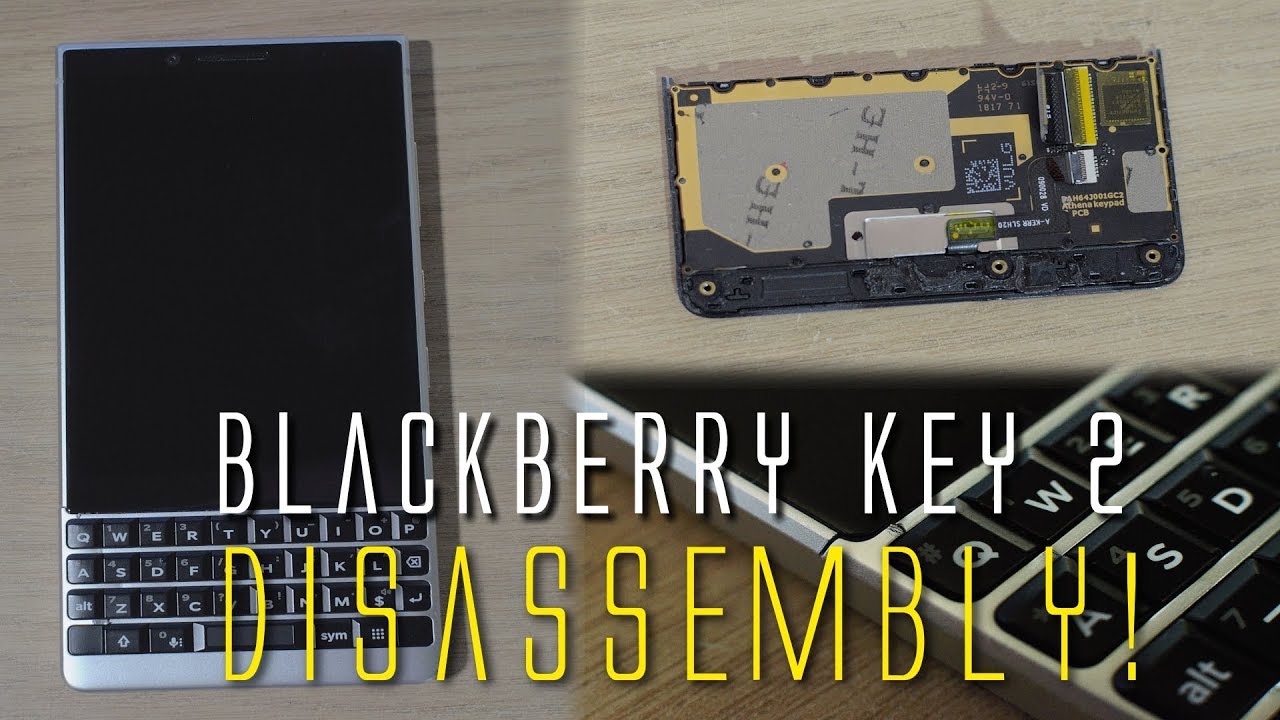
Blackberry Key 2 Disassembly By RedforShort
Alright, so to do a decent job of this you're going to need some tiny, screwdrivers needle nose, pliers me or may not need them, and this is just a magnet to pick out the screws, because the screws won't come out. It comes out easier with a magnet. They won't come out very easily. So let's get started on this, so on you're going to need a Stanley bleed as well or very thin blade. Alright. So anything you want to change on this phone at the front.
You have to go in the back. You cannot fly this off like I. Did I've now broken it, so it won't clip back in so don't try and do that I've also broken the actual bears. I, don't know if you can see it, there's a break there and one down further down in there, because I tried to pry this front off. To begin, which was a mistake so start on.
The back. Yours is gonna, be more tight than this ? loose, because I've already done this before and pried the glue off just want a sliding knife in there best you can and just work it in and then start lifting out again. This is going to be harder work for yourself, because yours are gonna, have glue going right from the rim, no pun intended, so you want to pry it off, be patient, you don't want to break it. Mine comes right off nice and easily. A little of glue left see that thin bit of black glue.
That's what's going right around the edges and once you've got it off you'll see there are a few clips here at the top. That's for at the top, don't listen, focus, but I think you get it and then there's another six of the bottom that turn it on each corner, and you've got two in the middle: there they go around the charging port and that's it you can see there. The blackberry logo is all one plate at the back. Zoom in the NFC is in this section here, I, don't know it's all tacky. This is all sticky, the video that's the case, it's pretty flexible, so you should be okay, you know, don't worry if it bends when you're pulling it off it'll flex back into shape.
So there you go. That's the back! Alright! So the inside the phone is, as you see it, there I mean big part, obviously being the battery a camera up there and so forth. This blue wire ? broke, so it's sticking up, I actually snapped off the connector accidentally, so be very careful. When you lift these out, it's not the next job. To do what we will be doing that soon.
First thing, you're going to want to do is pull out all the screws. They think there's 16 of them they're all the same size, except for this one, and this one this bit smaller they're all Phillips head, but to be honest, I couldn't quite get me any mice Phillips heads to fit them, so I ended up using a flat head and managing to get it in with a bit of pressure tuning it, and they all came loose pretty easily just take those out. So you see using a Flathead screwdriver, just going to find the right size, and it will fit in there, and then it'll turn and nobody comes and like I said, I got the magnet here just to get them out there and not lose them. First section to take out was the bottom section, so I tend to stop down here. First loosen all screws up, get them all out, so that's all of those just the one left now that is smaller than the rest.
They do use a small Phillips head for this I'll tell you what size as well on Condor my box. This is a double zero whatever. That means that I'm, not a DIY expert, but it says double zero. So there you go it's the last screw. It's the smallest one and I said now.
With this bottom plate unscrewed, we can actually lift this out. I'm, not sure what it is. I'm thinking it's the microphone and possibly the speaker. You can see there, I, don't know if it's focusing, we will put some connectors on it and there's a bit of weight to it. I'm, pretty sure, is to speak in a microphone.
It's not that section. There I'll show you the components better later on in the video we're just going to tear this down for the moment. Should we see the charging port there, which apparently can't be changed, and I'm not sure myself, I, don't know anything about electronics going to continue to take the rest of these screws out? Let's get this other small one out. First then I loosen up all the rest, No -. What happened to my phone was I.
I dropped it one too many times and obliterated the screen, so I am to order a new screen or Phoebe's got 60 bucks managed to change it in the end, but thinking it's not working because I broke that little blue wire there not so much the wire, but the thing it's connected to on the motherboard they actually didn't realize. There's been a real rough. They took it off a few times, trying to get it back together and take it back off, so I think I might have just pulled it off. Basically, when I pulled the wire off, you have to be careful with those wires, so the phone is kaput, so I more than new one, because I do like these phones with very good phones. All right, then that is all the screws.
There are no more screws that I can see right. So now, you're going to want to pop these wires off. As you can see, my blue ones already broken as I said, but the white ones. Okay, if I pull that out the way, see the white ones clipped on this. You just want to gently pry it up, and it comes off pops its connector.
See that connected in their know if you can see it that connected in there. It was one up here, but now it is stuck permanently in my blue wire connect us like I'm, not ready, good, ass Aldrin, so I'm not gonna, even try and put that back together. Let me give it a go actually, but um I needed a phone quick, so I ordered a new one. So once you pop these two wires off, you can see they run down the channel there. But now you've unscrewed.
All of this- the whole thing can come up in alright. So you pull these out. You just come up with a slot very easily, just give them a little tug and then this whole section will lift out, let's be a little careful pop it out the camera better. All comes off with it. You just careful good, beautiful, beautiful.
We need a bit of gentle persuasion with that one at the top here with the camera. Is it's also slots down these things can clicks into the top there, so we'll pop out. Now there you go, so this is just the cover for the camera section there and the flash section. There are some prongs there. So I'm thinking this might be the NFC section of the phone not entirely sure, but that's what it looks like you can see that again up pictures at the end.
So now we are down to the motherboard and just the battery left, so the battery has a connector right there. This comes off here. It's just stuck down you just peel that up, and then you have the connector there, which you can just pop off, can use your hands when I'm trying to do it, so you can see so just unclips battery stuck down. So this will also need some persuasion, but mine is on obviously I've already taken mine out once or twice, so it will come out a lot easier than you know as well. Just keep applying pressure.
If you stick the knife underneath it just slowly apply pressure, you really hear it like that. You could hear it unsealing, it's still quite difficult, even though I've done it a few times, slowly don't bend the battery, bring it out there. You go! That's the battery out! Now you just have the chassis and motherboard. So let's remove the motherboard. There's no more screws to take out you just gotta undo.
All these clips these down here are the keyboard. I think this one is the keyboard. Let's pop him up may be wrong. I say just pop out pop upwards, and this one and this one here is for the screen you pop out up and that one goes through. You can see.
There goes through down to the screen. This one comes down here, so I'm not sure if it may be the sound to do the charge in the power module, or maybe this one's the keyboard. Yeah, I think this one's the keyboard anyway. So with them up, we can now remove the motherboard hope, there's one more up here as well. I'm, sorry, this is for the volume buttons and the power button and all that.
So you pop that up same thing, and then you can remove the board if you just gently bring it up. So one thing you go to remove. First, I almost forgot is the SIM tray, because that will hold it down. I'll hold it in. So we need to pop this out there.
You go just forgot that, and this will just pop up and there it is that's the motherboard processor and all that other good stuff on there. I got the camera up here. This is the front camera I. Think, yes, it is well it's the two rear cameras there. Now we break down to the chassis now, so in order to get the funky board off now that it's all unscrew, the back, you can now start popping the front off, but be very careful and very slow, so you don't break it like I did I should not unclip it there's some little clips in there just pop them all up.
Once you pop fish, it up, don't pull it up too much again, like I said, like I did I broke mine just want to get this black thing in there, I thought, if you can see it yep for keyboard itself, I'm gonna, try and get in there and leave that out like if your American lever it up, not the easiest thing in the world. All right, so I was coming out there. You go cause mine's a bit broken. Hopefully, if you do it, there's some care. You guys won't be donen't pop, though some glue is reset one since I put back, if you see a line of glue there, and that's that, that's that that's it empty! This is the keyboard itself.
Space bar comes off with the keyboard. I couldn't tell you. If you can remove the space bar separately, always think you might be able to don't look like it. There's the lead of the cable that comes through goes through that slot there and clips under the motherboard and remember we pulled that out failure degree or maybe yours is black depending on the color. What color version you add, but this feature here doesn't come off the plastic I thought it did.
That's why it mines broken. You can see there, it's completely snapped, so you don't wanna, be trying to pull that off all right. So now we are down to the spotty. Has the screen still in it? And that is it. It has this little power module down the bottom or whatever it is, and that's it.
The rest is just this: I want to call it plastic, but I'm pretty sure it's not just plastic, it's some kind of McAllen boy. They call the car number what they called it, but um okay in order to get the screen off screens got a lot of glue behind it. You cannot get to it under here and pry it up, because it will break the screen. It will crack it all. I mean if the screen is knock.
It doesn't really matter it anyway. You can stop doing that, but the only way to push it out is through this section. Here you can push on that. Michael come away easily. As you can see, the screen is coming out there, but yours won't I'm gonna, take it all off, but that's how you do it just keep applying pressure.
Yours will probably break as you're doing it. Mine did when I push him. I know that my screen was already broken anyway. If you're doing a screen the place you don't care anyway, should I keep pushing that eventually it'll kind of come away. Then you just have to clear it all up all the broken bits of glass and put your new screen arm, which is this one here, so that is it.
That is the phone strip down as much as it can pretty much I'm, not taking all these little tiny little pieces out. One thing you know what this is. You, the up the volume up button, doesn't click when you press it until you pull all the parts back it back in together, switch putting pressure at the back of this switch there and, like I, said just be very careful these thin wires I should take our part, because you see there, mines broken the little disconnected -. We still stuck inside it, so I may try and solve that one day, you'll see something there's anything else to add, so I'll leave it there. For now, I'm going to put the images up on the screen.
Source : RedforShort
Phones In This Article

Related Articles

![The Ultimate Pixel 3 Camera Upgrade [Moment Lenses Review]](https://img.youtube.com/vi/Ct5xDATPiks/maxresdefault.jpg )


![iPhone XR vs iPhone 6 Speed Test & Gaming - Which one should you buy? [2020]](https://img.youtube.com/vi/DFnMcSgfoCA/maxresdefault.jpg )
Comments are disabled
Latest Articles


