Best Cheap Vlogging Setup | Samsung Galaxy S20 FE VS Canon G7X Mark iii By Navigating YouTube
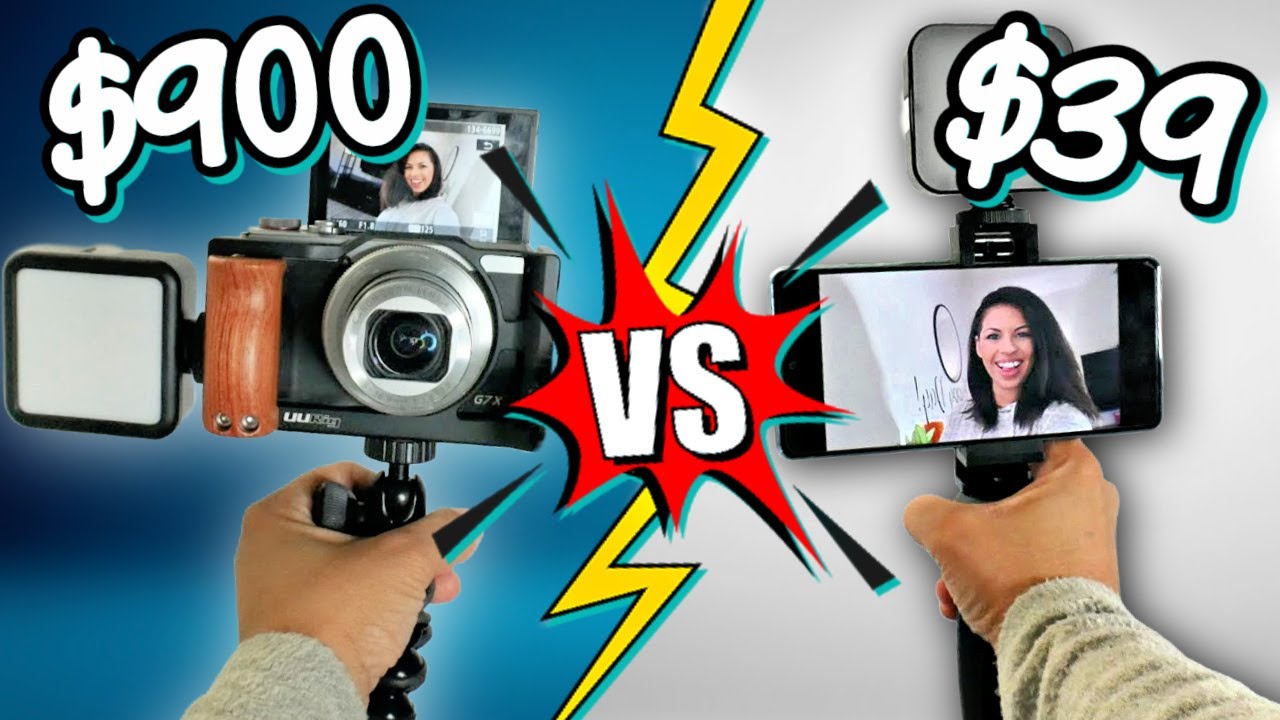
This right here is a 900 vlogging setup, and this is a 40 vlogging setup. What's the difference? Well one as a fancy, vlogging camera that everyone's going to tell you, you actually need to grow a vlogging channel and the other is actually what I started with and what a number of creators have grown their channels to over a hundred thousand subscribers with meaning. You don't need all this fancy stuff, it's just nice to have and if you're wondering how to take your cell phone footage to the next level to compete with this camera, vloggers. Well you're in luck, because you want to stay to the very end of this video. While I compare side by side of this phone can hold up to a 900 vlogging camera setup. Thanks for helping us build this community, I really appreciate it.
Today's shout out winner goes to this channel right here and if you would like a shout-out, our next video make sure to comment down below or take a screenshot of you watching this one and attack us over on Instagram. So this is the job. It is a black tripod. You'll see it with a charcoal lining, these are actually rubber, so it makes it easier to grip on. Of course, it has some red detailing here.
It has an adjustment, so you can go ahead and swivel the camera itself and of course you can adjust these to any way your heart imagines. Most people will go ahead and hold it like this. If you want to hold this straight, you can even have it set up as like a table tripod, so it'll go ahead and prop onto other things and of course this can kind of wrap around different things like poles or trees. So if you're outside vlogging, you can get a little more creative on how to do like your angles and things like that. Okay and then, of course, the job holds the camera itself, but you may notice this camera's a little different as it's actually on, what's known as an u-rig or a camera cage, so this actually comes in handy.
If you can see here, I have a light and a microphone attached to that, and that is because the camera I have is the canon g7x mark iii that came out in 2019, and it does not have any place for me to go ahead and attach a light or mic, although normally, if I don't have the rig on here, and I'm just holding my camera, I will have my sardonic mic attached to it, because it's just a kind of plug-and-play- and I don't need anything like this to where this is going to hold on to. As you can tell, this, has a shock mount now. You may be thinking what's the difference between the canon, g7x mark iii and the canon g7x mark ii. Well, besides the mark iii being newer, it actually is able to shoot in 4k up to about 10 minutes. After that you're going to run into the overheating issues.
It'll, probably freeze out on you and take about 30 minutes for it to cool down and reset before you can start shooting again, definitely not a vlogging camera to shoot vlogs in 4k, but it does come in handy if you're doing short, b-roll clips. The other reason why I got the mark iii versus the mark ii is the mark iii does have an audio output. So this way I can hook up a microphone to it. Although I have compromised the autofocus feature, the mark ii does have a better autofocus. So if that is the most important thing to you, you may want to go forward to the now cheaper mark ii version.
But if you're a person like me, that's all about audio, then you're gonna go ahead and go with the mark iii. Now speaking about audio. What I have right here is the move shotgun mic. This is very similar to the road, but it is a little cheaper and one thing I really like. I don't know if you guys can hear this, but one it doesn't like to come off.
It has a grip on the inside that the rode mic did not have, and there was plenty of times I would be vlogging outside and if I tilt my camera down, this wind muff would fall off, and I have almost lost it multiple times and if you're wondering what this furry thing does it help you block wind noise when you are vlogging outside the worst thing you can do is be vlogging outside thinking. People can hear you, and it's just the wind, so this will go ahead and literally do what it says: muffles the wind, so you can still be able to be heard outside and then, of course, on the other side, I do have a light switch. This is a ponies LED light and I do like this one because it has a battery on the inside. That is rechargeable with an USB port. It has up to five levels of light, so this is perfect if you are vlogging outside or maybe in a dimly lit area having.
This is really going to increase your light. Although the canon g7x series is known for their apertures, it has a really wide sensor, meaning a lot of natural light does get into the camera. So if you are vlogging outside in dim lit places- and you don't have this light- you'll be surprised how well lit your footage will actually be with your canon, g7x mark ii or mark iii. Okay, and, like I mentioned at the beginning of this video, this is over 900, so the camera is going to run you upwards of 700 and then with all the other accessories, it's an extra 160 which brings you to 938 for this setup right here, all right, of course, some of you are probably like. I don't have 900 to drop on vlogging equipment.
That is where this 40 setup comes in handy you'll, see it actually has almost the same thing. You have a smaller table mount tripod. It doesn't adjust as much as the job does give you more flexibility, but this feels perfect in the hand, and especially when you have a cell phone, you don't actually need anything that big this is going to do just fine. It also comes with the mount itself which swivels. So if you wanted to do long form, maybe you do Instagram content.
All you have to do is Intouch it here. You can place it, and now it's vertical, or you can keep it horizontal for YouTube related videos. So that's really nice as well. Of course, it adjusts to any phone size with this little swivel, so you just open it up, put your phone in there and then go ahead and tighten it. So it holds your phone really nice, and it does have the shoe mount attachment on top, which we can put our light on, probably wondering where the mic is and what's really nice is.
It actually comes with a lapel mic, although my phone does not have the audio jack that is needed for the lapel mic, but I do have an audio jack attachment. So if you have an iPhone or one of the newer Samsung you're going to need the attachment that goes into the charging port, and then it attaches to the phone jack, and then you can go ahead and use the lapel mic which just fits on your chest. So you can be able to hear a little better because it's bringing the mic closer because we all know at the end of the day cell phones are that just cell phones, and they're not meant for vlogging or video production, and so the audio isn't going to be as clear. So again, this setup, not counting your phone, is going to be 40 and what's really nice is it actually comes together in a kit, unlike the other stuff that I had to buy individually. The reason I don't put the phone price in here is because it's something that most of us have whenever we go to start.
So it's not like you have to go out and buy something extra. You already have this. You just need everything out. I don't mind vlogging with my cell phone, but I hate editing on my cell phone. So I'm definitely a person that chooses to edit on a computer or a laptop, preferably a computer, so I can use a mouse and a keyboard and really get into those edits that I need, but trying to download everything from your phone to your computer can be a headache.
Sometimes I found photo fast which actually allows you to back up all your photos and all your videos onto this little device here, while you're charging your phone. So all you need to do is plug this into your charger. You connect the two together, and it actually has a small micro SD card in here. It also backs up to an app. So all I do is I plug it into charge, everything's backing up on here and once I'm done.
I can either plug this into my laptop directly and just take all the backup, videos and camera from this little device to my laptop and start editing, or I just take out the micro SD card from the back slot. Here I plug it in to my SD card jack that I have for my computer and again just transfer everything over like. I do from my SD card on my camera, the computer, so I can move everything and start editing there. So if you are a cell phone vlogging person you're looking for an easier way to back up all your footage as well as just transfer your footage in a flash. While you are charging your phone definitely check out photopass I'll, go ahead and leave it down in the description box below for you, okay, so this is going to be the front-facing camera and the 1080p at 30 frames per second is not the lowest.
It actually does provide 720, but not a lot of people shoot at 720 anymore. So this is kind of the movement, so you can kind of see the quality of it. The lighting of it um how it really picks up the difference when I move how it adjusts and everything like that, the one thing you do not want to do, though, is look at the screen, I'm actually looking directly at myself, but, as you can tell, it looks like I'm really looking over there. So you want to look into your camera lens the entire time. Okay.
So this is the rear-facing camera on the galaxy s 20 Fe edition, so their fans' edition is slightly different from the regular s20 or the ultra. It's like that step in between. So it does have three cameras on the back of this one and again, you want to make sure you're just looking directly in to the camera lens itself, which obviously is a little easier, because you don't feel tempted to look at yourself, because there is nothing to look at downfall of this. Are you don't actually know when you're in frame and the only reason I'm able to keep this in frame right now is because I'm actually using my other camera's viewfinder to make sure that I'm not a like way up here or way down there or anything like that? Okay, so I am back in front of the ring light and the soft box light in front of my usual setup that I do sit down. Videos on- and this is the camera at 60 frames per second go ahead and actually post the 30 frames per second in the 60 frames per second next to each other.
So you can kind of see the difference of me moving around just ignore the talking, because, obviously they're going to be completely different words again, I'm still using the mic from the cell phone. So this is the lapel mic that comes with the vlogging kit that you can get for 48, and this is what my phone looks like at 60 frames per. Second on the rear-facing camera all right, and now we have gone to the front-facing camera at 60 frames per second, as well, with the exact same lighting setup and the same sound setup. So I wanted you guys to see the difference between the quality. Because, again, I understand that a lot of people are going to want to go to their front-facing camera.
Okay, so right away, you should be able to see my pores a little more with the higher quality camera at 4k. So again, here is me moving. This is always important because you want to check the stabilization to see. If I move, I walk back and forth, I'm walking how shaky is my camera going to be so this is one of the reasons why, on a camera, a lot of people will use a stabilizer, because even if they're walking or moving it's not going to be as shaky because the stabilizer will move with you all right and again flipping it around. This is the 4k setting at 30 frames per second on the cell phone and the rear-facing camera.
One thing I did want to know is: if you are doing rear-facing, or you are doing front-facing make sure you are cleaning your lens. A clean lens will make a world of difference in your quality. Okay, we are officially at 4k 60 frames per second on the Samsung s20 FM edition with the rear facing camera. So if I rock back and forth, I kind of sway, I kind of move again. This is the 40 vlogging setup you can find on Amazon.
That includes the tripod, the light the mount and the lapel mic that I'm actually speaking on right now, so this is kind of the quality of it. This is the highest quality, you're going to get, but let's go ahead and flip it to the forward-facing camera. Okay- and here is the front-facing camera on the 4k setting at 60 frames per second on the front-facing camera. I think I already said that, but um again, I just wanted to show you what the quality is going to look like when you move back and forth along which is visually, what you're going to be able to see on a camera or on the um cell phone camera. If you are forward facing all right- and this is the audio coming straight from the phone itself, I am still on 4k 60 frames per second at my front facing camera.
I just wanted to be really quick to show you what the audio sounds like, so you can get a difference between the lapel mic audio and the regular camera audio, which you should be able to hear a difference, and the lapel mic audio should be a lot clearer because it's closer to you um, giving you just a better crisp, clear, sound, and again it does have a little of a wind, muff or um mic. So this way, if you're outside, when things like that um, it will condense that a little, although the wind muff on the um camera setup, is going to do a lot better, just because it's a lot bigger um, and it's specifically made for that. While this is just made for like smaller crackles and things like that, let's go ahead and look at the light. So this is the first level. This is that in between second level, third, fourth, fifth, six, seven, eight, nine and ten their brightest setting.
So you can kind of see the difference. Of course, you want to be able to adjust, because you don't want to be too washed out. You want it to look as normal as possible, but this is the quality, the lighting quality, the sound quality from the kit for your cell phone setup and again this is only 40. This is the canon g7x mark iii. Without the LED light on.
You are just hearing the audio from the move shotgun mic, and it is currently set to 1080p at 24 frames per second, so this is at um 30 frames per second, a lot of filmmakers like to vlog in this, while a lot of vloggers lifestyle bloggers, things like that like to do the 60 frames per second, because they feel the quality and image quality is a lot better. All right and as a reminder, the lights you are seeing is coming from my ring light and my soft box lights that I normally do my sit down. Videos for and the sound you are listening to is coming from the move shotgun mic, Wednesday, wind muff on top, which is definitely going to help for windier days. So I just kind of wanted you to see the light that this camera gets again. This is not edited.
I have not done any color correction. This is coming raw straight from the camera. I really wanted you to get a glimpse of the quality. What the colors and look is going to look like which, if you have the right settings in the right light, it's going to make it a lot easier because you're not having to do a ton of edits in post to make sure the color grade is well, although I usually always go back in and just make sure the contrast is really well make sure I have a nice even tone, make it a little more realistic. Real life make colors pop a little more.
So I do slight quality adjustments, but you actually do not need to because the quality looks so good coming from the camera itself. Okay, so this is the canon g7x mark iii shooting currently in 4k. I am still using my ring light along with my soft box light and the audio is coming from the move shotgun mic, with the wind muff on it. Okay, so now we have moved up to the 60 frames per second. Most of the difference is going to come from the movement, so as I'm moving, the camera you'll be able to see the difference between these 30 frames per second and the 60 frames per second.
I do not normally vlog like this, where I'm moving back and forth like crazy. But again I want you to go ahead and see the difference. See the quality see what it's gonna look like when you're starting to walk when you're vlogging things like that um, I am not using the stabilizer. This is just the job gorilla pod um tripod stand, so this is going to be all movement. So if you're shaky or anything like that, this is what it's going to look like.
Um again, I do not have the light on, but we're going to go back down to 1080p at 60 frames per second, so I can show you um the light a little better okay. So here we are at the um 1080p 60 frames per second, with the sound coming from the move shotgun mic um with the wind muff, on top of it something you'll notice about the video quality as well. When you go back down, is it kind of has a beautification feature? So if you are vlogging a lot of um content creators really like this camera, because it gives you a more flawless look um versus when you're, really in those high depth, you're going to see pores you're going to see all of that stuff um. So I personally like the 1080p at 60 frames per second, because it doesn't make me look as old as I actually am so right now. The light is off, find all the buttons okay, so light is off.
This is level one, so you can tell right away. It gets way brighter than level one um with the other one, but the camera does a perfect job of adjusting itself. Then this is two we're going up to three four and five again, you want to make sure you're choosing a setting that does not wash you out, and you can really tell that. There's like a shadow behind me too, so you want to try to avoid that as much as possible. Of course, um, usually when you put this light on, especially this high you're, going to do it outside or where it's dark um, it's pretty light in here, so this is too bright for this setting, but I just wanted to show you guys that I've actually blinded myself.
So let me just kind of turn that off, and it has a really nice off on switch, while the other one has a power button right in the middle foreign okay, so I have put a side by side with the Samsung s20 Fe edition, with some color correcting next to the canon's raw image. So the canon over here is not color corrected, so I just wanted you to see the difference and how you can enhance your image quality by just slightly color grading, and then we also have the same image of just one side is color corrected, and one side is raw from your cell phone. So this is why I'm saying fancy cameras are not needed. You can definitely enhance your image from your cell phone in post all right, but those were the comparisons between a 900 vlogging, camera setup and a 40 phone setup, not including the price of your cell phone. But again a lot of people have a cell phone to go ahead and start their vlogging channels on.
But let me know in the comments below, could you even see the difference of them and if you could, which one did you prefer it's all about personal preference, but for more simple strategies to grow on YouTube? You can go ahead and check out this video here. I'll. Have it downed in the pin comments below now get out there make some content and let's grow together.
Source : Navigating YouTube
Phones In This Article

Related Articles


Comments are disabled
Latest Articles


