Best And Worst Screen Protectors for Samsung Galaxy S20 Plus By HighTechCheck
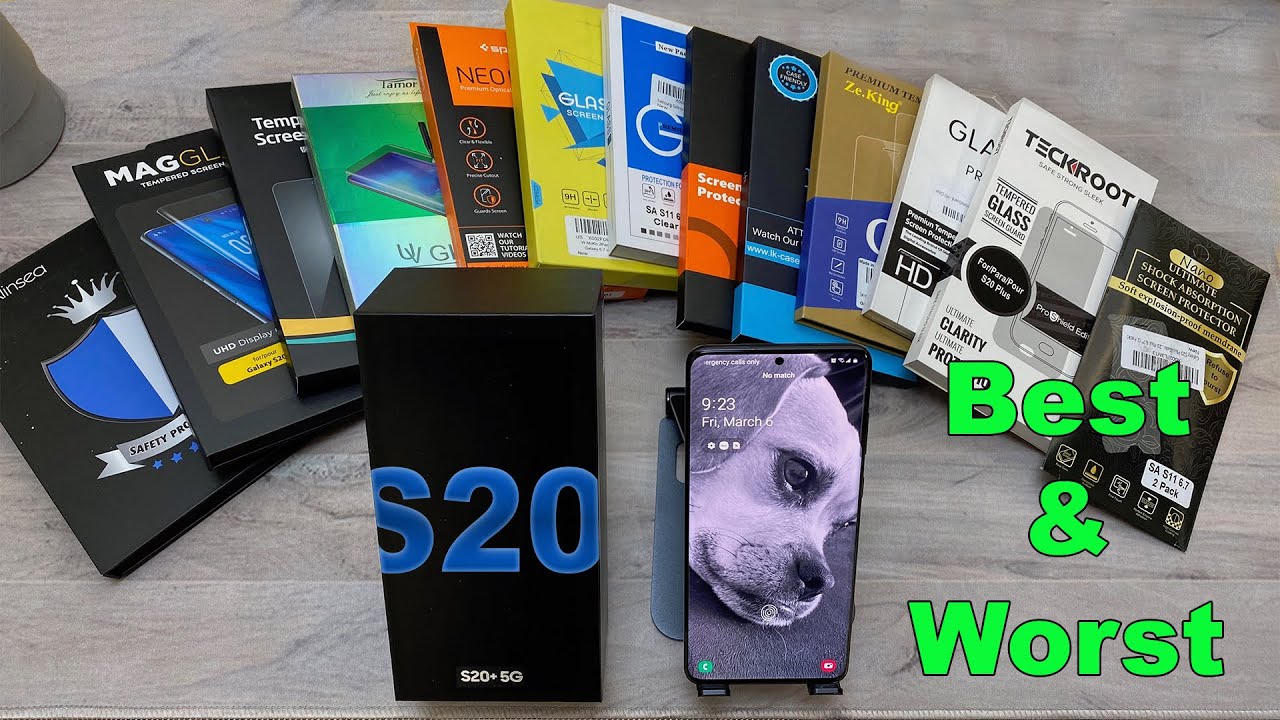
What's up everybody Tony here with that tech check and today is the day. I have a ton of screen protectors for you that we're going to go ahead and test out on the brand-new Galaxy S 20, plus they also do sell these for the other s.20 variants, so just check them out online I will be putting a link in the description for all of these screen protectors in case you guys want to check them out yourself and if you guys like me- and you want to support my channel, please use those links because it helps me keep purchasing products. Dude reviews to you guys, so I'm also going to be putting timestamps for each one of these, because this can. This is probably going to be a lengthy video I'm dedicated to showing you guys, which screen protectors are good and which ones are bad, because I know how frustrating it is to try to find a good screen protector out there. That works with your phone well and I, want to save you guys the time and money and show you which screen protectors, work well and which ones don't all I'm. Asking is, please show me that you care that I'm doing this, for you hit that subscribe button and if you guys, like the video hit the like as well last year, I did this some screen.
Protectors didn't work with the fingerprint sensor. So that's another big thing, especially with the glass screen protectors this year. I know they work with. You know the flimsy plastic screen protectors, but the biggest thing is with the glass. So first off I'm going to go ahead and start with the film screen protectors, then move on to the glass screen, protectors that don't use adhesive, and then I'm going to move on to the last two that I bought that do use adhesive, because it looks like it's going to get pretty messy.
So let's go ahead and get started. So first, we're going to start off with the plastic screen protector, this one's just a generic one, got it off. Amazon, like I, said: I will put a link in the description for all these. In case, you guys want to check them on yourself, but let's go ahead and get started here. Okay, so yeah it looks like you have squeegeed our installation, kit, installation instructions.
They have a couple kits here and our screen protectors. Okay, so, first off we need to remove the plastic film that is on that came with the phone. Okay go ahead and open up our packet here, okay, so here we have a cleaning wipe. It looks like we have alcohol, prep and some dust stickers. So first we'll go ahead and wipe off the phone.
Okay, hey then we'll use our dust sticker, get all the remaining dust off. Hey then we'll open up our screen protector here, okay, so first it says to take off a which is underneath all right, don't touch. The underside here looks like we got some more dusts, so there's really nothing no guide or anything that you can use to make sure you get this on right. So you just kind of have to eyeball it which I hate, but it is what it is. Okay.
Now, if you can see that it's adhering to the screen, okay, and then we'll take our squeegee here, can I remove some bubbles. So now we have to lift B and you kind of pull this back and make sure that you can see the edge here kind of pulling up make sure that's up and above the phone put the squeegee underneath here and just kind of push the screen protector out forward. Okay, so now we're gonna, do we're going to flip it around and do the same thing with this other side. Here: okay, flip this back and then make sure that that protective cover comes off a little and is above the phone and then put the squeegee back behind here, and then we'll just push forward. As you can see, the screen protector is coming out.
Okay, I'll just squeeze you that, so then we'll go ahead and remove D make sure you gently pull that up, because you don't want to pull up the screen protector. Okay, so that is off, go ahead and squeeze you a little more here on the bottom on the top and then what we're going to do is kind of roll down the edges make sure you get those down perfect. Those are the four usually the first things to come up on a phone and make sure you push those down pretty good. Okay, so first problem, you can see these lines that are in the screen protector. How is he fighting see those lines they're not coming out, so those lines are in the phone or on the screen protector, which I have no control over I mean I, did everything that they said? I should do first off.
That's one, there's actually three lines: I, don't know if you guys can see those very well see those three lines. They're. Second, it looks like the edges won't stay down. It's not on it's not touching the metal on the sides. It's just in the corners.
Furthermore, it looks like it's not staying down. That's a huge deal, especially if you have a case. So the edges are coming up. I, don't know if you guys can see that huge bubble right on this side, there's a huge bubble that came up so no not really case friendly, I'm going to go ahead and tell you not to get this one, those with the lines and the edges not staying down. That's a huge deal.
So this is a note, go and just so I don't waste your guy's time. If this is, if I put a screen protector on here, and it's a no-go, that's it I'm, not going to test anything else waste your time because there's no point in even purchasing it. So here we have the sign is this is a film a plastic film, not the glass screen protector and this one is also going to be using a wet application, unlike the other ones, that used just static electricity to kind of adhere to the screen. This actually uses a liquid to let it adhere to your phone. So here you get two screen protectors.
You get the vial of liquid, and then you also get a little accessory packet with some dust removers and a squeegee okay, so I'm gonna. Do it exactly how they showed how to do it on the video? So we have to open up our little vial of solution, so they don't give you out an alcohol. They just give you this little. You know YP, so you kind of just got to make sure that all the grease and everything is off of it. I would probably wipe it down with some alcohol, but they don't give it to you.
So what they say is just put it in the case that you're gonna use with the phone, so we'll go ahead and do that, and it didn't show them using any alcohol proper anything in the video, so I'm not going to do that either. Okay, it's pretty much all wiped down. So we have our dust removal sticker here, make sure you get in the cracks, because anything in the little edges here will make the screen protector most likely come up over time. Okay, so we'll take out one of our screen protectors here. So what we're going to do? What it showed was to wet your hands with the spray, okay, okay, so it's all wet and then on the underside of this.
We need to spray it down as well. This is the sticky side, so we'll go ahead and spray that down perfect make sure you get everything covered, and then we're going to go ahead and place it on the screen here, and then you need to put this into place exactly right. I'm going to go ahead and spray it down just a little tad bit more because, it sticks, things seems to be lined up, and you're going to want to hold this and then squeegee out all the water. But it's very important that you get all the water out. You don't want any bubbles.
I got a little paper towel here and just kind of Pat it down to get most of the water out see. The problem is, if you don't get this just right, there's going to be bubbles, and it looks like that's what's happening. If there were me doing this, normally I wouldn't advise putting this on with your case. Just because, if it's not perfectly aligned, it's not gonna. Go down and your case may go over the screen protector once it's adhered, but because it's its not ready.
Yet it's its not going down very well just kind of go along the edges. Here, make sure it's its down, okay, so this is not working well, because the screen protector is going to the very, very edge. If you do not do it just right, it's not going to adhere. So this is not gonna. Work.
I have to take it out of the case and then try to do the installation that way, because it's not working otherwise. The edges also are not sticking down yeah, it's its not staying, so we have one more I'm, gonna, just call this one a bust, we'll, try the other one hopeful I'm still hopeful, but we're going to try this one, not in the case, because that was not working if they would just cut it just a little less. So it's not you know taking out the whole screen. You need the whole screen just the majority of it and go ahead and do what they did other than the case. Spread your hands down: okay, okay, we got the whole thing we'll go ahead and place it on the phone okay.
So that looks pretty good, we'll hold on to this and squeegee out the bottom and then squeegee out the top I'm. Not going to lie guys. It's not looking too good, so the mean the problem with this is not the main part of the screen, but along the sides, as you can see it just won't, it won't stay down. The edges are kinda. Staying down for the most part the biggest thing when it's wet the adhesive cannot adhere to pretty much anything on the phone, and you really have to work and kind of rub out.
All the you know solution and make sure it totally dries. Just keep working the edges and keep pushing the screen protector down until it's totally dry, and the screen protector has a chance to adhere to the glass, because these edges were not staying down. I had to really you have to work at it and make sure that it is totally dry, and then they should stay down. One thing with this screen protector: it's so there's still some more bubbles in here that I can see its kind of rubbery. It doesn't feel like glass, so your finger sticks a little on the screen which isn't like huge deal.
I kind of I like the feel of glass, more, but I mean really out of all the screen protectors. You saw. We really don't have a lot of options here, so this might very well be your one of your best options. Unfortunately, you either go without a screen protector or you know you go with the screen protector, and you have some of these issues. There are some bubbles still in here.
You can see a hole, there's a bunch of them. You can't really see them unless you put the phone in a certain light, but they should go away probably after a day or so after it totally dries out underneath the screen, you can continue to kind of try to work them out if you want, but they should eventually go away. At least that's my experience with most of these screens that I've had to use it. The solution with and here I'm just kind of working more, and you can just kind of work them out but, like I said, if you just want to kind of leave them, they should go away and like a day or two but yeah. So it doesn't have that.
You know that glass feel to it. It's got kind of like that, sticky, that's sticky, rubbery type of feeling to it, which I don't particularly care for I, like my finger to kind of glide across the screen, but, like I, said before, we don't really have a lot of options. So, looking at the edges now, they're looking like they're staying down only time will tell because once you put this in a case, these edges might come up. The biggest culprits are the ones in the corners. So, as you can see, they are staying down.
I don't want to put it in a case yet because I want to give it time to adhere. So I'll have to leave this for a day or two, and then I'll put it in the screen, and we'll see what happens then. So, okay guys. So here we are, this is the next day I, let to speak and screen protector kind of cure overnight a little, and let me just wipe this down, so you can see so, as you can see, the majority of those bubbles are now gone. They're still, maybe like one there's one here over in the corner, but for the most part the bubbles are pretty much gone.
The only problem that I can see is that has like this orange peel kind of texture to it, as you can see kind of in the light. It's got like this see that how it's all Tripoli I mean it is kind of smooth. It doesn't feel too bad. So, as you can see, the screen protector has stayed down for the most part. The only concerns I have are maybe around the edges here, where you can see just a little tiny bit of the screen protector, where that will most likely start to come up along the edges.
Here, it's pretty good in the corner, pretty good, and it's a little coming up there. This one was coming up just a tad bit and I had to push it down just a little for the most part, this came out pretty decent. It does give you to a screen protector. So if you mess up one, you can try the other one like I did so we're going to go ahead and test the fingerprint sensor, and I'm going to bet you that's gonna work pretty well, okay, so I'm going to go ahead and add my fingerprint. This is the first time I'm checking it, so we'll see if it says anything about being dirty, nope, okay, looking good so go ahead and start the process here, as you can see it, it doesn't have any problems, recognizing my thumb and that's how these film screen protectors are for the most part.
They really don't have a lot of problems, but they don't offer you the best protection and that's unfortunate because I like the glass feel and the protection of the glass, but they just don't work nearly as good, okay, good edges, so really no problems at all. So we're going to go ahead and try the fingerprint out here, and it opens instantaneously yeah, so yeah I mean you can't really beat these film screen protectors. The only problem is that they don't stay down in the edges. That's well! That's like the biggest thing. What they think.
What they need to do is maybe get a film screen protector with that that adhesive, underneath and that'll probably work even better, because it'll have the adhesion for the corners, and I'll have the fingerprint sensor for the middle see it works so well. So this screen protector, it looks, is looking like it's going to be the best one so far, I'm going to go ahead and put it in the case, and we'll see what happens there. Okay. So let's take a close look here, so it kind of comes right up to the edge there if they just made these more case friendly I think they would also be a lot better to see. There's just a little just a little of space between the screen protector and the case yeah see in the top right-hand corner there.
There's I already see a little bubble. You see it right there, so that corner is going to be it's gonna start pushing up. Also, another thing that I've kind of seen is usually when it gets a little warmer. The screen protector comes up even more AC in the corner. Here, there's a couple bubbles that are already starting to appear.
Unfortunately, like I said this. This curved glass is not good for screen protectors and people just don't make this the screen protectors. You know more case friendly, so the corners don't roll up. They need to make one that just kind of fits on the flat portion of the screen, and then I think it'd be probably a lot better off. So the next one we're going to do is by MP mall.
So here we have our dust stickers. Our squeegee alcohol comes with these little foam pieces that you're going to put down, and this just helps you install the screen protector. Yeah, we'll go watch the video before you do anything else, because you're going to want to know how to install this okay. So that's it! You get a couple screen protectors here, yep you got three screen protectors, which is nice, so first I'm going to go ahead and put down this little sticky thing like I said this is to help you install your screen protector. You just put that down there, so we need our squeegee our wipes and the little cloth there.
So first we'll do number one I'll go ahead and wipe off the screen make sure it's all clean, go ahead and wipe it off make sure it's nice and dry um. Actually, you can use the dry wipe here to either. One now we'll use our dust sticker. Getting remaining dust off the screen start with number one we're going to pull the tab off and make sure you don't touch the bottom of the screen here now we're going to go ahead and line it up with the phone. The best that you can.
It's got the little notch there, so you can kind of line it up with the camera. Okay, so I think I have that lined up pretty good, go ahead and use the squeegee get out any big bubbles. Okay. So this is where this little bumper comes into play. You put it up against the bumper we're going to lift number two now, and we're going to end up putting our squeegee right here at this line, so we'll lift on tab to make sure that this, the green portion here lifts and slides over the screen of the phone, and we're just going to go ahead and push our squeegee forward.
Okay, now we're going to flip it around and do the same thing for number three lift we'll put our squeegee here, make sure the green lifts over the screen, and we'll just push forward. This method is the best way to get a bubble, free installation, for you know pretty much all these film screen protectors. They this part usually works really well on all of them. It's always the edges that don't stay down, which kind of stinks so just go ahead and kind of squeeze you out any other little bubbles that you might see, then we'll go ahead and flip this around again. Now we're going to take off tab for lift off slowly to make sure that it doesn't lift the screen protector like it just did, so we'll kind of lift slowly here, and we'll just peel that off, and then we'll take our squeegee again and kind of get any remaining bubbles out.
Once you do that everything looks good. We're going to go ahead and smooth out the edges, just roll them down its these edges. I'm telling you I, don't know what it is. That's why I hate curved glass on these phones, because you can't,, it's hard to find a good screen protector that stays in place, so the installation is done and now, as you can see the edges here, they just won't stay down. These edges are just I, don't know what it is they just don't.
Let mean look at that that edge there, as you can see like it light just like the first one. It is on the glass, it's not on the metal and they just the edges. Don't want to stay down, see, look at the bubble here on the edge. So you can see this parts down in this part. There's a bubble and I can keep going over and over and over- and it's probably just going to keep coming up see this side already came up again.
You're not going to want to keep having to push this down all the time dirt and dust is gonna, get underneath there, and it's just going to come up and never stay down again. So I'm going to go ahead and tell you to stay away from the MP maul. Just not cutting it. I definitely stay away from the MP maul screen protector. Okay, so next up is screen protector by OK.
So this one kind of looks almost exactly like MP mauls. It's got the little bars here the guides, so we'll try this one I'm, pretty sure it's going to be exactly the same, but we're going to go ahead and try it anyway. So you got your squeegee three wipes here, three dust stickers and guides and your little wipe so use one of those a little light and a dust sticker. And then here you also get three screen protectors as well. The installation is great up until you have to push down those edges, and it just doesn't want to stay I, don't know if it's, because it's the screens curved or maybe because there's an oleo phobic protection on there, but it's just not looking good use our dust sticker here.
Okay, so same installation as before, we're going to go ahead and peel back. That number one makes sure you don't touch the bottom of the screen. So really the alignment here is using the camera and then kind of your best judgement that looks pretty good. So we'll use the squeegee again to kind of get all those big bubbles out so again, we'll put down our little rubber bumper here push the phone up against it. We're going to go ahead and pull up number to put our squeeze down at the bottom here, lift and pull back and then make sure again that green tab slides over the front of the screen, and then we'll just push forward with the squeegee okay.
So that's that one go ahead and switch it around now we're going to go ahead and lift number three put our squeegee back at the line here. Pull back push the green screen above your iPhone screen and then push forward. Okay, make sure you get any little bubbles you see out and then very carefully again we're going to go ahead and lift on number four: okay, another beautiful installation, no bubbles. Now we're going to go ahead and work the edges down. So there are a couple bubbles, that's not a big deal.
It could be just because of the way I installed it. The top looks good the edges kind of have some bubbling, so you can see there, and I'll push it down now, it's down along the edge here, as you can see, the bottom corner edges are coming up to this edge is kind of coming up a little and then the edges here as well, so I mean: let's see what happens when I put it inside the case here. So, as you can see, the edge here is coming up in the corner. These are very case friendly, and this is not a crazy case. This is just a simple, a simple case.
So again, just like the MP malls, the link is pretty much just the same. I would probably steer clear of them too. As you can see, it is coming up in at one corner and once it starts coming up, you're just going to be pushing it down all the time dust will get under, and it will never stay down again. Okay, so we're gonna start on our glass screen protectors. Now this one is made by cover on it's a little squeegee here, your installation kit, and you get one glass screen protector, so you better make it better make it work the first time.
So this is quite interesting. This glass has a circular cutout, where the fingerprint sensor is going to be in your phone. So there's not going to be any glass protection right there, I don't know if that's going to know you guys or when it's on the phone, if you, if you see it, it's going to annoy you something to know. So there is a little cutout for the fingerprint sensor. So go ahead and open this up, wipe down our phone, make sure it's all clean.
Okay. So on the bottom of this it has adhesion. So when you peel this sticker off the bottom, don't touch the bottom of the screen. I think. Maybe a little guide would be too to actually get the screen to turn on.
So it shows the little fingerprint sensor, so you can kind of put where the holes going to go. So it's over this to where your fingerprint goes, and then we'll drop it down and kind of push through the center here use our squeegee, but there's a little fingerprint hole. So it is touch sensitive. The only thing I can see that I, don't like so here's what I don't like. As you can see, the part where the fingerprint sensor is not.
It doesn't adhere very well, and it's got that smudge, and I've tried pushing down on it as much as I can, and it just looks horrible and that's where the fingerprint sensor goes. No, so is that going to bug you I know it would bug me. The screen protector is on here. I mean it's: not it's not moving around anywhere, it is, does seem to be responsive. So just so, you guys know.
I do have the extra sensitivity turned on to allow the fingerprint sensor to work a little better. The touch does work, so I'll go ahead and put our fingerprint in here. This isn't looking very promising, so I got a push extra hard, and it doesn't always recognise my finger. I've tried to reposition it. It's it may get your fingerprint it may not.
But do you really want something? That's going to be this hard to do your fingerprint, because how well is it gonna work when you're going to have to unlock your phone, so I'm going to go ahead and say this is another. This is a no-go stay away from this glass screen protector buy cover on so far. No we're not looking too good. So the next one is the glass screen protector by tech root. So here we have the glass screen protector again.
This one has a cutout in the middle for the fingerprint, which is pretty horrible. I, don't like that yeah from what I just saw I, don't I, don't like that at all, but we'll go ahead and test it out. You get your little accessory packet here again. You only get one of these screen protector, so you got to make it count the first time, but go ahead and wipe it down with the alcohol prep go and take our little dust sticker. Here again, there is a little tab here.
Once you peel off this film, you don't want to touch the bottom of the screen again, we'll try to light up the screen, so we can see the little fingerprint, so we can line it up. Okay, no squeegee! So you just kind of gotta push it down the best you see fit. So we're going to take our cloth here and kind of just push it all down. It has a little of adhesive, not a lot, so the screen can come up pretty easily. So already it says, make sure the fingerprint sensor is clean and dry and dry again.
I didn't even do anything yet, and it's already saying that it's dirty. So this is not looking promising. Okay again I push down on this little opening here, the best that I could- and it's still I mean I'll thank God, okay, it finally added my fingerprint we'll go ahead and test it out, no match no match finally unlocked. So it's not super quick, it kind of works, but are you going to want to try to do this over and over again just to get it to work? You want it to work the first time every time and it to be quick. So this one's a mixed bag, it kind of works, and it kind of doesn't I, would probably tell you to steer clear from this.
I mean it does kind of work, but trying to get your fingerprints recognised in here took forever, and it was. It was a pain in the butt, so use caution with this one I would still say stay away from tech rude, but if you guys want to try it out you're more than welcome okay. So next up we have he king's glass screen protector. Now this one online said that it was supposed to be a three pack, and this is only a two pack. So that's already one as you can see on the bottom here, it says three packs and here it says two, which one is it which one's supposed to be.
So that's already something that I don't like we'll see what we get in here. You get three wipes a squeegee three sets of dust stickers and three of the screen protectors. Take our wipe here. First, we'll use our wet. Oh, my god.
Could they be any smaller? That's pretty bad, so two strikes already against the he King, and then we'll take our dry wipe, which is just as big as the other ones. This is horrible. Oh, my god and I'm not gonna, go ahead and use my own wipes to wipe this down, because this is what you guys would be getting inside the package and I wouldn't expect you to have to use something of your own because you're paying for it to get it inside the package. So there we have that we'll go ahead and use our dust sticker number one. Here is you peel off the back? Remember again, don't touch the backing, and you got to kind of line it up the best you can because it doesn't come with a guide.
Okay, then we'll use our squeegee to kind of get out all the big bubbles here. So then we're going to go ahead and take number two we'll go ahead and lift that up. You go ahead and make sure that the number two flips up over the screen, and we'll take our squeegee and just kind of push it down and out. Okay, then we'll go ahead and do the other side the same way. Okay, make sure it comes up and out don't push our squeegee down.
Okay, pretty much no bubbles there, and now we're going to go ahead and push down the edges, so I've thoroughly pushed down all the edges here. So let's take a closer look, as you can see it's already starting to peel up that should stay down the first time you push it down. I mean how much again, how many times should you have to push this down? And it's mostly the edges and also another thing about z, king. This says premium tempered, it says glass. This is supposed to be a glass screen protector, as you saw it was not glass.
It was that film so definitely stay away from he King. So, as you can see, there's a lot of garbage out there. That's the whole reason why I want to do this, for you guys to make it, so you don't have to waste your time and money. Okay. So here we have another glass screen protector made by owners, we'll see if this one's actually glass nice presentation, it's its like a wooden box, it's pretty nice! So you get one glass screen protector in here and again.
This one does have that little hole where the fingerprint sensor is going to go. We already know how that went, but we're going to go and dry it out, and you get a little packet here. So here we have our dust stickers, little installation guide, squeegee instructions, a little alcohol wipe, okay, so first off we'll go ahead, and I will give them credit for giving a bigger alcohol wipe, and we'll use. Our dust sticker, okay, instructions, clean screen, remove a line into the position, peel off step to remove any air bubbles peel off step.2, hmm I only see one peel off step, 2, so I, don't know what else you want me to peel off yeah I, don't there's no other, there's nothing else to peel off so skip that Wow. So, as you guys can see, there's the fingerprint here's the hole if I line up the hole correctly, the glass goes over.
It goes well above the phone, so this is not gonna work right off the bat. The fingerprint is misaligned. It should be like that, but the hole for the fingerprint sensor is too low. So this is pointless already. Another bust stay away from Gunners is, and they only give you one.
So it doesn't work all right. So here we have. Another glass screen protector, this one's made by mono two 2-pack. Here's your two screen protectors, couple installation kits and instructions again, another one that uses the fingerprint hole. I already can probably guess how this is going to go.
That seems to be the theme there. This little fingerprint hole is the only way that your glass screen protectors work. So you got your alcohol prep here, let's go ahead and wipe down the screen. The alcohol prep is kind of dry. That's awesome, give it a little wipe down, use our dust remover.
So again, there's a film you just remove the film, don't touch underneath and there's some dust. A dust stuff always comes off when you take off that plastic part. Okay, what kind of turn the screen just get the little fingerprint lined up at least this one looks like it's going to be lined up. Okay, go ahead and push down in the middle again. This fingerprint thing not looking good.
It's already messed up, okay guys. So, as you can see here again that little hole it just doesn't come out right. This I don't think this is gonna work with the fingerprint, but we're going to try it anyway. Okay, make sure the fingerprint sensor is clean and drive and try again that's always a good sign. Okay, again, not working, that's pretty horrible! Okay! I'm done with this stay away from mock.
It's the fingerprint sensor does not work okay, so next up is mag glass. This is another glass screen protector, a little warranty card here. This one comes with a guide: that's pretty nice! Okay! So here we have a guide. It's got a top and a bottom here, get your glass screen protector, important for screened fingerprint sensor to work properly. You must road your fingerprint after the screen protector has been installed: okay, uh-oh, there's the whole little instruction cards, dust, remover good and take our wipe well.
Take our little YP here, wipe everything down. I do like the fact that they give you a guide at least dust removers done, we'll, go ahead and put on our guide snap that down and go ahead and remove the layer underneath. Okay, this is on the top and go ahead since we don't have to worry about where the fingerprint sensor is we'll just push this down. Okay and I, pushed down on the fingerprint sensor and all over the rest of the phone guide off, make sure you don't pull the screen protector with it and just kind of push down on the edges. Here, hey, the screen is responsive so far you set up our fingerprint okay, it's never a good sign, but we'll try it: okay, okay, so a fingerprint finally added.
Let's go ahead and see how it works. Okay, so far, so good, it's a little slow, but it's its working! Okay! So that's not bad! The fingerprint sensor on this is working definitely a lot better than all the other ones yeah. It only said no match one time now, and we got another one but okay, so that's working not too bad. It's an it seems a little slower than if there was nothing there, but it is working and, like I said I do have the sensitivity turned up so that'll it'll work better with the fingerprint sensor. So now that that's pretty much passed, let's go ahead and put it in a case see how that works out.
Okay, so it looks like the screen. Protector comes pretty much right up to the edge of the case and just enough for the speaker. So that's looking pretty good I'm surprised. So the only thing that you have to get past is that there's that little hole it you may not like it. That might be a deal-breaker for you, but at least this glass screen protector does recognise your fingerprints, and it works with the cases I'm going to go ahead and give this one that thumbs up good job mag glass case.
So next up is ears tempered glass screen protector. Okay, so this one looks like it has a guide as well a couple of cleaning kits, here's your guide, it doesn't say top or bottom on it. So I guess it doesn't really matter which way it goes. And then we have two screen protectors. Okay, so this one does not have a cutout for the fingerprint sensor.
This is the first one I've seen yet, so I'm interested to see how well the fingerprint sensor is going to work on this one. You get a dust, remover alcohol, prep and then one of these little cloths will clean off the screen. All right take our little dusts sticker here, we'll put on our guide. Okay. Now there is again another little tab here.
You just peel off this backing and then don't touch the bottom, we'll just kind of lay this on here and then push it down, and then we'll pop off our guide just hold down the screen protector while you're doing it, because you don't want to pull it up, we'll kind of wipe it down again make sure the fingerprint sensor is clean and dry and try again. That seems to be the theme. Okay. This does not seem like it's working at all. Okay, so 0% ESR no go stay away from the screen protector.
Okay, so here we are with the tempered glass screen protectors that do use the full adhesive on the screen, this one's made by Tamara. So here we have our accessory packet. Okay, we have like a little card where you can get a $10 gift card. There's only one screen protector in here, so you got to make it right. The first time you're glue- and this is your little UV light.
So it looks like it uses a micro USB. It does not come with it. So hopefully you have one at home: hey alcohol, prep dust, remover, okay, so one thing I will tell you guys is you do not want to get this glue inside your speaker on the top, and this did not come with any sticker or anything to put over the speaker grille. So you might want to use one of these installation stickers and cover your speaker grill, because if you don't, you're, not going to have a good day, kinda would think that it would come with it, but it doesn't here's our glass. It is a full piece of glass, there are no holes for the fingerprint sensor ooh.
This is not sticking so use your screen as a guide. You can kind of see where the screen stops right above. That is where you're going to want to put your tape. Yeah, just use some tape to cover up the speaker, grille, okay, so we'll take off one end of the glue here break that off it doesn't come off very easy now. This stuff is all over my fingers, so unscrew the other side.
Okay, make sure all the liquid comes out make sure it's kind of level. It's not going to be very level because there's a camera bump, so just kind of do the best that you can then we'll peel off the backing here, make sure not to touch the bottom and then kind of just lay it down on the screen here and then just let all the adhesive cover the whole screen by itself. It might take a few minutes. You can position it a little, try not to touch it a lot and just let the adhesive go all over the place and make sure especially around the corners. The add the adhesive covers everything and I would suggest getting like a little q-tip or something to kind of run around the edges to get any excess that has run off right here in the left-hand corner.
We still have a little of adhesion, don't touch it, don't push down on it, we'll just let it go over the whole screen. It will eventually cover everything by itself. It's almost done, and it's not going to hurt to leave it just a few more minutes. Just in case you know, you can't tell if it got all the way around the edges or not, so I'm. Just going to go ahead and leave this here for a minute.
So that's looks pretty good. So what we're going to do is take our little LED here, and we're gonna. Do we're going to go around the edges for about two minutes just to cure that first, so it doesn't move? Ok, so now we're going to go the rest of the phone for another. Three minutes, you, okay! So now that that's done go ahead and pick the phone up here. I'll go ahead and take our alcohol, prep and kind of just wipe down the sides.
Edges look pretty good, there's our tape, so you can take the tape off. So you can see no adhesive got into our speaker, grille there. Everything looks pretty good so far so good, so you can see a little adhesive there on the side underneath it should be all hard. Now, though, shouldn't be any more leaking out. So let's go and try the fingerprint sensor, it's responsive, okay, and we didn't get that dirty fingerprint sensor signal.
So, let's see what happens here, not looking good, not looking good at all press a little harder. How much harder do you want me to press? So, as you guys can see, I do have the increased touch, sensitivity on it's still, not working so go back. Add fingerprint, okay, not looking good, okay, so stay away from the Tamara tempered glass screen protector. It looks pretty nice on the phone, but your fingerprint sensor is now useless. So now, if you guys are curious, I'm going to go ahead and try to take this screen protector off.
You should just be able to lift it up pretty easily with your fingernail just be careful because it is glass, and it can shatter, it seems to be lifting pretty easily and there you go it's off. Okay, guys! Next, up on the tempered glass screen protector that uses adhesive is the Alicia Wow. Okay. So here we have a accessory packet. Got these little foam pads here Wow.
These are gloves some more little pads, I'm, not sure what that is, but you do get two tempered glass screen protectors, which is pretty nice here, is the LED uses USB type-c, which is nice, because that's what your phone comes with a couple of glue vials than that and then some install instructions. So this is pretty intensive, so we'll put on these little black rubber stickers on the bottom. Here you probably only need two, but that's okay, so that's that now the phone won't rock at all. So that's nice, that's positive for them. These stickers here are to cover your bottom speaker, grille and the front speaker grille, which is nice because I told you before you don't want to get anything inside these little speakers, because if you do you're not going to have a good day.
You just make sure that's the stickers on there, nice and nice and tight I. Don't really not really too worried about the bottom speaker grille, but I'll put it on just in case okay, so that's on there got our top speaker covered okay. Next up they say you want to do the buttons as well I'm gonna, forgo that clean screen. Let's go ahead and open up our accessory package, get your alcohol wipes dust stickers, a nice big, wiping pad! That's that's cool okay! So when you clean the screen off those rubber pads also help with this to makes it nice and easy to clean, because the phone doesn't Rock, and it doesn't move, so definitely a plus for that works out. So well, very nice.
So far, so good you get all the dust off. So okay, you want to go ahead and push these things down because it's going to interfere with the installation. So the bottom one is this: one's got this 3?m sticky stuff on it. Hey so we're going to go ahead and put that on to the bottom. Here, that's just to help line it up.
Okay, then, the top one I'm going to do the same thing. Okay, then, this goes in here like that. It's not very smooth, so you need to be careful, just kind of put it in halfway. Okay, so then we unscrew the glue the top portion first. Okay, that's, and then we turn it upside down and unscrew.
The other portion make sure it's somewhat in the middle okay. So now that we have all the glue out go ahead and make sure that it's kind of centered in the middle okay go ahead and peel off the bottom part and making sure not to touch the screen. Okay, then what you want to do is make sure that you have the bottom part down and then lay the top portion on top of the little rest here, make sure everything's lined up properly and then go ahead and pull out the very top portion here and just let it flow all over the screen protector. So some did come out at the side here. I, don't think we have to worry about the top speaker grill, because it's moving so slow that all the excess would be down around the other portions of the screen.
So again, this might take minutes.5 minutes, 10 minutes just leave it until all the adhesive has made it all the way across the whole screen protector before we do the curing process, okay guys. So that literally took almost an hour to complete it's just at the very edges of the screen protector everywhere else the adhesive has completed, so I'm going to go ahead and start the curing process. The biggest thing I'm concerned about is the fingerprint sensor. If the fingerprint sensor does not work, then this whole thing is pointless. So and I also have another screen protector.
If I need to do it again, I think it took a little longer because when I unscrewed, the vial caps, the liquid, didn't come out very fast, and I'm sure there was a couple more drops left in there. So, for the most part, looks good. Not a lot of adhesive has come out. The sides and, like I, said, if you just take like a little q-tip and run it along the edge it'll absorb right into the q-tip, and you won't really have to worry about anything. So here I have my battery bank.
What we're going to do first is cure the edges in the middle portion. First, okay, so now that we've done that for three minutes, we're going to go ahead and put on our little gloves here and while we're at it, we're going to take off these little sticky tabs. We don't need this anymore, go ahead and take off the top here, wipe off the excess with our alcohol prep very carefully, because you don't want to move this screen any when you remove the gloves, make sure you pull from here and then pull over your hands. So you don't touch anything that was on the outside okay, so the curing process continues with another three minutes, but this time we're going to do the whole thing. Alexa set a timer for three minutes.
Okay, now I did have one screen protector. That I did on my galaxy as 10-plus. That had me pushed my thumb down on the screen when I was curing it to make sure that it was as close to the screen as possible, and there was less adhesive on that thumb, portion, and I'm, starting to think that that might be the key, because so far none of the glass screen protectors worked the last one we did used full adhesive and the fingerprint sensor didn't work. We're doing the same thing with this I. Don't expect the fingerprint to work with this either because it uses the same process.
Nothing's changed, so I. Don't think this is going to work either, but we're going to go ahead and find out after this. The biggest concern with these screen protectors and the adhesive are the edges. You definitely want to make sure that all the adhesive has filled all four corners and along the sides, because that's where the points where it would lift, especially if you're going to put it into a case okay. So here we have our stickers.
You can go ahead and take the bottom sticker off and the top sticker, because we don't need those anymore. As you can see. No adhesive got into the speaker girl up there, which is nice, and we have our back stickers. You can kind of just peel those off okay, so I didn't realize it, but there was some adhesive that leaked underneath the phone, so I just cleaned that up, but as you can see on the sides here it is adhered. We had a little spillage down at the bottom here we can probably get that off again in the corner adhered tops, pretty much done, so it looks good.
The real test is going to be the fingerprint sensor, so it is responsive. Okay, all right here we go true test. Well, it did get a little of my finger, but that's pretty much if I mean again. Are you gonna want to have to press super hard on your phone every time you want to get into it? You should just very gently tap it and then the fingerprint sensor recognise your fingerprint. So this looks like it's going to be a bust as well.
I was really hoping that they made some improvements, so the fingerprint sensor would work through the glass screen protectors, but it still doesn't. Look like it's there, so you can go ahead and avoid the Alicia as well, and then for all of you who care it's very. It should be just as easy to take this off your just kind of get a corner with your fingernail and gently lift on the screen protector, and it will come off there. You go so as far as my recommendation for all of these screen protectors. Obviously the ones that I said are no-go are totally out of the picture.
The tech route I would probably just forgo this skip it. Don't even look at it if you're gonna, look at any of them, I would probably take a look at the sign or the mag glass. These are the ones that worked the best out of all of them, the mag glass. It gives you good glass protection and the fingerprint sensor sort of works, as you saw it's kind of hitting this. The sign fingerprint works amazingly, but if you have to put the phone into a case, you're going to have to deal with the bubbles around the edges.
That's pretty much how it is I'm hoping to get the White stone dome glass screen protector, so I can do the review for you guys, because that seemed to work a lot better than the mag glass, and you still have the protection of the know. The glass screen protector over the film, so if you guys haven't subscribed, definitely make sure you subscribe and hit the notification bell. So it's you guys know when I put out those new videos I'm sorry, this video was so long. I just wanted to give everybody all the information that I had on all these screen protectors show you what went wrong, how tunes all everything! So, if you kind of thought it was too long, I'm sorry I just wanted to give you the most information that I could. So, if you guys have any suggestions on, maybe what I could have done a little better? What you thought I, maybe could have cut out of the video to make it a little shorter thing.
You don't really care to see. Let me know in the comments, so I can know for next time, and you know make them make the video better for everybody. I, definitely value your feedback. If you guys enjoyed the video, please give me a thumbs up. Thank you for all your support.
I hope you have a great day, and I'll see in the next one later.
Source : HighTechCheck
Phones In This Article
Related Articles


Comments are disabled
Latest Articles


