25+ Tips & Tricks for iPad Pro 11 Inch (and 12.9 Inch) By sakitech
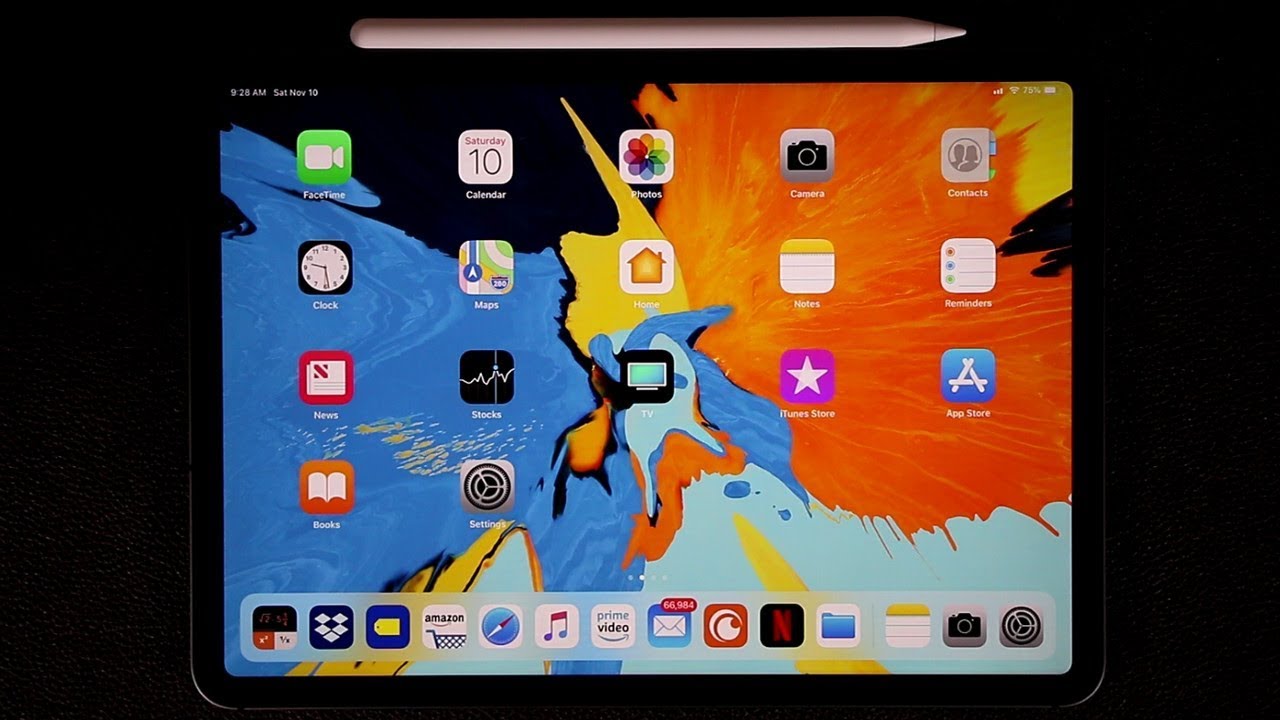
Hey guys sake here from Saki tech and in today's video I want to share 25 plus tips and tricks for your new, shiny and expensive iPad, pro 11 inches or the 12.9 inch model. This video will also include a bunch of Apple Pencil tips and tricks for the second generation Apple Pencil. So, let's dive in and start mastering your iPad now before we dive in, if you do, want a smartphone or a tablet, make sure to subscribe to switch and also click that notifications bell icon to get instantly notified. When I upload a new video alright, since the home button has been removed, let me quickly talk about the basics of navigation. Just in case you don't know about it. So if you do launch an application just about anything, if you want to go back home is instead of pressing the home button, all you do is swipe up on the screen really quick and boom.
You get dropped back to the home screen. Now again, if you're back in the application, there's one more thing, you should know uh. If you pull up slowly, it's going to bring up the dock which is going to allow you to access an application. If you pull pause and let go it's going to bring you to the multitasking pane, but if you pull really quickly, it's going to take you back home just make that distinction as you're using your iPad and, of course, if you pull from the top down it's going to bring up your uh today's screen. But if you pull it from the right corner over here, it's going to bring up the control center.
Okay, so those are the basics of navigation uh. With your iPad and one more thing, if I have multiple applications, let's launch a couple applications here again, if you go to the multitasking you're, going to see them right here and if you do have applications launched, you can switch between them simply by swiping to the side at the bottom, just like that. Okay, so you can just do that. Just use that black bar as a reference point and swipe over to the next application, all right and of course, as you may or may not know, the power button is not going to turn off your iPad. When you press and hold the power button, it brings up Siri.
So if you want to uh power down your iPad, what you want to do is press the power button and the volume down at the same time, so the volume keys are on the top. Here you got the volume up volume down, and you got the power button. So if you want to turn off your iPad, you want to grab the volume down and power at the same time and just press them and that's going to bring the slide to power off option which allows you to power off your iPad and, of course you want to take a screenshot. What you do is you press the power key and the volume up at the same time to take a screenshot. So let's do that real quick, so that was a screenshot.
It's right here! You can tap on this guy. Make some modifications then click done and then save to the photos. Okay, and of course you go to the photo, it's going to be right there, all right, let's keep moving on by the way, really quickly. If you're looking to buy a new case for your iPad Pro, I highly recommend the new muse case for the latest generation. iPad pros muse case is manufactured by Zulu case, who just happens to be the number one top-rated case manufacturer on amazon.
com. I have been using their top-rated prodigy x series on my iPad Pro 10.5 for over a year, and I love it. It has a best-in-class kickstand that will not collapse no matter what you do to it has excellent drop protection and has powerful magnets that will allow you to attach your iPad Pro to your refrigerator. In case you want to follow a recipe for cooking now you can either buy or reserve the new muse case, specifically designed for the iPad Pro 11 inches or the 12.9 inch right on their website or amazon. com.
I will drop all the links down below for you guys to check out. You are going to love these cases now in case you have an Apple Pencil. Let me show you a couple of things you can do with the Apple Pencil, so it's magnetically attached to your chassis. If you do attach the Apple Pencil back over here, it's going to give you a little Apple Pencil and the battery percentage meter, which is very convenient to have. But let's grab this, let's turn off the screen.
What you can do is you can tap on the screen once with the Apple Pencil, to take a quick note, okay, so that's great for taking notes on the go now, let me go back inside here. It's going to ask for the passcode, of course, because the iPad was locked. Now what you can do with this is you can go to the settings and there's a couple of things you can do with the Apple Pencil just in case you own the Apple Pencil. Let me just find it. If you go to the notes, it says over here, lock screen and control center, so the option is here: access notes from the lock screen.
So if I tap on this one, you actually have the option to disable what I just did all right. You can also change the settings to resume last note created on the lock screen resume last note, viewed in the notes' application. So if I turn this off this option off and if I turn off the screen, I can tap, and it's not going to do anything it's going to turn off the iPad, but it's not going to bring up that actual note. Okay, so make sure you come to notes and modify that setting and, of course, there's only one more option here that I do recommend that you enable. So when you do launch the notes' application, it's only going to accept Apple Pencil to draw and then your fingers will be used to navigate uh, uh scroll through the pages.
So that's going to be very convenient. If you do go to the notes over here, uh just uh, here's a new note, so I can only write with the Apple Pencil and with my fingers. It's not going to interfere with the Apple Pencil input. It's just going to be used as a scrolling uh tool, and since we are on the topic about the Apple Pencil, let me talk about one more really quick thing. So if you go to the settings, there's an Apple Pencil menu, you can tap on, and it's going to give you a couple more options.
So if you have the second generation Apple Pencil basically get these options here. So let me show you what they are. Let me go to the notes over here: uh. Let's say that you were typing something, or you were not typing. You were actually writing something.
If you double tap over here on the pen, it's going to switch between the pencil, whatever tool you're using to the eraser automatically. If you tap it one more time right here, it's going to go back to the pen. Now, if you go to the settings over here, real quick, you can change those options to switch between current tool and last used or show the color palette. So if I choose this one, for example- and if I go to the uh oops to the notes' application now, if I double tap this area, it's going to show me the color palette, all right. If I double tap it again, it's going to disappear, and I can continue uh drawing stuff on the thing so make sure that you actually modify those settings to your liking.
You can also turn it off if you don't want it alrighty. So let's go back out here and continue with more tactics and one more thing I want to talk about quickly is the control center, so this control center over here is something you're going to be accessing a lot. So just so you know if you go to the settings and if you go into the control center, you can tap on customize controls, and you can add and remove controls from this control center from this area. So everything on the top here is included, and everything at the bottom here is stuff. You can actually add up.
So, let's add the screen recording feature. Let's add voice memo. Let's add the timer. Now, let's add one more thing over here: let's just tap on a stopwatch now, when I pull this down, it's going to be more populated because I just customized it with more options. Now one thing I'm going to show you really quickly if you go to the control center and if you press and hold any of these guys they're going to expand to give you even more functionality, for example from here, I can turn off true tone on and off over here I can turn off night shift or actually turn it on and the same thing with the music.
But if I tap on it, it's going to expand to give you a bigger player, same thing with this guy, it's going to expand, to give you more options, so just be aware of this, just press and hold on these guys, and they're going to give you more options, and you can slide around to take the modifications, even with the flashlight. If you press and hold if it's going to expand, you can turn it on at level. One two three four! So four is the brightest and number one is the lightest nope? Let's turn that off and of course the real thing I want to talk about here is the screen recording functionality. So let me press and hold on this. This is going to allow you to record the screen of your iPad, which is absolutely fantastic.
So let me tap on start recording, and it's going to do a countdown three two one, and now we are recording the screen, so I can record this entire screen and even share it with somebody else. If you look at the top, you're going to see a red bar that says it is in fact recording when you're ready to stop recording. You can tap on that bar, or you can pull down the notifications panel and just tap on this or press and hold and tap on, stop recording once you do that, it's going to be saved to your photos' album. So if I go to the photos right now, it's going to be right here. That was a 20-second clip and if I play this, you're going to see exactly what I recorded happening.
On the background. It's great for uh showing people what to do creating tutorials anyone getting help from somebody if you're having a problem with your iPad. So that's the control center uh. The other thing I want to talk about really quick is the dock at the bottom here now, you'll see that there's a little horizontal bar over here on this side. You only have your frequently used applications.
Only three are going to show up here as you use them. So if you keep using something uh often it's gonna show up right here on this right side of the bar of that horizontal bar the line, and on this side you can have up to 13 total apps in your dock. Okay, so there's a limit to it, there are 13 apps! So right now I have less than 13, but if I try to put a 14th app, it's simply going to drop back to the home screen so make sure you populate this area with only the applications that are very important to you. Now I want to quickly talk about multitasking. So, basically, let me launch something over here: let's just go to google real, quick.
All right so we're at Google. Let's say I want to do a multi-test. I want to look at some websites. I want to do something on the side, or I just want to glance at something really quick. Let's say I want to glance at the stocks' application.
I bring up this guy over here or let's just say that I want to use a calculator, so I grab this guy. I dump it over here now. This is called the slide overview, so I can do something over here: real, quick, okay, blah blah blah. I can make some calculations, and then I'm done with it. I just swipe this guy away.
Uh. Let me see just like that. It's gone that was called the slide over view now, if I bring this up again and dump this over here, what if I want to do a split screen multitasking this time? What I want to do is tap on over here and just pull it down like this, and now I have real split screen multitasking. I can work here and here simultaneously. Okay, so you have the option to slide over or multitask using split screen.
Of course, there's one more thing: you can do, uh if you bring up Netflix and let's say you play a movie real, quick and if you go to the home that is going to minimize on the side over here, which you can also make bigger. If you want, if you want to watch a movie and do stuff on your iPad, you can do that as well. You can put this anywhere, you want. You can even hide it on the corner here. Okay, so if you're doing something- and you want to quickly look at the whole screen- you can hide this or bring it back just like that.
At the same time, you can also activate uh the slide overview with all these things enabled. So you can do all these things together. This is almost like doing three things at the same time, watching a movie doing something over here and doing some calculations. Okay, it's a little too much, but it's an option when you're done tap on x, boom that closes up, and you're good to go. The next thing I want to talk about is called the uh the screen time option.
So if I go to the settings uh over here, you're going to find the screen time option over here. You tap this one. Just click continue. If you're doing this. For the first time just say this is my iPad, so this basically is going to manage the way you're using your iPad.
You can set limits on your application, so if you're playing too many games, if you're watching too many movies, you can go here and set the app limits now. First, what you do is you are tap on downtime. You enable the downtime- and you pick a time so what's right now, 9 21 a. m. So let's pick uh nine all right, so, lets uh so right now, the downtime is in fact enabled.
Then you have to pick some apps. So I can things like add a limit to the uh social networking or games. Let's just do everything okay for now, so you see exactly what I'm talking about, and then we're going to set a limit for each app. Let's do one hour all right now we're done now when I go back to the home. All the apps that are under the app limit are blacked out.
So if I try to launch one of these guys, it's going to say you have raised your limit on the news application. I can tap on ignore, limit and read it anyway, but is that the option is there to actually keep it disabled? Now, let me go to the settings over here. Uh, let's go back to the screen time, so that's downtime. Let's disable that for now and then um, that's how you create limits for individual apps and of course you can create exceptions. So if you have downtime enabled you always create exceptions such as don't disable messages, FaceTime or maps, okay, some required applications.
The biggest thing I want to have you guys do is uh tap on use screen time passcode. So if you create a passcode okay, let's just create one, that's great, because now nobody can come here and make a modification unless you put that passcode in the passcode does not have to be the same. One that you used to unlock your iPad. You can create a separate passcode for the screen time option all right. Let's move on to the next tactic.
Now the home button is going, but some people still want to have it, so there's a way to actually enable the home button. If you go to the settings and if you go to general, you go to accessibility and from here what you want to do. Are you want to go to assistive touch and enable it as soon as you do that there's a home button on the screen? Now, as it is right now, it's not going to function as a home button, it's multi-functional! So when you tap if it's going to expand! You can tap on this. That will take you home. You can tap it again.
You can tap on notifications going to pull it down. Furthermore, you tap it again. Furthermore, you can tap on Siri. It's going to bring up Siri, okay, so it's uh. It's replacing a lot of the hardware buttons.
You can even go to device and do much more, so I can do more. I can take a screenshot now. What, if you want to use this guy just as a home button? That is in fact an option. Go to the settings tap on customize, remove everything. Okay, then tap on custom and pick home now.
This is simply a home button. So let me go out here boom all right, so it doesn't expand and give you options. It's just a plain old home button. You can always edit this and pick any one of these options. You can tap on um.
Let me see screenshot. Now it's going to be a screenshot button. All right! Just keep that in mind. If you want a home button instead of swiping up all the time, you can have it and of course you can put this guy anywhere on the screen and also it kind of hides on the corner. If you don't touch it for a time, so it's not really intrusive.
It's just barely visible okay. So let me turn this off and move on to the next tactic. The next thing I'm going to talk about is locking your notes. So if I go to the notes- and let's say that I want to hide this note this- let's say this note was important- had some sensitive information. I want to lock it.
What you want to do. Are you create the note? You write something in it. You tap on this button, and you tap on lock the note when you do it for the first time it wants you to put up put a password okay. So let me just pick and put this guy here. Click! Ok! So now it says: do you want to allow notes to use face ID, so you can actually use the face ID to unlock the note or use your passcode, I'm just going to use a passcode, I'm not going to use the face ID for now, but the lock has been added right now.
It's unlocked because I'm inside it, I can tap on this. Now it's locked now. If I want to view it again, I have to tap on view note and put that password in to see that note. So that's a lock node, it's a great option. If you want to hide some stuff behind the password now, if you mess up that option, you can always manage it again.
If you go to the settings again and if you scroll down to the notes' application, you can tap on password, and you can manage it from here. You can reset the password change the password and also enable using face ID to unlock that password. So this is the area where you manage the locked note option and of course, your iPad comes with a good camera in there. I think the camera is on par with something like the iPhone 7 plus. So what I want to show you guys quickly is if you go to the camera and if you go to the video and start to record a video, there are some options you can modify here to change the options you go to the settings, and I'm talking about video recording specifically here not taking photos.
Okay. So if you go to the settings you go to camera from here is where you choose uh the resolution and the fps of your videos. So you got 720p 1080p if you do want to record at 4k at 60 frames per second, you tap on this guy. Now, when I go back into the camera, you'll see that it's going to say 4k 60 on the top over here; okay, so that means it's being recorded at 4k at 60 frames per second same with this one. If I do 4k 30, if I go back over here now, it's going to say 4k 30.
If I go back in here, I can choose all these options and, as I choose them, they're going to reflect on that video. The other thing is also the uh recording slow motion. If you tap on this, you have two options to choose from so make sure if you go into the camera, and you're doing a slow motion recording you choose the proper option and look at the option setting on the top. It says high definition 120, which is this one, the one that we chose. So you can do high definition, 240, which is slower motion alrighty, and that brings us to the last tip for your iPad Pro.
If you do want a smartphone or a tablet, make sure to subscribe to switch and also click that notifications bell icon to get instantly notified. When I upload a new video.
Source : sakitech
Phones In This Article
Related Articles


Comments are disabled
Latest Articles


