Unique Blackberry Priv Restoration - Android slider with keyboard By Hugh Jeffreys
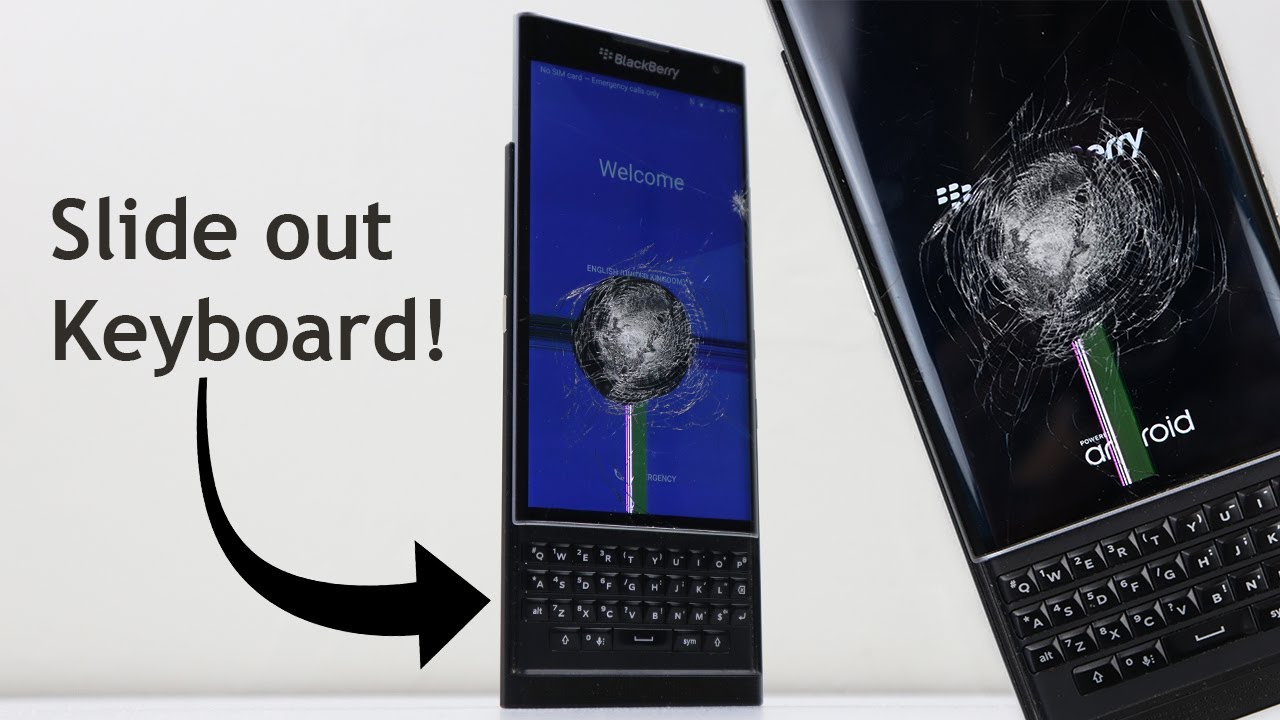
Hi guys welcome back to another huge video in this video. I'm going to be restoring this blackberry proof slider phone from 2015. , it can be said, blackberry, didn't follow the trends in the designing of this phone with its slide-out keyboard, curved high-res, OLED screen and carbon fiber back. This is one truly unique and retro feeling phone that looks like no other modern smartphone. Unfortunately, this phone has been hit with something very hard in the middle of the screen, and this has caused a deep gouge in the glass with a large portion of the screen shattered and the screen underneath it dead. The proof was blackberry's first android phone after they ditched their own bb10 software, while they also released two other phones without physical keyboards.
They have since stopped making their own phones and released a few blackberry branded devices made by other companies such as TCL as I'm receiving this phone. I've never owned a blackberry or a phone with a physical keyboard. So I'm interested to see how repairable and useful the phone is. I received this phone back in June 2020 in a phone line. I won the listing for a total of 19.45 cents. Furthermore, I later sold one of the working phones in that lot for 20 dollars, for the proof cost me negative, 15 cents.
Unfortunately, this tech lot was packaged really poorly and with no protection, so our poor blackberry got pretty scratched up along the way. While this is only cosmetic damage and I could easily live with this, I will demonstrate how you can replace the back panel as well for our new display panel. I purchased this one for 125 Australian dollars. You can find them without the sliding mechanism attached. However, this was the only one I could find in my country.
China is also selling them a bit cheaper, but I didn't want to risk the high chance of getting scammed with a dodgy low quality display. So I was happy paying a little more. I did notice this was a used panel and had a slight chip at the top of the screen. However, that doesn't really bother me, because this is a lot better than the one. That's coming off of it to open this blackberry I'll need to separate the back panel from the rest of the phone using some plastic picks.
I can work my way around the phone. Releasing the clips. The top portion of the back panel is thin and can be easily broken. I damaged it slightly near the sim slot in the removal process. Overall, though, this is much easier than taking off the back of the Samsung or even trying to do a housing swap on an iPhone once we're in.
We can remove this piece of plastic and get a proper look at the internals of the phone front and center is our 3 360 William hour battery, which, if you're wondering, is more capacity than what you'll find in the iPhone 11 Pro you'll also notice the battery states. Its non-user replaceable a bit strange, given how easy the bat comes off, getting started with our repair, I'll disconnect and remove the battery. It is held down with some light adhesive, although a pull tab is provided to make the removal a little easier. This did take about 30 to 40 seconds, to remove but didn't require any alcohol or heat to remove, like many other android phones. After removing the battery, we can see two large dents on the inside, which correspond to the huge impact to the front screen continuing on I'll need to remove the motherboard, so we can get access to the screen and get that off of the phone all screw heads throughout this phone are torques, while not as common as Philips, there's still quite a common type of screw that any good tool kit should have.
After removing the two antennas, we can get a better look at that motherboard, and you can see that micro, USB port is unfortunately soldered to the motherboard. In my case, though, it's working perfectly, so there's no need to worry about that. With the screen and keyboard connections disconnected, I can start by removing all the torn screws holding in place our motherboard. After all the screws are removed. We can carefully lift on our motherboard, but being careful not to lift too far, as we still need to disconnect the cable.
Underneath with that out of the way we can see quite a lot of thermal pastes left behind, which is quite dried out and will need replacing removing eight more torn screws. We can finally separate the display from the mid-frame with our display removed. You can see how the sliding mechanism works. The display is attached to a rail system which has a spring behind to help the display move and snap into place. I should also note this cable is replaceable, as it's only an extension cable going to the back of the screen.
This also means the display can be replaced without even opening the back of the phone. That is, if you can find a screen, that's not already attached to a frame with our screen off. It's a good time to clean the mid-frame of the phone. This includes the keyboard and parts of the phone. You won't actually see when it's reassembled, this phone, isn't water resistant or dust resistant in any way, which is quite obvious.
So dust can get in this phone quite easily I'll try my best to remove those dents as well, while I'm at it. This is also a good time to remove that crusty thermal paste, which we'll be replacing later proceeding. We can attach the new display assembly carefully routing the two cables through the mid-frame. This process is similar to an iPhone 4 or 4s. With our screens seated into position, I can reinstall the eight screws in a star-like pattern we can now see our display is attached to the phone it's time to get some new thermal paste applied to the blackberry.
These phones are notorious for running quite hot, so reapplying lots of thermal paste should help combat that heat. We can reconnect the flex cable going to the buttons of the smartphone before carefully routing the motherboard into place being careful not to get our new display cables covered in thermal paste from the processor. As you can see, I took my time with this making sure nothing got caught or was damaged in the process. I could reinstall that modular headphone jack get everything pressed down into position and reinstall all the screws into place. Next up, we need to reconnect all of our connections going into place.
Reinstall the two antennas at the lower portion of the smartphone. Before we can reinstall our battery and test out the device putting the original battery back into position, I can reconnect it to the phone by screwing it into place I'll also clean the phone with some alcohol to ensure as much dirt as removed as possible testing out our blackberry. You can see our screen is now fully visible and everything appears to be working. Just fine for an experiment. I tried to add a heat pipe to the blackberry for extra cooling.
This phone can get warm when in use so using an old galaxy, s8 housing. I removed the heat pipe using some heat and a jimmy tool. I then attached it to the blackberry using some heat-resistant tape and reapplied some thermal paste. Furthermore, I found this made no difference as the heat of the phone appears to be coming from the other side of the motherboard, and I don't believe this heat pipe gets enough surface area anyway, so I removed it and left the phone stock. The last thing I'll need to do is install a new rear case.
You can see the replacement. I have actually had a wireless charging module attached as some models of this blackberry come with wireless charging. I brought this housing to see if I could add wireless charging to the phone. Unfortunately, the little pins that are on the motherboard aren't there for the wireless charging, and I'm not sure whether the circuitry is there as well, and as I didn't want to break the phone, I decided not to try and bodge in wireless charging into this model. One rather interesting thing is: if you shine a bright light from the back of the housing, you can see it's somewhat transparent.
It's now time for the final step, reinstalling the back panel onto our blackberry PRI. This is quite easy as it just snaps into place. However, you need to be careful not to damage any of the buttons, while clipping the panel into place once it's all snapped together, we can remove the protective films from the buttons and the rear, flash I'll, also install my new sim card and SD card tray, as those were missing. It is at this point I'll also install my daily sim card last thing. I'll need to do is remove the protective film, and we're done, so this is it a restored blackberry PRI from 2015.
I've been daily driving this phone for over two months. At this point, and while it's not the latest or fastest phone, there are many features, keeping me using it running, android 6, it can still run most of the latest apps, as android has great backwards compatibility. This five-year-old blackberry still holds up very well in the display and battery department in comparison to the latest iPhone 11 Pro. This blackberry has a higher resolution display with more pixels per centimeter than what apple calls their super retina Dr OLED display for the iPhone 11 Pro. The same can be said with the battery.
This blackberry, shipped with a 364 William hour, higher battery capacity than the iPhone 11 Pro. This phone is equipped with 32 gigs of expandable storage, three gigs of ram and a snapdragon 808 processors. The phone is a little slow but manages basic tasks. Just fine, remember this: isn't a phone designed to run games or take photos? It's designed to communicate. I didn't replace the battery as it gets me between one and a half to two days on a single charge.
After pairing my galaxy watch, I received a bit less with around one to one and a half days. However, the battery still has an estimated capacity of over three thousand William hours on the phone itself. I can sign up the keyboard and enter the settings app by holding down the s key. That is something you can program with the blackberry launcher in the about section. You can see it's running, android 6.0.1 in the day of touch screen, keyboards some might wonder. What's the advantage of a physical keyboard, this PRI has many productivity features revolving around that keyboard beyond setting shortcuts to apps or tasks.
It's also touch sensitive, so can be used for scrolling or gestures. The keyboard also has basic cut copy and paste shortcuts similar to those found on a computer. You can also double tap to scroll through text. You can also swipe upwards, while typing to select predicted words and swipe to delete. The PRI also has a touch screen keyboard, although I wouldn't understand why anyone would want to use this, and this was actually the first time I've used it in two months.
The back of the phone is made out of a carbon fiber plastic material, which is drippy and doesn't feel like a wet bar of soap. Like most modern smartphones, I've also just picked up a blackberry k1, which is made by TCL. I look forward to repairing this in a future video, so stay tuned. For that, it's true to say, blackberry, doesn't follow the trends and isn't influenced by other phone makers, which is one of the reasons their modern phones are so different. This phone has made me, love the physical keyboard, and I'll continue using this phone.
For now, blackberry is set to release a new BB branded device in 2021, which I'm excited for, and on that note this has been a huge Jeffries video if you like what you saw hit that subscribe button and consider checking out the restoration playlist for more videos. Just like this one and if you're looking for any tips or what tools I used to repair devices be sure to check out my website, link for which is down in the description. That's all for this video, and I'll catch. You guys next time.
Source : Hugh Jeffreys
Phones In This Article
Related Articles


Comments are disabled
Latest Articles


