Top 10 Unknown Samsung Galaxy S20 Ultra Camera Features By Techisode TV
Now, if I zoom all the way into 100 times, zoom then hold the shutter button. I'll start recording video at the full 100 times zoom and won't be limited to the 20 times. Zoom like I, am in video mode. What's up guys Eric here from Decca, so TV, and today we're taking a look at the top 10 unknown. Camera features on the galaxy s 20 ultra first up. Did you know that if you swipe down on the shutter button, you'll start taking a burst photo, and this will take a burst photo with up to 100 pictures? Then, when you select the picture, it'll actually put a crown on the picture, it thinks was the best.
But if you see another picture, you like you can go ahead and scroll over to that tap. This icon here then tap the photo, then tap the crown icon and that will set that photo as the best shot. If you want to free up some space and delete the rest of the photos that you didn't like to go ahead and tap this icon again tap the photo again tap this download, looking icon, it'll, say: save one picture from the burst shot then tap delete any unselected pictures I'm going to tap that tap, save that will just save that one picture and get rid of the rest of the burst photos and in case you're wondering these are full resolution burst shots, so you won't be losing any detail by using this feature. There is one caveat, though, and it's that you can't take burst photos when you're in the higher megapixel range. So if I switch to the 40 megapixel range and I try to take a burst photo that does not work says I can't take burst shots in the 40 megapixel high resolution mode.
The same is true for the rear-facing camera in regular three by four regular photos. I can take burst shots, but if I switch to the 108 megapixel camera and try it again, then it says that I can't take burst shots in the 108 megapixel camera mode. If you don't want the swipe down gesture to take burst photos, you can actually change that. By going to these settings, then just tap swipe shutter button to edge to then you can change that to create GIF or If. So now, when I swipe down, if I move my hand over it and let go to the photo you'll see that it creates a GIF gift.
I do need to point out that this is a much lower resolution. You can see that it's only 480 by 640 pixels, so this is good for maybe sharing on social media a funny little gift that you created. But if you want a higher-quality gift jiff, then I recommend taking a burst photo and then using those photos in an application to actually create a GIF. If you swipe up on the shutter button, you can actually move the button wherever you'd like, which makes it a lot easier to take one-handed photos. Then, when you're done with the one-handed photos, you can just drag this back down to the bottom, and you'll.
Now only have the shutter button at the bottom and in case you're, wondering swiping up or down when in video mode does nothing if you're looking at a product in a store- and you want to see if Amazon has a better prex, so you can do a price match, while you're at the store. All you have to do is swipe over two more tap Bixby vision. Flip the product over scan the barcode then tap view product with Amazon assistant, and you'll get the price right there. Now, if you don't see this option, all you have to do is tap the three dots in the upper right corner, tap, Settings scroll to the bottom and make sure Amazon assistant is turned on. If you want really fast access to this feature, you can create a widget using bigamy routines, and if you tap the widget, it's going to automatically open up the Amazon shopping assistant, then you just have to tap to take the picture, and it'll find it right there on Amazon, if you're not familiar with big sphere routines, it's one of the most powerful features on Samsung devices and I have a video that dives really deep into how to set all these things up so definitely check that out by clicking the card, that's sliding out above or the link in the description, because there are a ton of things you can do with big sphere routines.
A new feature that hasn't been available on previous Galaxy devices is the ability to switch between the front and rear facing cameras, while you're recording a video. So if I start recording a video here, you can see that I can switch to the rear facing cameras and the video does not stop. Recording. On top of that, I can also switch between all three different cameras on the back and something else that a lot of people don't know is that you can actually swipe across these little trees here to very smoothly zoom in and out of the video now. Unfortunately, this does not work with the 8k camera.
The reason for that is that the front camera cannot record in 8k, so you can't be in between a 8k recording and up to 4k, recording back and forth, like that, it's going to be pretty difficult for the phone to kind of merge. Those two files, however, speaking of filming in 4k with the front-facing camera. If you go into your settings, you'll see that we can now record at 4k at 60 frames per second. With the front-facing camera again, older Samsung devices were limited to 30 frames per second, so it's pretty cool to get 60fps with the front-facing camera. Now the super slow-motion 960 frames per second recording on the s20 ultra now uses a much wider angle camera than previous Galaxy devices, which makes it significantly easier to use when you're inside it also now records.
For a full second, instead of just point, eight seconds which may not seem like much but when it slowed down to thirty frames per second, it becomes an 8-second difference in slow-motion video when you're taking a photo in night mode with the rear facing camera. You'll see a time here in the corner. This is how many seconds the exposure is going to run for, and it's going to change based on how stable the camera is. So if I start moving the camera right now, then you'll see that it drops to 3 seconds, but something you can do to force it's to take a longer exposure is tap the screen and drag this slider up. Now you can see that it goes all the way to 28 seconds and 28 seconds is the longest exposure you can get with the galaxy s, 20 s, 20 plus, and s 20 ultra.
If I tap again and drag down the other way, then I can also drop the number of seconds that it takes a picture for so, if I take a picture, and it comes out a little blurry, then that's when you would drop the exposure which would reduce the amount of seconds, and you'd get a less blurring picture. However, keep in mind when you do that the picture won't be as bright, so there's definitely a balancing act. That needs to be done here. The good news is that Samsung does a pretty good job of automatically figuring out what the exposure should be based on your conditions, so making these adjustments is really just for fine-tuning. The image in case you're, wondering night mode, does work with the front-facing cameras as well.
I'm going to go ahead and put something here to kind of make that darker, and you can see that it goes up to 3 and if I adjust this, it doesn't go any higher than three seconds and the reason for that is: there's no optical image, stabilization with the front-facing camera. So there's not much. They can do to get a really crisp image at longer exposures. Another quick tip is that, if you're having a hard time getting a good nighttime selfie, then you can only just go back to photo mode tap the flash icon and turn the flash on. Now it's going to make this green a bright white before it takes the picture to light your faces up.
Unfortunately, if you do this, it is going to make the background a lot darker. So if you did want the background in the photo as well, then it's a much better idea, just use the rear-facing camera and have someone else take the picture for you. Typically, when you're recording a video with the rear facing cameras, you're limited to 20 times a zoom which is actually pretty far, but if you want to zoom in even further there's a trick to do that, all you have to do is switch to photo mode. Then zoom in as far as you'd, like let's say you want to go to about 57 times. Zoom now just hold the shutter button, and you'll start recording at that full 57 times zoom, and this does also record audio now there is one caveat with this and is that you're recording at four by three resolution, but you can quickly fix that by tapping this switch them to sixteen by nine, which is a much more standard resolution for video, then zoom in as far as you'd, like, let's say, want to go all the way 200 times zoom this time now just hold the shutter button, and you'll be recording at that full 100 times.
Zoom again with audio I should also point out that this is limited to 1920 by 1080, when you're filming anything past 20 times zoom. If you go to settings, then tap the words' scene optimizer, it brings you to the scene, optimizer settings. If you turn the optimizer on, you also get the option to turn on document scan. If you turn this on then go back to your camera, it allows you to quickly scan images or documents. So, as you can see right away, it found this image here, and it gives me the option to scan it, but what's even more awesome about this is if I tilt it at a pretty severe angle, you'll see that I still get the option to scan it.
Now, if I tap, the word scan it's to take a picture of this crop it and reorient it so that it is oriented correctly. So this is a great way to quickly scan documents, receipts or images. There are two things that you can't do with this feature. While you are scanning and cropping the images, you can't actually convert it directly to PDF to do that. You'll need to have an app to convert it to PDF.
The other thing it doesn't do is convert it to text all it does is crop and reorient the image when most people want to scan a QR code. They'll pull the notification shade down twice to reveal these toggles and tap the scan, QR code, toggle, and then they'll aim it at the QR code and scan the code like that. However, what a lot of people don't realize is that, even if your screen is off and your phone is locked, you can just quickly double click- the power button and scan right away. You don't actually have to hit the QR code toggle to do scanning, then, if I want to go to the webpage I just have to log in, and it takes me right there and if I didn't have time to actually go to the web page that the QR code linked to it also gives me a notification with the link right there that I can access later. If, for some reason, you didn't get the QR code link in the notification up top, but you did get a picture of the QR code, you can quickly extract it from the picture by tapping the Bixby vision button then swiping over to the QR code option and right there to read the QR code and I can tap this, and it'll.
Take me right back to the website and if you don't see this QR code icon on the bottom, just tap the three dots in the upper right corner, tap. Settings then turn on the QR code toggle right here. If you go back into settings, you can turn on something called that shot suggestions, and if you do this, you're going to get a little bubble that pops up to tell you where the best place is to aim the camera for the best shot. So, as you can see here, I'm aiming too high, so it tells me to aim down a bit further to get a better shot. These white lines on the sides are telling me to rotate my phone.
So if I go ahead and rotate the phone eventually I'll see these yellow lines go all the way across to the side and that's something that this is what the phone thinks is. The best shot. I've used this a bunch in real world situations, taking pictures of actual people, and it does actually work pretty well. There's only been a few times when it didn't quite line things up the way I thought it should. So, if you're, someone who's generally pretty bad at taking pictures, I highly recommend turning this feature on because it'll make your pictures come out better.
If you swipe all the way over to Moore, then tap Bixby vision, then tap the three dots in the corner go to settings, go to Bixby visions for accessibility and turn this on. You get some great features for people who have either impaired vision or hearing the first one is seen describer and when you double tap the screen, it's going to audibly tell you what you're looking at so, if I go ahead and aim this out, my window tells me it's a sandy beach next to a body of water and obviously this isn't really the view outside my window. This is actually just my computer screen, but you get the point. The other really useful feature is a quick reader. So if I bring a document in front of the camera, it'll actually just start reading.
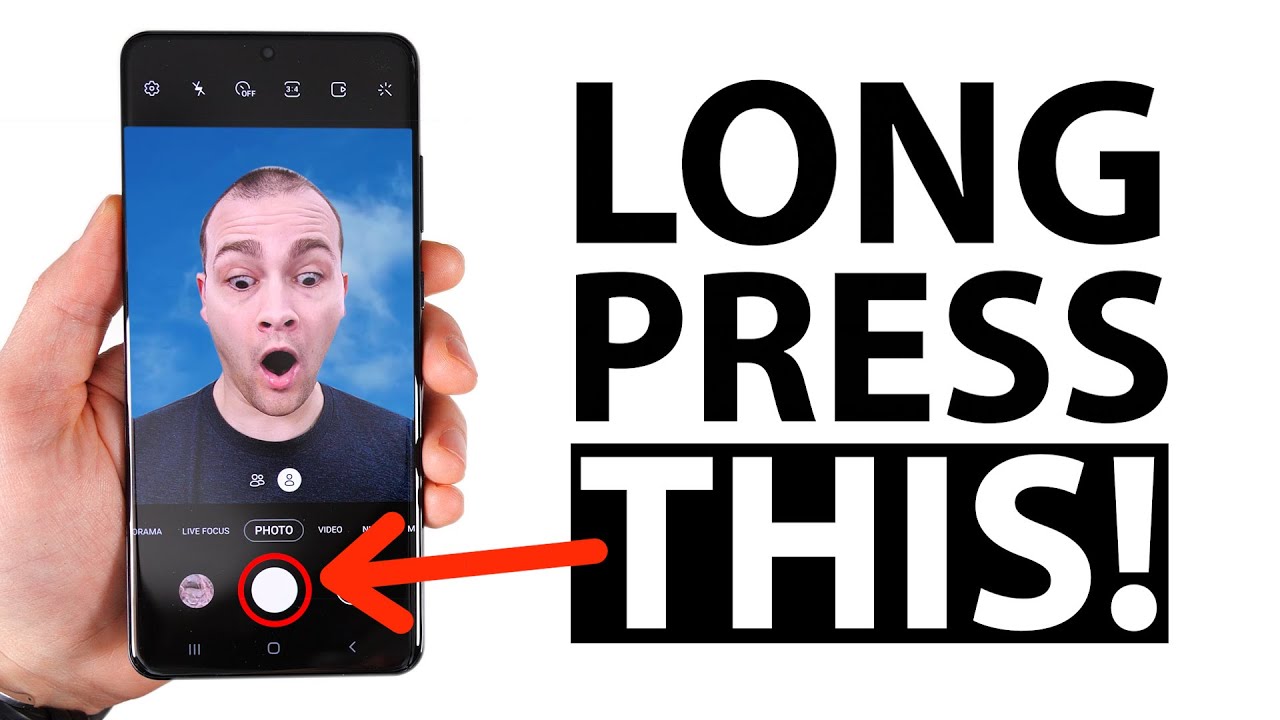
All the text on that document and the last one is a code detector. So if I aim this at this blue wireless charger will tell me that that's dark blue and if I am it up a little further dark brown. Now, honestly, it looks a bit more like a light brown to me, but it's still brown nonetheless, what's great about this. Is that once it's setup, even if someone is on their home screen, all they have to do is hold the side key and say open, Bixby vision, and it takes them right back into this mode, and they can just swipe across and choose whatever option they need. If you swipe all the way over to the right to the more section and long press on one of the camera modes, it takes you into an editing mode, and then you can long press again and to drag that anywhere down in the bottom.
You would like this makes it a lot faster to access your favorite camera modes and, if there's a mode that you never use like, let's say, for example, you never use single, take let's go ahead and long press that dragged it out and now that's one less mode I have to scroll through when I'm using my camera, the only modes you can't move are your photo and video modes. Speaking of modes. Hyperlapse gets a new feature. If you go ahead and tap that then switch to the rear-facing camera you'll get this new moon icon. If you tap that you'll turn on night hyperlapse mode, which takes long exposure photos instead of just regular photos, so we can get a hyperlapse of a nighttime scene.
Another fun fact is that if you're not in the night hyperlapse mode- and you tap this icon in the upper right corner, then you can actually select what speed you want. The video to playback at what's cooler than that, though, is that if you select a different speed, it'll tell you what that speed is useful for so, if you're not sure what speed to use for something just tap through the different speeds, until you find what you're looking for and if none of the categories really fit. What you're looking for then just go ahead and leave it in auto mode. If you're using the front-facing camera, and you go to settings, then scroll all the way to the bottom you'll see that there is an option here called selfie tone. If you tap this, you can change the tone of the selfie, so you can go with a cooler tone or a warmer tone.
So if you feel like your skin tone, isn't quite accurate when you're taking selfies, you can use this to try to fine tune the selfies for your face. Let me know how many of these features were new to you in the comments below and if you want to dive, even deeper into some incredible galaxy s.20 ultra features, Devlin click. The notification bell next to the subscribe button, because, if you don't, you won't be notified of any new uploads, even if you're already subscribed, that's it for this tea sold, god bless guys, and I'll catch you in the next one.
Source : Techisode TV
Phones In This Article
Related Articles


![Poco F2 Pro 5G by Xiaomi [$529] - It's Missing Flagship Features](https://img.youtube.com/vi/45vH1TTM0Xg/maxresdefault.jpg )
Comments are disabled
Latest Articles


