The New 2019/2020 Motorola Razr Disassembly Teardown Repair Video XT20001 By PBKreviews
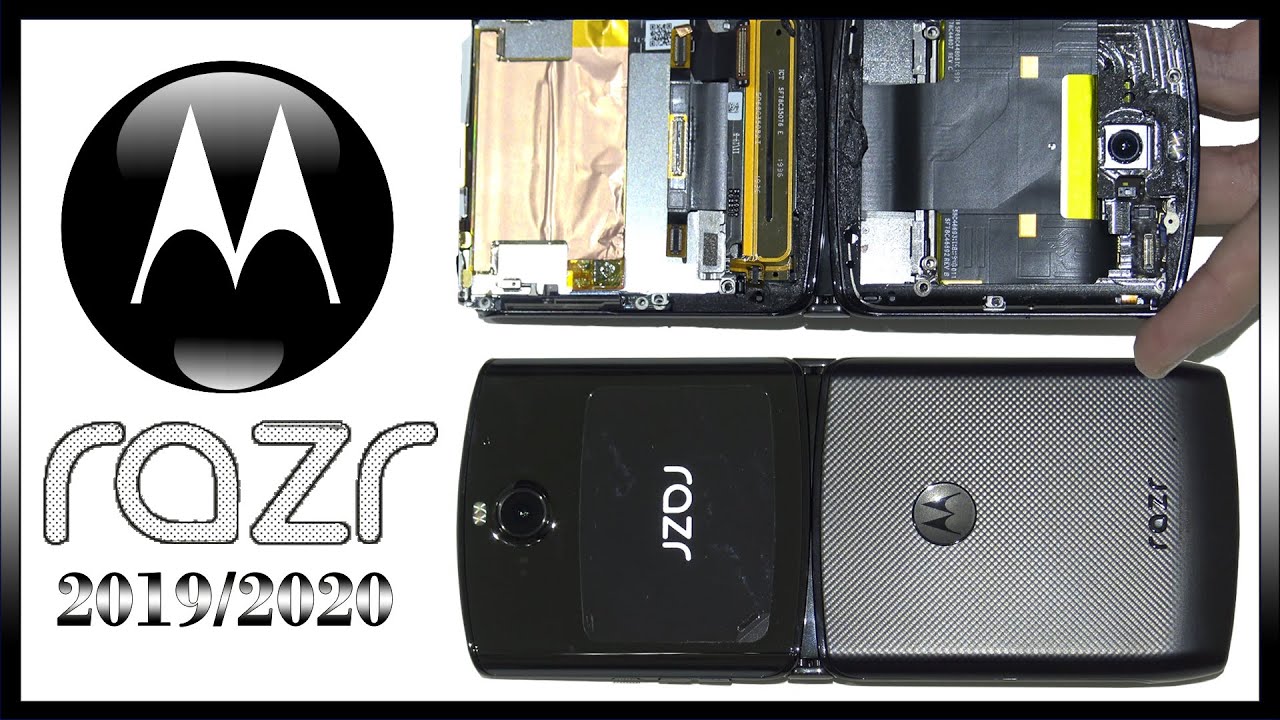
Yo, what's up everyone today, we've got the new Motorola, 2019 or 2020 razor, whichever you want to go by, and we're going to be taking it apart. Alright, first, you want to heat the back-up, so you can loosen up the adhesive underneath the backplate, and then you're going to use a plastic pry tool, so you don't damage the frame, and you're going to have to get in between this plastic back and the frame of the phone I just work your way around, so you can loosen up those ease if I'm pry off the back I'm just going to close the flip to make it a little easier to work with you all right, so just slide it down gently but be careful. You saw the cable for the fingerprint reader over here attached. You have to somehow slide it out with a small tool out of its connector. Alright, next you have 44 screws. You need to remove on the front locate it here go and remove those screws you now once the screws are removed.
They're going to slide. This bottom plastic cover off this Dan 10 assembly down here you see the lines running through this plastic right here and stuff, just bigger for this cable still attached, underneath it to the board, so don't pull it all the way off and after this connected from the board. So here's a closer look that antenna assembly and your loudspeaker- you have down here, there's a black plastic bracket over here. It's covering the connector for the battery and this antenna right here. Let's go ahead and remove this bracket I'll go ahead and disconnect the battery cable pop it up.
Now we're going to pry this battery off use a plastic pry tool or a preferable membership part, so I could get all the way underneath it about damaging the battery. You hereare a closer look at the battery. Now nice we're gonna, disconnect this cable right here, just pump it up, and we're also been to this night, the cable for the screen. Now you're left with 84 screws. On this side you have to remove, go ahead and remove those screws, and I'm going to flip the phone over.
You have one ? you four screw over here on the vibrator motor. You have to remove now go ahead and disconnect the cable underneath the vibrator motor- and you also have your cable over here for your microphone microphones located right. There disconnect this cable, and then you're gonna, lift your main board slide out. Just a little be careful. His cables underneath is still you're.
Going to flip it over those cables right here. Attached, you're going to have to disconnect those you all right. So here's your main board. You have a charger port here, a liquid damage indicator right there, here's the backside! So here's the back of the board with a shield removed, there are two thermal pads over here and there's a copper tape with a what looks like a graphite heat transfer tape over it. Here's a closer look at that all right, so you got three more t4 screws on the lip of the phone.
There's one here, one in the middle and one on this corner quarter more those you all right! Next go ahead and heat the top of the phone or the flip-top, where that opens up, and they're going to use a plastic pry tool to work your way around the edges, but be careful, there's a cable over here underneath that you don't want to damage so try not to go in too deep, but I already took this apart once so, I'm letting you guys know it's pretty difficult. Taking the adhesive off over here, you're going to have to use a lot of heat throughout the process as you're taking it off and prying it off you're just going to work your way around. You've got some cables over here. You going to have to disconnect. So this right here is going to be your outside display exclude basically on to the aisle type plastic.
So on the top flip you have 95 screws. You need to remove, go ahead and remove this once you got those screws removed. The screen is going to separate from the frame on the top, be careful. There's a cable still attached over here, you're going to disconnect all right. Nice going to disconnect this cable right here, and they got 24 screws 1 here and a 1 here you have to remove, go to remove those.
This was a removed and lift just some bay, but be careful. The batteries still attached underneath it right there. You can have to disconnect that at this point you can remove your camera assembly. There's a closer look at that. You also have a liquid damage indicator right.
There use your front-facing camera now we're gonna gently, peel, less cable, just attached to the battery with some adhesive all right. So next you're going to pry off this metal piece right here. We are to remove the screws on that earlier. So there are two magnets on this side, which are pretty strong, holding it down and somebody civil in each corner. So just pry it off once you remove that you're going to want to gently pry the screen, cable off the back metal plate, make sure you don't tear the cable now you're gonna gently just slide the screen towards the bottom of the phone and slide the whole assembly out.
So here's the basically metal frame are your hands over here and here's your screen with the additional battery over here. On top your piece right there. So then it is so paper thin. Well, there you go guys, that's the new razor phone disassembled, and now it's time to put it back together. Now one thing I should mention before you screw down the main board.
These four screws make sure you just latch over here for that connect there, for the fingerprint reader is in the open position which is facing up I'll push down so make sure it's up. So, whenever you're putting the phone back together at the end, when you slide, the fingerprint reader portion in you'll be able to push the cable in and then lock it go to power on the phone, and you're done thanks again for watching guys, I'll see you guys in the next video.
Source : PBKreviews
Phones In This Article

Related Articles


![Replying to SMS Messages on Huawei Watch GT2 Pro! [Mood Messenger] ⌚](https://img.youtube.com/vi/W7tYWdf1hD4/maxresdefault.jpg )

Comments are disabled
Latest Articles


