Smartphone Portrait Technique using Xiaomi Mi note 10 Lite By AUXOUT
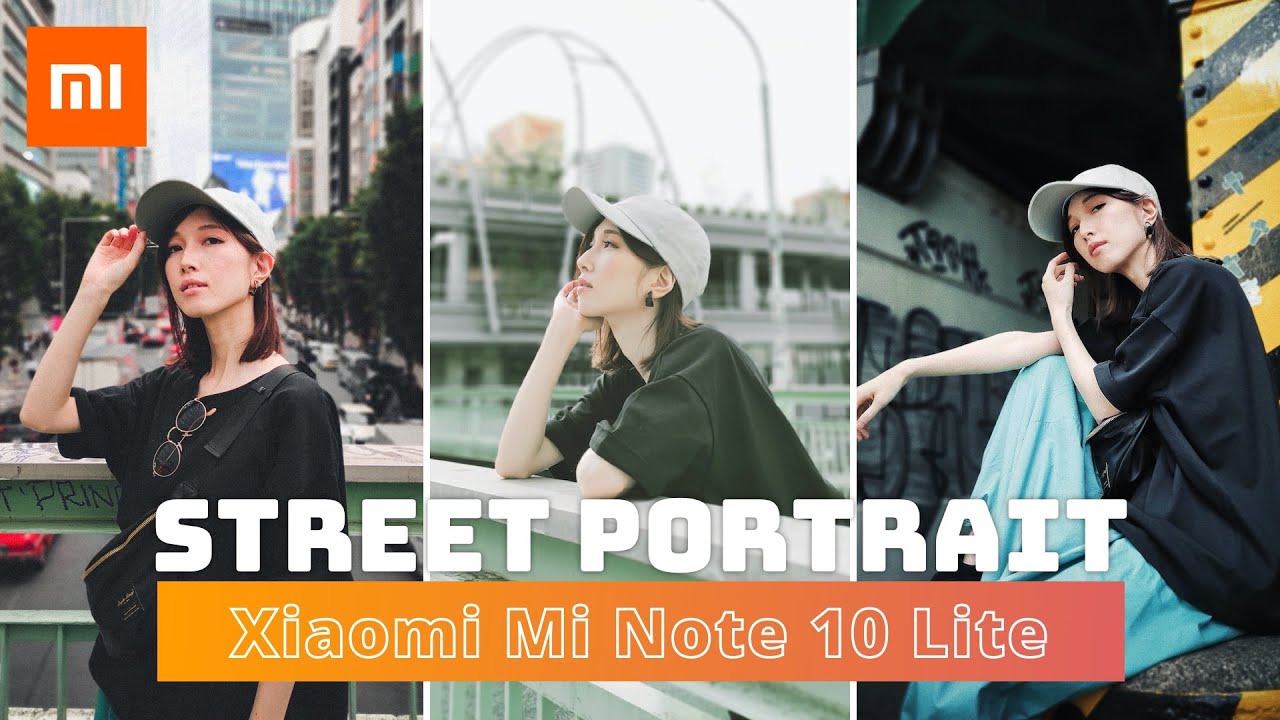
Hi guys, it's AUXOUT. Today, I'm going to talk about taking and editing photos using only smartphones, this smartphone here is "Mi Note 10 Lite" recently released from Xiaomi, here are my sample photos taken by this smartphone. So, I will show you some shooting tips and editing techniques to get photos like this. Let's begin. Before getting started, here is the thing. After I have finished editing the photos, I uploaded them on my Instagram account.
What I usually post on IG are the photos shot with my DSLRs. But, what whould happen if I post them without stating that they're shot with the smartphone? I was wondering whether my followers can notice them or not. The average Likes I get is around 3,000. And, this photo also got over 3,000 likes. Then on the next day, I spoiled on my IG story that this is actually taken with smartphone.
Many of you seems shocked by the truth. Almost 80% of the people couldn't notice and they were really surprised. So, what I really wanted to say is that many people are still underestimating the cameras on the smartphones. Photos cannot be judged by which camera is used to shoot, there is always something better. I'm good with something that has at least the minimum requirements.
Then, what's the minimum requirements? If you look back your photos only on your smartphone, or not going to enlarge your data to print out your photos, only thing to do is to upload on your SNS accounts, then, I'm sure it's enough with today's smartphones including this Mi Note 10 Lite from Xiaomi. Now, let me tell you a little bit about Mi Note 10 Lite from Xiaomi. On the rear, there are 4 cameras with maximum of 64MP. For video shooting, 30fps/4K or 60fps/FullHD of framerates can be recorded. And, this Vlog-mode is super fun, you can easily create a vlog of about 10 seconds with BGM.
That was really fun. Other features are including 6.47inch OLED display, and the very large built-in battery. And, the price on the official amazon store is USD315.30! (as of July 7th, 2020) It blows my mind, because the smarphones these days easily costs over $1,000. But this phone, with this high performance, it's definitely cost effective. Also, this is SIM-unlocked, so you can combine this smartphone with a low-cost SIM, to save your money but you can still get a high performance smartphone.
Now, let's move on to shooting techniques. First of all, a composition. A good composition brings various good effects to your photos. Especially on street photoshoots, everything around the model comes in to a frame. So, you have to make the main subject of your photo as clear as possible.
The photo with a good composition has to be well-balanced and organized so that the model can stand out even in the crowded background, for the viewers to be able to find the subject of your photo at a glance. In the street photoshoots, what we do at first is to find a good location since we don't shoot close to the model, but zoom out and blend her with the background. "How about this foodbridge? Let's see what's up there. " Now, to find a good location means finding a place you can easily find a good composition. One of the easiest patterns is to find a straight road surrounded by buildings or trees, you can see the depth in a composition, and can be found almost anywhere.
In this case, we decided to shoot on this footbridge because, it's easier to explain with this kind of highway, your eyes will be drawn to this point at the center. This is because of the leading lines made by the depth guide your eyes to this particular spot, this is one of characteristics of our eyes. Same for this picture, the trees and the buildings make leading lines toward the model, drawing the viewers' eyes toward her even in the middle of a crowded city. The leading lines can be found anywhere around you. They can be made by not only the depth, but also the colors, shadows of the buildings, or even by the patterns on walls, almost anything can be a leading line.
But, if you can't find any line or if lines are too weak, try using the wide-angle lens and shoot from lower angle looking up toward the model because the wide-angle lens gives you more perspective. I hope you guys can try this sometime. The next composition is this. This photo can be divided into 3 parts, the handrail in front, the buildings behind her, and the sky. And, each part is equally divided in the frame.
By organizing the objects in your photo, viewers can see it well-balanced at a glance, and there also are leading lines. "When using this kind of handrail here, well, it's okay to have handrails on both sides, but shooting from here, the handrail starts from front of her to the back of her, and, there also are the buildings at the back, they can also be used as the leading lines. " Now, this "Mi Note 10 Lite" has several shooting modes. In addition to normal and 64M shooting mode, there are Portrait, Night-scene, Panoramic, and also what's called Pro mode. Pro mode allows you to manually adjust your shutter speed, ISO, and others, but I used Portrait mode for this photoshoot.
Portrait mode can create artificial bokeh on the background as if taken with DSLR. I think this feature is already one of the basics on recent smartphones, but since this is to create the artificial bokeh, sometimes they add too much where shouldn't be. Or, sometimes the borders are not clear, the result totally depends on the cameras. Talking about Mi Note 10 Lite, the results looked really good. I've already told you but again, you can get this at almost $300! When you adjust focusing, you need to tap the screen.
When tapping the screen, you can also adjust exposure by sliding up and down. Well, it really depends on your situation, but you can shoot either over or under exposed, it sometimes brings your photo a dramatic atmosphere. For example, the day we shot this was very dull and cloudy, then I decided to shoot with high key, hoping to create more atmosphere. I set a bit over exposed that the clouds can barely seen, on purpose. Because the weather of that day wasn't good, here is a sample photo from another day.
If you find the backlight, you can adjust way under exposed like this, leaving the only silhouette makes the color of gradient sky more emphasized. This is really fun to try things out with the situation you get. All the sample photos for today are edited only with the apps in Mi Note 10 Lite. The application is called Lightroom released from Adobe. This is a great editing app used by many photographers.
But, you have to become a paid member to use this. If you don't want to, there's still a way. This particular photo is taken using only the filter installed in Mi Note 10 Lite. When shooting in Portrait mode, tap the icon on lower right side. You can choose from 12 different filters only for the portrait mode, with the real-time preview while shooting.
It's good for a mini photoshoot. Or, if you are not good at adjusting colors, I recommend this because it's very easy and the result is great. There still are more features to tell you but I couldn't finish all up yesterday. So, it's the day after. Okay, the second half will be about Lightroom.
I'm going to show you my editing flow on Lightroom app with Mi Note 10 Lite. However, the video will last 10-15min from here to show you the whole steps, so I'm going to pick some important points and explain them to you. The first thing to do is to correct the photo. This doesn't mean color correction, but correcting angles, or adjusting the composition by cropping the photo like this, that's the first thing to do. Then, as you may see, the handrail is a bit angled.
To fix it, here is what you need to do. Turn "Constrain Crop" on, and this time, let's use the easiest "Full" Upright. Well, just a little bit but getting close to horizontal. You can continue tweaking, or if "Full" doesn't work well, you can try "Auto" and see how it works. Maybe Auto works better for this photo.
Okay, so this is how to correct your photo. Then, the next step is Color Correction. This is to adjust the basic color to make it consistent from shot to shot, sometimes it's too dark, or white balance wasn't good, those kind of things. So, even if you already have your goal color, first thing you need to do is to make your photo as flat as possible. After that, you can add your own color as you like.
Once you get used to this, you may skip some of these steps. But if you are not, I really recommend you to start with adjusting them at first. Then, the next step is on the color tab, Temperature, Tint, and Saturation. Let's try adjusting them now. Recent cameras are actually smart enough to automatically adjust the white balance when shooting.
So, if you already have the image of your result, try to roughly adjust toward the goal whether you want to make it cold or warm, just like that, using Temperature and Tint. And, you don't really need to adjust Saturation at this point. Because we will move on to Color Grading step after this, you may leave or just tweak a little bit for now. Now, let's move on to Color Grading. Tap "MIX" on top, From here, you can pick a color you want to change and adjust it individually.
Let's start. Okay, I'm done. This time, I made it something like this. Since some of the leading lines are made by these trees on both sides, I set them as the base of the colors. So, the green color is a bit reduced, to create the depth of colors.
For the skin tone, higher saturation by a bit, in contrast, I reduced the yellow. For the red, the color of her lips and others, I wanted to make her complexion look good. So, I gained a little bit. And, not many blue things on this photo, but I reduced the saturation a little bit. So, this is what I've done so far.
But this is not the end of the color grading. What I usually do as wrapping up is these curves. Let's move back to Light tab and adjust the curves. Now, let me adjust the curves. Okay, I'm done.
This is how it ended up. What you can do with this curve is, on the far left end of the line corresponds to the shadow area, by lifting up the shadow a little bit, I'm going to crush the black area on purpose. This crushes of shadow or highlight often happened on old film cameras, but I'm trying to make it look something close to that. Okay, here is before & after. How did you like it? I am quite surprised that I could actually finish the whole steps with only this smartphone.
This is all set to be posted on Instagram. How did you like it so far? Today, I showed you the steps of portrait shooting and photo editing using only this Mi Note 10 Lite, with some sample pictures by me. Don't you want to upload your photos right after you shot them? Especially when you're on a trip? Well, I don't say it's bad to edit your photos at home after you came back from the trip. But for the little snapshots, it's good to share with your friends soon after. I can say that the smartphone is way better than DSLR in terms of these points.
Well, I think I've already said this twice, but you can buy this at almost $300. I'm sure we all want to save our money as much as possible, so, if you're looking for a cost-effective but high-quality smartphone, this is my recommend. Okay, that's it for today's video. Thank you for watching. I'll see you on the next video.
Source : AUXOUT
Phones In This Article

Related Articles


Comments are disabled
Latest Articles


