SAMSUNG GALAXY S21 (ULTRA) PRO MODE: How, Why, & When To Use It By Brent Hall
Wow, that's cool. I love finding new compositions. What's up guys, welcome to a new composition and stupid windy spring New Mexico day. This is like the 39th intro that I've done today, so we're gonna hope for the camera not being blown over and me not being blown off this cliff. But we are here for what are we here for pro mode? So if you guys are new to the channel, you probably uh bug you're, probably new, to Samsung or whatever the reason um you're here to learn about pro mode. So today I'm going to walk you through all the features of the pro mode and how and why and when I use it and maybe that'll help, you figure out how and why and when you want to use it, and we're going to do all of that in this stupid, bright, beautiful, New Mexico desert and try not to get blown off of this rock.
So maybe we'll find a better spot like out of this wind, but I just really wanted to showcase this because oh yeah, I don't take where I live, for granted. I'll. Tell you that, okay! So, let's get this set up, let me get my tripod out and some time-lapse is going with some other cameras because uh that's what I do all right, so a little lower. We've got that thing that big rock blocking some wind, hopefully that'll, help I'm squinting a lot now, because it's New Mexico and that's that's what you do in New Mexico. Are you squint? So what was I saying? Oh, yeah right pro mode, so why uh would we want to use pro mode? Well, technically, you can use pro mode anytime.
You want. I mean its photography, it's a great way to learn the basics of photography, because it has all the basic controls which we're going to go over. Typically, I use pro mode when I do phone stuff at times when I require a tripod. So this is just a people always asking me videos about tripods and stuff, but this is the one I'm using recently lately. It's the photo backpacker, it's a great little travel tripod for phones and uh little tiny cameras, and it can hold even big cameras if you want anyways.
That's not the point uh I use pro mode when I have need for a tripod, so what I have need for a tripod is usually long exposures stuff like this, so all of these shots were with taken with pro mode and there's a lot of different techniques for doing long exposures. I have many videos on that as well, but yeah. That's when I want to do uh pro mode. That's me personally, like I find the regular auto mode in the Samsung phones is perfect enough for me for most things. So the other reason that I use pro mode or that I would want to use pro mode, or you might want to use pro mode is if you want raw images.
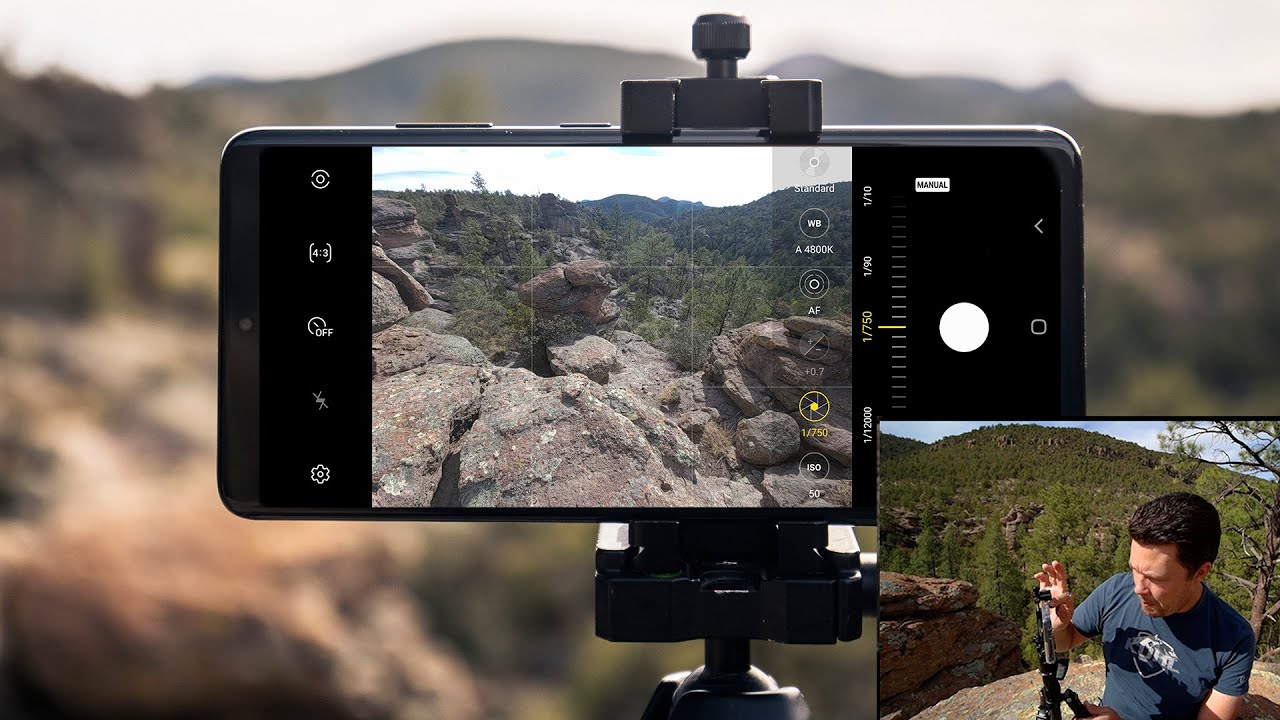
So, basically, if you want to take control and have complete raw images and not have the JPEGs so that you can have more editing power, then you're going to need to be in pro mode for that, and I'm going to show you how to get there in just a second so looks like we're almost set up, I'm trying to find a spot that will show you guys at least something decent to look at so first, I need to get the screen recording going all right. So let's get into our phone here and open up the camera. So first all you can change this right here. If you just go into uh scroll all the way over and click more, then you can arrange this. However, you want.
This is how I have mine set up, and I just kind of lied to you there, because this isn't my phone, that's my wife's phone. This is how she has her set up. So first thing we need to do is come in here to camera settings, and we're going to go down to format and advanced options. This is what we're going to make. This is what we're going to make sure is turned on where it says raw copies, we're going to click that and make sure it's turned on.
So there we have now we have raw copies being saved along with JPEGs. You can't have just raw copies on the phone there's no way it will always save a JPEG. If you have used to be with the SD cards, I think this can still have a SD card. Can it? I don't remember I don't remember if this has a SD card or not it used to be that it would put the raw son the phone internal storage and then the JPEGs, wherever you had it on the SD card, so we're in promo now, and you'll notice that it looks a little wonky and that's because uh in pro mode, you have to change all the settings. It's not going to do it for you.
That's the whole point here. So, let's start off with, let me just get a proper exposure here or something that we can see. Okay, all right! So let's talk about the first setting. This is one of the most important for photography and that's ISO. I have a whole video about the basics of what ISO is.
If you don't know what it is, and you want to learn, it's basically your sensor sensitivity to light, but you can see here. Basically what you want to know is the lower the ISO, the better, the higher the ISO, the more light you're gonna, let in so. If we bring this up. You're going to see it's blowing out it's turning white because we're increasing the sensitivity to light. So it goes up to 3200.
We're going to get more into that when we do Castro stuff, of which I have a bunch of mobile Castro videos, but suffice it to say typically, you want to try to keep it low as possible because you have something called noise. Digital noise looks really yucky when you increase it, you have that chance of bringing in a lot more noise and on the phones. It's a lot more noticeable because they have a pretty tiny little sensor comparatively speaking. Okay. So we want to drop that down we're going to leave that at 50 now.
So the next thing we have control of here is our shutter speed and that's pretty self-explanatory. Again, I have videos on all of this stuff. ISO shutter speed aperture. That kind of thing but shutter speed, is how long the shutter stays open. So that goes in this phone all the way from 1 12 000 of a second, which is superfast.
All the way up to 30 seconds, which is gonna, come in handy when we're doing long exposure, trail, light trails, night, stuff, star stuff, so and then everything in between so another thing, you'll notice here, is that we can't really in pro mode in this New Mexico, stupid bright, sunlight middle of the day. We can't really get a solid picture and what I mean by that is, we can't get everything exposed properly. So if I come in here- and I try to expose to get this rock shady bits exposed to where we can see some detail in the shade there- that everything else look at the sky, it's all blown out and then, if I try to go for the sky and bring that down enough to where we get detail in the sky, then the rocks are all blown out. So that's what we call a high dynamic range scene, so most cameras can't capture that full range. That's another good reason for pro mode.
Before the advent of the HDR technology, that's built into the phones, we would have two exposure brackets. So we would have to take a shot like this and then up the exposure. A little take another shot up the exposure a little take another shot blend those together in post, and then we would get a very high dynamic range image after a lot of editing. But if we see here if we can go back to uh the regular mode, so we can go back to the regular photo mode if I just take a shot right now, it looks like it's blown out a little, but when I click on the image, it's done a lot in camera to drop those highlights and boost those shadows, and it does a lot of software wizardry to make it look as good as it can and that's really impressive. So that's kind of why I say that for normal HDR stuff and for normal photos, I'm just going to use the auto mode, because it's just doing such a good job, and that doesn't mean that you will eliminate.
You know your composition, and you should take in consideration your subjects and your rule of you know: composition, rules, all that kind of stuff, but that's artistic and that's totally separate. So let's just get back into pro mode, so that's shutter, speed, shutter, speed in pro mode is also perfect for action. Shots. A lot of people ask me: how do I get good action shots on my phone because when I take them, they end up blurry, or I miss the shot or there's a delay or whatever? Well, that's because your shutter speed is not high enough. It's not fast enough to either freeze the motion or whatever, so you can go, so you can go into pro mode, and you can go into shutter speed and if you're taking a picture of skateboarding or your friends, mountain biking or your kids running around or your cat doing, backflips or whatever it is, you can go in here and increase your shutter speed to something superfast and then get your exposure right.
If you have to increase your ISO than whatever, but the point is you can control your shutter speed. So you'll know that point at which you're freezing whatever motion is in your image. Of course, there are other modes that your phone has like the burst shot and all that stuff that can help do action stuff. This is just one more option: that's there for you future Brent here, guys so um the phone messed up when I was out there recording it's the next day, I'm editing this whole video, and I realized that, or I noticed that the screen capture just stopped recording for some reason, uh twice, and it cut out the last two chunks of what we're going to go over. So I'm going to do them in here and set it up and do this again, and hopefully we will get this right and finish this video up, because I know it's getting long.
So let me get this set up all right. So, let's get in here and sorry about the crappy background. We no longer have cool New Mexico background. Now we have random camera crap in a studio. So let's go into pro mode and I believe where I left off was right above shutter speed.
Let's take a look at this guy right here, which is the exposure compensation, so you'll see that if we slide it up or down, we get that little number, the plus one. So that's telling you that it is over exposed by what it thinks is properly exposed by one stop of light. You can go all the way up to plus two, so that'll help brighten it up and then all the way down to minus two so under exposed by two stops of light. So this thing in pro mode, you'll notice like if I go back to the shutter- and I start changing this you'll- see it's grayed out right there. That's because I'm changing the shutter speed, but you'll see it's a little red plus two and that's just an indication that this is overexposed by what it thinks is, should be exposed properly.
So that can help you dial in your exposure if you're kind of iffy on what the proper exposure should be. So like this thinks that, if I want to get it to zero, then I should slide it down to right there. So 20th of a second there's a little of light variation flickering in here. So now it says plus 0.3, which is a third of a stop uh. If I bring that down again to get it to zero.
So 1 20th of a second is kind of what it feels like is the overall exposure. I don't really use it that much in pro mode other than a really quick guide. If the scene is like consistent in lighting or whatever like outdoors or something, but it's there to help you so now, let's take a look at the autofocus. So by default it's in auto, and you'll see right here in the top right corner you'll see the auto is a lit up in yellow it's highlighted in yellow. That means it's in autofocus, so I can tap wherever I want, and it will focus there, so I can focus back there on that back lens or up here on this front lens.
Okay. So if we go back into that- and if I start shifting this manually, then it will go straight to manual focusing so what you'll notice now is that we have a little flower down here. The flower stands for macro. It stands for super close focus, and then we have a mountain which stands for infinity, which is everything focused way in the background. We don't have anything infinity here, because I have a wall right there, but what you'll notice is, as I slide you'll start to see this green stuff.
The green stuff is, what's called, focus peaking, and it's a really great tool to help you everything that's highlighted in green is in focus. So I know that if I'm right here, I've got the front of those cameras in focus, and you'll notice, a little of green even on the back bigger white lens there. So some of that stuff is in focus the more I shift back now we're seeing the camera body of the r5 is in focus and even the 800 and the background is in focus, and now we're seeing little green flecks on the wall, indicating that that part of the wall is in focus. So that's how you dial in your focusing, if you don't want to leave it in auto and that's the focus peaking that's going to really help you nail it if you're doing stuff like Castro photography, where you want to make sure the stars are in focus and if you're doing stuff, that's really close up. Like macro stuff- and you want to make sure a certain part of that is in focus, so if I stick my hand right here, you'll see when it's showing the edges of my hand in focus so right there.
You can see my ring, there's a little glow on my ring and that's indicating that's in focus and everything else is out of focus. So that's the focusing. The next thing is. We have white balance. So let's talk about white balance.
White balancing is how we manage the color temperature of the light source, so every light source has color temperature. I have a much more in-depth video on white balance. If you want to check that out and learn about it, but suffice it to say white balance is controlling the temperature, and it's adjusting the temperature of the light source. So if we're in a really dark room or for like in a restaurant or something or your house where it has a lot of incandescent bulbs like regular light bulbs and everything looks kind of orange, just when you go in there, then you can adjust this to a higher white balance. To balance that out and if we come into a light that has more like LED lights and more daylight, and it's its uh cooler, so in temperature, then we can slide that down to match it and so you'll see here the lens.
In the background, is its a white lens? If we want that lens to actually look white, then we need to match that temperature, so maybe somewhere right in here, because I'm using LED lights. So you can also click on the auto, and then it will try to auto white balance. That, for you and it's saying that auto white balance is 48, 4900 kelvin, it's fluctuating a little and then, if we try to drag that and just dial it in then we'll say: okay 4 800 there. It is so that's! What's making my whites look white and that's what's going to help my skin tones? Not look so uh weird. So if I were to bump this up, you'll see my skin tone starting to look weird along with all the other colors, but skin tones are really important in humans, because if we don't have normal looking skin tone, then we look wonky.
So that's white balance. The next thing we have is the standard. It says standard, it's the last thing up there. So this is the color profiles, so you can change all of these things. It's got contrast highlights shadows, saturation and tint, so you can change all of this stuff, and you can then use that as basically a color profile, if you didn't want to edit so much or if you're going after a certain look.
I don't like this personally, because you can't save the templates and as like a preset or something, and because it does a lot of weird things in the phone. I just don't like it. Furthermore, I prefer to. If I'm going to use pro mode, then I'm going to do all my editing in whatever snap seed or Lightroom mobile or photoshop or whatever it is. I'm going to do all my editing there.
So I don't mess with that. I leave it as standard all right. So the next thing we have over here on the left above the settings is we have the flash and that will turn the flash on or off. So you can just control that the same way you would in any other mode. Then we have this little off guy with a watch looking thing, so that's the timer.
You can set it to a 2, 5 or 10-second timers, and basically that will be uh. It'll wait two seconds, take the shot, wait five seconds take a shot whatever, whatever you set it to and that's traditionally that was a good way to help to keep for long exposures. You don't want any camera shake so like if you touch the button, and it could shake the phone a little, and you didn't want that. But these days you can just go in and turn the voice control on, and then I have it set up to where, when I say, capture it'll take a shot. So that way, it's just completely hands-free, and it's a lot easier than having to remember to set the timer on and off, but it's there if you still want to do the traditional way.
So next, let's go into the ratios, so the first ratio is 4x3 and that's the standard size, and that is the. This is really important to understand about the ratios, because you can shoot in 16x9, but what you'll notice there is it just cropped in, and I could shoot one to one, but you'll notice is that it cropped again, and then I can shoot full, but you'll notice that it's seriously cropped in. So I can go back out to 4x3. That's because the sensor size on the phone is a 4x3, that's its native square. I mean rectangular resolution so anything other than that.
It's actually going to crop into the image to make that there's no way to make it actually wider with the full. It's not going to stretch that out. Furthermore, it's actually going to crop it in until it gets to that 18 by 9 resolution or whatever the full screen is of this. So I keep it in 4x3 for that reason, because I want the most pixels the highest resolution, that kind of stuff, so the last thing is metering mode. So we can go up here, and we can see we have center weighted, we have matrix, and we have spot metering.
So center weighted is the most common, and that is basically your sensor is going to average the light that's coming in the center area of the screen, and it's going to give you an exposure reading based off of that, and then you have matrix metering, which is going to take an exposure reading an average of the exposure reading for the rest of for the full screen, and then you have spot metering which is going to take meter off of the spot that you want it to so spot metering is perfect for backlight stuff. If you have like, I have a front light right now, because I have this giant light coming towards me. So we can see that here and that light is really bright. So if I were to turn around like this and have shot me this way, then spot metering is going to help that, because the light is behind me, and it's going to not take that into consideration when you're, exposing so having uh the ability to like. If the light is behind your subject and your subject is going to be all dark, then spot metering can help you.
You can also come in here and do the exposure compensation, like I showed you before, and just up the entire exposure compensation. That will mean that things behind your subject and around your subject will be over exposed. They will be very bright but depending on what your subject is, that might not matter, so that is the metering. I just typically leave it on uh center weighted, and then I don't mess with it. I just if I need to overexpose I'll overexpose, okay and then the last thing that is uh kind of new feature for from the s21 uh, and I think they just did it to my ultra too.
Let me check real quick, so my s20, so I still have my s20 uh yeah. They did so they upgraded. They updated the s20 pro mode as well to include access to the wide angle. So now, you'll see that I have the ultra-wide, and you'll see that the settings are different because it's a different camera, it's a different sensor, so we have to go in there and change them again, but now you'll notice that it's ultra-wide. So now you can see all the rest of my crappy stuff that I didn't want you to see and that's there, it's really nice that they have included the ultra-wide.
However, they still if you'll notice, there is no access to the telephoto lens, and that is a real shame so to get around that I'm still having to use. If you want the telephoto links and don't want to crop into your image because you can zoom in still see I can zoom in all I want, but all that's doing is cropping out on the image. If you don't want to do that, then in pro mode, then the only option you have is to get a telephoto lens and attach it to your phone, and I use the moment lenses for that and, like I have for my s21 case, uh, the s21, sorry so many numbers, the s20 case. I have the s20 ultra um the moment lens, and it just clips in right here and that's very nice. I don't I don't know they're, probably in my car or something, but the s21 case is not out yet, but when it does come out, I've pre-ordered it.
Furthermore, I will have it I'll, be doing videos with it. You know that kind of stuff, but the telephoto will clip in to the lens case and that's really easy. You can also get adapters and stuff, but they don't work as well as just having the case natively. So, unfortunately, no access to telephoto lenses yet, but we do have the ultra-wide now and that is going to be very helpful when we're doing Castro stuff and if you're doing architecture or big city stuff or just whatever, you would want to use an ultrawide for uh. It's very great that we have access to that now, all right! That's it! Let's go back to regular Brent and the rest of the video and wrap it up.
So that's pretty much it for all the settings in pro mode. So, like I said, I really love doing long exposure stuff like waterfalls like this and then the last thing my favorite, like I said before, is Castro. I love doing macrophotography and the phones being able to do that. Now. I have a Milky Way.
S21 ultra Milky Way, video coming out soon we're just waiting on the moon to go away. It's its waning! So we're waiting on new moon, and we're going to have I'm going to take you guys out and show you how I capture the Milky Way with the s21. If you don't want to wait for that video, you can check out how I capture the Milky Way with my s20. It's a really great video, there's not going to be that much difference in the image quality. However, this does do a little better of a job, all right, I'm going to wrap it up here.
I need to go check on my time, lapses up there and make sure that my r5 didn't get blown off the cliff up there. So that's that's all about pro mode. I hope that helped. If you have any questions about pro mode, you want to know anything else if I missed anything, leave them in the comments below, and I will definitely answer that. I have all the links for everything that I use with my phone uh, all the accessories that I use for my phone to help me get this kind of images there in the description below.
So if you want to know what I'm using what kind of filters, what kind of tripods cases all of that stuff all of that's in the links below and that's it, so questions down below links down below and hit that like button for me if this video helps you out, because I really appreciate it and that's the best thing you can do to help me out. So thanks for watching I'll, see you in the next one you.
Source : Brent Hall
Phones In This Article
Related Articles


Comments are disabled
Latest Articles


