Samsung Galaxy S21+ 5G Disassembly Teardown Repair Video Review By PBKreviews
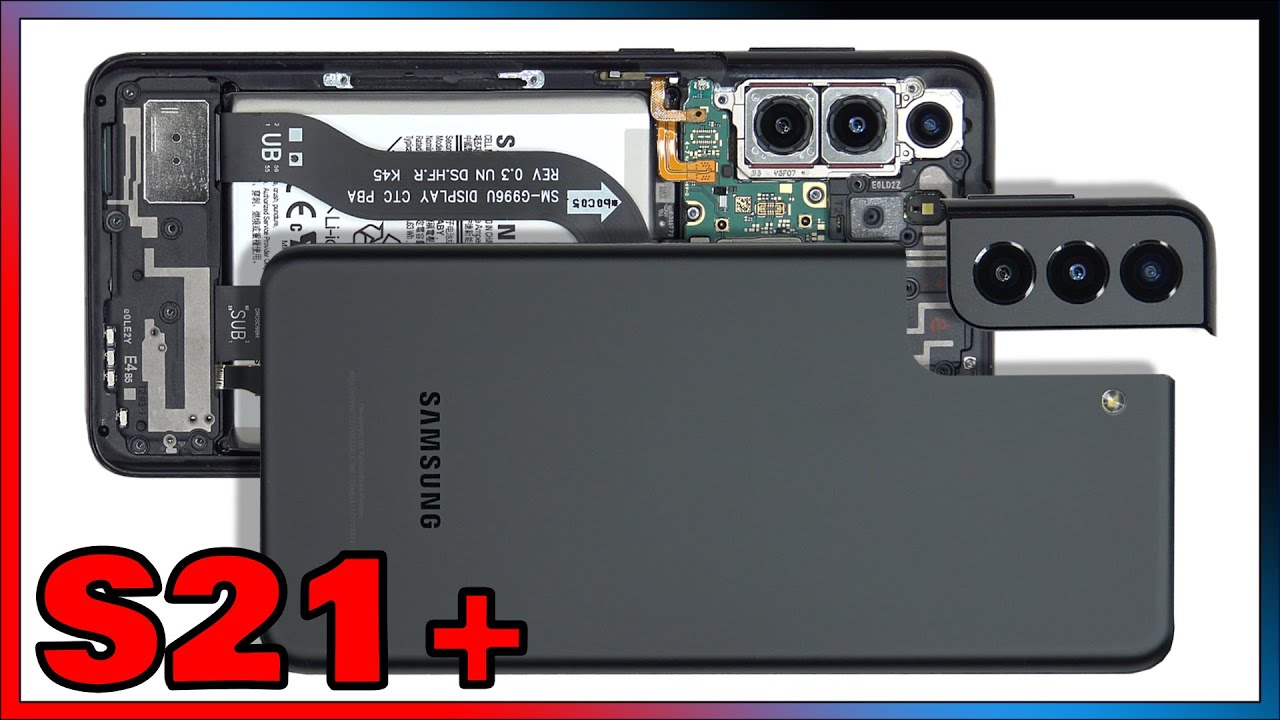
So we took apart the s21 and has 21 ultra now it's time to take apart the s21 plus, if you guys need any tools, there are links in the description. First, we're going to start off by removing the sim tray. So here's the sim tray for the s21 plus- and this is the dual sim version, so you can see it has slots on both sides and there's like a small metal plate in between and here's the sim tray for the single slot. It's just plastic now, one thing to note all s21s, whether it's the s21 plus or the s21 ultra, come with a dual sim reader. However, only the dual sim versions of the phones come with a dual sim tray. Now I went ahead and took this dual sim tray and tried it on the other s21s which are single sim.
However, the additional sim reader pins on those phones are disabled, so the software wouldn't recognize the additional sim. So this means, if you have a single sim version, and you want to convert it to a dual sim you'll- not only need to flash new firmware on there. You'll also need to get a dual sim tray in order to remove the backplate. We need to use a hair, dryer or a heat gun to apply heat, so we can loosen up the adhesive underneath, and then we're going to use the plastic pry tool to pry the backplate off. So here's your glass backplate, there's no flex to it, and this metal plate over here with the glass covers is removable.
It's held onto the backplate with adhesive. So if you want, you could just separate it. You'd have to apply heat and pry it off once the backplate is removed. The first thing we notice is on this model as well, which is an international version that has the Enos 2100 processors. It is missing the 5g millimeter wave antennas over here and over here.
Now that doesn't mean it doesn't have 5g. It just doesn't support the millimeter wave 5g. There are 19 Phillips screws that need to be removed once all the screws are removed, we're going to peel off the wireless charging pad from the bottom speaker assembly. Next, we're going to disconnect the flex cable for the NFC antenna on the right and the wireless charging pad cable on the left. So wireless charging coil is located right here, and this is your NFC antenna right here, and here you have a look at the other side, we're going to start off by disconnecting the battery cable first, once the battery cable is disconnected, we can go ahead and disconnect the rest of the cables.
This cable over here is for your power button. Now we're going to disconnect this cable over here, which is your screen, cable and this flex cable over here, which we're disconnecting connects your main board to your sub board on the bottom. We've got one more flex: cable over here we've got a flex cable over here for your speaker, assembly and one on the corner over here for an antenna assembly. Now we can lift and remove the speaker assembly. So, looking at the speaker assembly, we have numerous antenna lines running through it.
They are these light gray lines over here and taking a look at the other side, we can see the speaker assembly itself right here, and one thing to note, just like the s21 ultra does not have the white foam balls on the top speaker assembly like the s21 does now we can go ahead and disconnect the front facing camera once that's disconnected, we can lift and remove the main board. So, taking a look at the camera assembly, you got your 12 megapixel ultrawide lens on top your 12 megapixel, wide angle lens in the middle and your 64 megapixel telephoto lens on the bottom, the wide angle lens and the telephoto lens both have optical image stabilization. You have your LED flash located right here, a secondary mic above it over here, and the main board is a multi-layer board design, just like the other ones. Another thing to point out that is 21 plus has a third microphone over here on the main board. It's on the other side of the motherboard, which I'll show you soon.
So, basically the sound travels through this hole over here in the backplate. Through this hole over here in the speaker assembly into this hole over here in the motherboard, so the sound for that third microphone seems to be traveling through where the LED flash diffuser is down through this pathway over here into this opening over here, which it has a filter over it. So, looking at the other side, it would be going to the border over here where the LED flash diffuser is. So here's a look at the other side of the motherboard. You can see the additional microphone the third microphone located right here.
You have the connectors for your cameras right here and here and those can be disconnected by just popping them off. Furthermore, you have your proximity sensor located right here, and you have a graphite pad over here on top of the shields once the graphite pad is peeled back, we can see some thermal paste on top of the ram and processor. Here's a better look at it with the thermal paste cleaned off all right. Now, let's go ahead and remove that speaker assembly on the bottom. You also have some antenna lines running through the speaker assembly as well, and here's a better look at the speaker assembly.
You have the white foam balls on the bottom speaker assembly. So now we notice on the s21 plus you have a removable display, flex cable. You can disconnect it over here on the bottom. The s21 ultra does not have the removable cable. Let's disconnect this flex cable over here and this one over here.
There are three Phillips screws, one here, one here and one here which we need to remove. Now we can lift and remove the charger port board. So taking a look at the charger port board, there is a red rubber, gasket around the charger port itself, and you have your primary microphone located right here. Looking at the other side, you can see your dual sim reader over here. So when it comes to removing the battery, just like always with Samsung, there are no pull tabs.
So you're going to have to either apply heat to the front of the phone where the screen is, so you can loosen up the adhesive underneath the battery and then use a plastic pry tool to pry the battery off, or you're going to have to use some isopropyl alcohol to get in between the edges and underneath the battery to loosen up the adhesive. So you could pry the battery off. Once we remove the battery, we can clean off the residual left over the isopropyl alcohol. Here's a better look at your battery, so once that battery is removed, we can see the in-display fingerprint reader located right here. There are rubber gaskets with mesh filters around the phone where the speaker openings or mic openings.
Are you also have the flex cable over here, which is for your volume keys and that's routed between the frame and the screen itself? So if you ever have to replace that, you would actually have to pry the screen off the front-facing camera is glued in and here's your linear style haptic feedback vibrator motor over here and for the antenna on the top corner over here. You do have four trowing screws holding it down, and you have the 3d graphing layer over here to help transfer heat, just like the s21 and s21 ultra. So if you want to replace the screen, you would have to take the backplate off, and then you remove the speaker assembly on bottom. You disconnect the flex cable for the screen over here, and then you heat up the screen on the front to loosen up the adhesive underneath, and you pry the screen off the frame, and you get a new screen reapply the screen back to the mid-frame and just reassemble your phone. So now I'm going to go ahead and put the phone back together.
Once all the screws are back in place, reapply your backplate flip over the phone power it on, and you're done now. As far as repairability goes, I give this one: a 7 out of 10. Pretty much all the parts internally are replaceable. However, the fact that the battery doesn't have any pull tabs and has strong adhesive underneath it makes it quite difficult for any type of battery replacement. I hope you guys enjoyed the video and, if you guys want to see more videos like this make sure you subscribe and click on the notification bell, so you'll be notified the next time.
I upload a video thanks again for watching guys, and I'll see you guys in the next video.
Source : PBKreviews
Phones In This Article


Related Articles
![Samsung Galaxy S21 vs iPhone 12 Speedtest Comparison [Exynos 2100 vs A14 Bionic] 🔥🔥🔥](https://img.youtube.com/vi/3zaIsVZBHdw/maxresdefault.jpg )


Comments are disabled
Latest Articles


