Samsung Galaxy S10e – Battery replacement (including reassembly) By iDoc EN
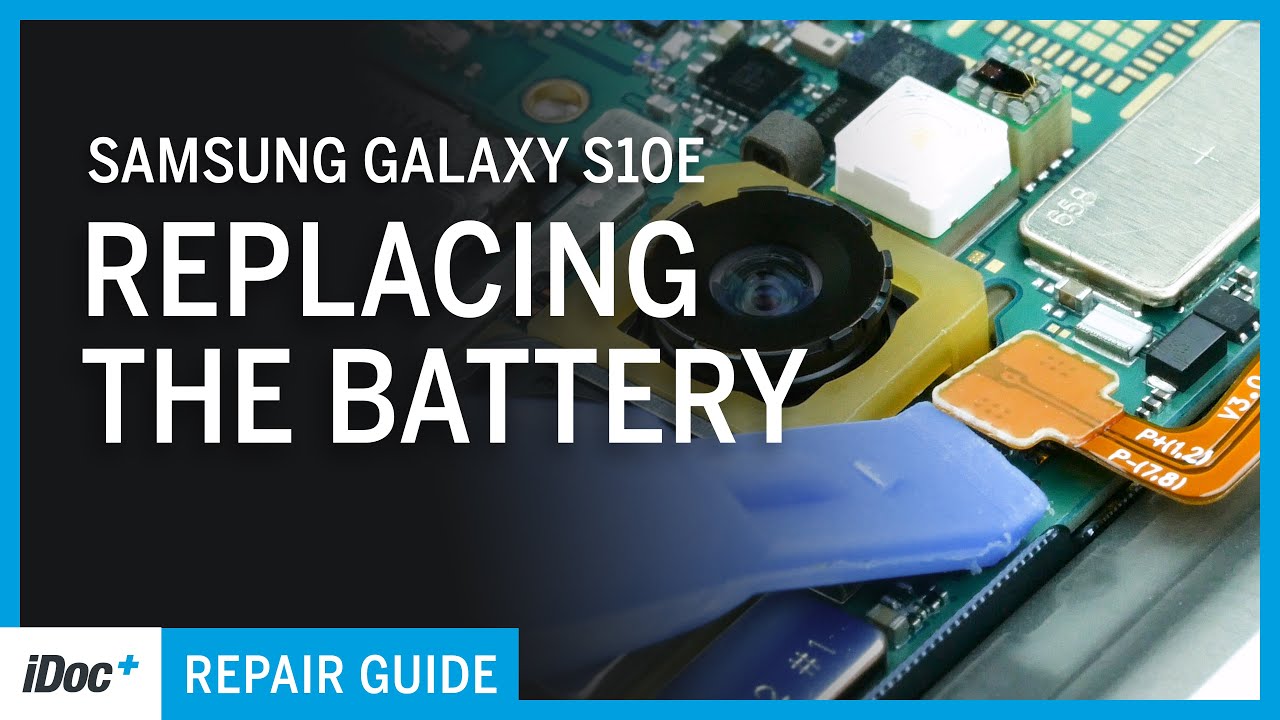
In this video, we at IOC Europe, show you how to replace the battery of your Samsung Galaxy s10e yourself. The repair is a bit more difficult because the back cover and the battery are heavily glued on. You should plan about 60 minutes for the repair for the repair. We recommend the following tools: high quality tools and original Samsung spare parts are available at www. idoc. edu all links to the spare part, and the tools can be found in the video description, and now we wish you a lot of fun with the repair switch off the device first to avoid short circuits during the repair.
If the screen doesn't work anymore, it's not that bad. The device will turn off immediately. If you disconnect the battery in a few steps, the device is open via the strongly glued back cover, but attention after a repair. The mobile phone is no longer water resistant anymore. You can remove the back cover by warming up the glue and sliding all around with a flat tool between the back cover and the frame tools like the eye plastics or the flex are especially suitable for this.
The flex is very flexible, has rounded corners and is very thin, but still stable. You'll also need several flat picks and a suction cup to remove the back cover, take a hot air gun or an ordinary hair dryer and gradually heat up the entire edge of the back cover. Don't heat the phone too much just so. You can still touch it comfortably place the suction cup on the bottom of the device and pull it to create a small gap between the back cover and the frame then try to get into the gap with your tool with the flex it's a little easier than with the plastics, because it's made out of metal and is a bit more stable. The flex also makes it easier to scratch the frame of your device.
So we recommend using a plastic tool as soon as possible slide the eye plastics under the eye flex into the gap. Then you can pull out the eye flex, don't push the tool too far into the device and be careful not to scratch the back cover with the edges of the tool. That's why we recommend using a plastic tool as soon as possible, do not insert your tool too far into the device in the area where the cameras are. You should be careful not to damage anything then heat up again. The area where you continue to work and move your tool further along the edge to prevent the glue from reconnecting.
You can use several picks and stick them into the already loosened parts, be really careful as the back cover is made of glass and can break easily, then continue along the entire frame and gradually loosen the glue, if necessary, heat repeatedly and repeat the process, removing the back cover can take half an hour better, take a little more time and work carefully to avoid breaking anything here, you can see the glue. It is mainly on the edges and, above the cameras, now take off the back cover and put it aside, then remove all Phillips screws of the same length from the plastic cover and put them aside together. If individual screws do not come loose immediately, you can use tweezers to remove them. The cover protects the main board and holds the coil for wireless charging. The coil is lightly glued to the side of the frame, loosen the glue and remove the cover which is hooked into the frame.
Now the battery connector is free to avoid short circuits during repair always disconnect the battery first. If you unplug connectors, do not lever where there are small components on the board. The battery is strongly glued in place, so you should use hot air again to loosen the glue, however, never heat the battery directly, but always from below via the display. We recommend using a flat tool such as the eye plastics, to go under the battery all the way around and lever it carefully. If you can't get under the battery this way, you can take something more stable.
The sesame is good for levering the battery out. Since it's made of metal be careful not to damage the battery. You can also use a battery spider to lever the battery out, be very careful when removing the battery in the center below the battery is the back of the display. It should not be scratched, as this could damage the screen again, take a little more time and heat repeatedly and evenly don't bend the battery and make sure you don't use any tools to pierce the battery or damage its wrapper also be careful not to damage any surrounding components or scratch the back of the screen with a metallic tool. If the adhesive is partially loosened, you can use a wide flat tool like the eye plastics to gradually slide under the battery when the adhesive is loosened, lift the battery and remove it from the device.
As you can see, the battery is only glued around the edges, not in the middle, remove any remaining adhesive from the device. Any excess glue that wrinkles can push the battery upwards, be careful not to damage the black surface. You can find the suitable spare part and tools for this repair in our online shop at IOC. edu. Now remove the protective foils from the adhesive surfaces of your new battery.
Now put the battery back in place, make sure it has some space on all sides and doesn't press against the frame anywhere carefully press the battery slightly down so that the adhesive sticks together now connect the battery again position the contact over its socket and press it down carefully before you put the back cover on the housing check the glue on it, it should be evenly distributed on the edge so that the back cover sits flush everywhere, remove any excess glue if necessary. If you want, you can also remove the old glue and use a new one. We have linked a new adhesive frame in the info box below heat the rear glass again with hot air, so that the glue will bond again. Please note, however, that the smartphone is no longer fully waterproof after repair. As long as the glue cools down you can press the rear glass down with your fingers or lightly press it down.
Your phone is fixed now, and we hope it was fun for you. If you liked the video, why don't you leave a thumbs up and subscribe to our channel high quality tools, spare parts and accessories are available in our store, see you next time.
Source : iDoc EN
Phones In This Article

Related Articles


Comments are disabled
Latest Articles


