Samsung Galaxy A70 Teardown and water damage clean By Ricks Tech
Today on the workbench is a Samsung Galaxy, a 70 which, as usual, it's been on the heat pad at 75 degrees, Celsius, and now I'm, using a fin pry tool to open it up. Yeah, I did stuff up and actually accidentally record this footage it eight times slo-mo, which I'll just skip to that footage. Now, as you can see, very slow I'll bring that back to regular speed, don't get anyone from there it's another time back to regular speed. I found that getting the back cover off the a-series to be a lot easier compared to the s-series I. Believe. That's because the back on these is plastic where the s-series is glass, so you do have a lot more flex and can actually bend the back of it considerably more to get into it, which overall I find on most phones.
Typically, they live in a cover, so the plastic back is perfectly fine. Perfectly acceptable. Glass I'll just say that as another fancy way to drop to make the phone feel more premium but at the same time increase the risk of dropping it, because you can't actually grip the phone properly and cool. However, the only way I always keep working around the outsides of this there's minimal risk to really damaging too much inside of it. Just keep working your way around the outer perimeter and should be able to get it off relative ease from there.
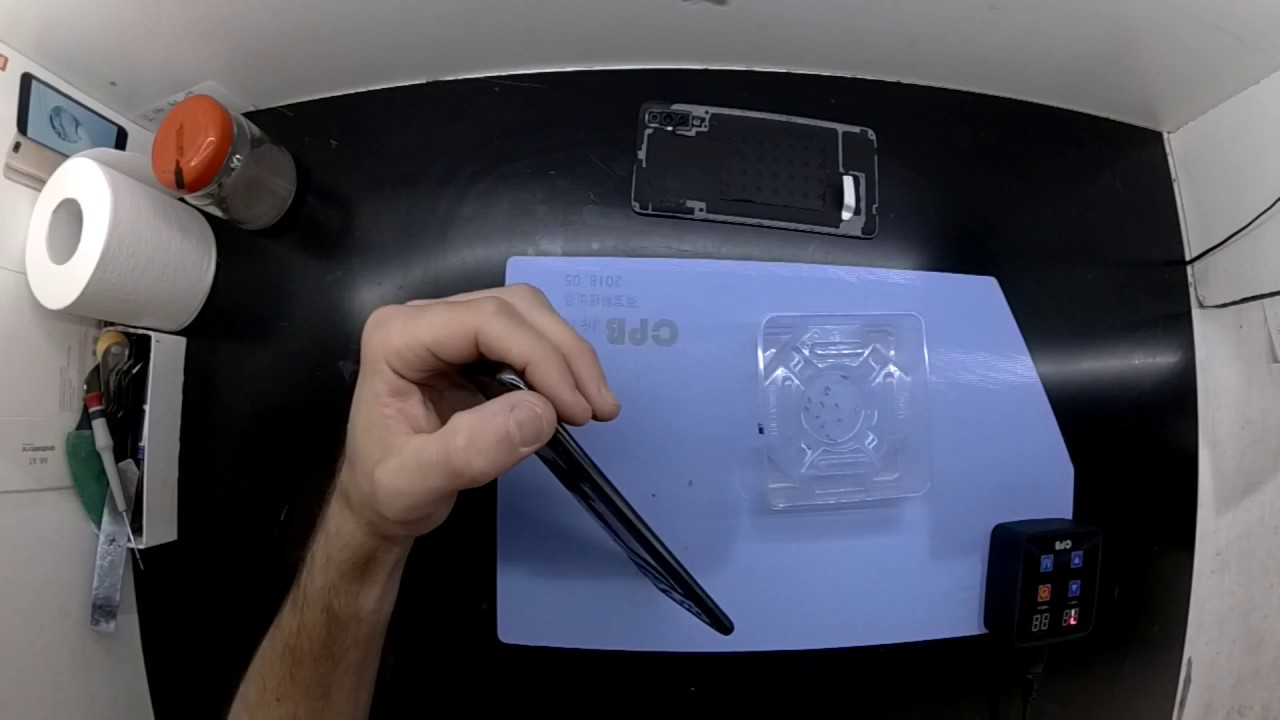
So I will just fast-forward this bit as you can kind of understand what needs to be done here. You there we go, the backup is now been removed. Another thing you should also do is remove the SIM tray prior to proceeding too far with this and from here it's a matter of removing a quite a few Philips head screws or fairly typical of a Samsung phone. You and therefore those screws removed I will proceed to remove the SIM tray here. I did find it took a while to find the right site length, SIM tray, remover to actually get to it.
Most usual ones have kicking around we're no good. Anyway, with that all removed the SIM tray out, I'm going to do a little pry around the plastic frame of the phone between the screen and the frame that should be able to pop it off. Not much luck here. There we go, so this one was very straightforward to separate, and we're in one interesting thing: I found with this model as well top left or underneath the cameras we have the battery connector at the vibrating motor on the right hand, side that circle in the middle we got this. There are cables connecting the main board to the daughter board, but also on the daughter board itself, which is the charging port right down the very bottom of the phone.
It has the connection to get to the display, which is weird typically, that would connect directly to the main board, but on this particular model, that's routed down the very bottom. The reason why this particular phone is here today is that it got liquid damage and shorted out no power, no nothing, so being that the moisture indicator at the top near where the cable or near where the battery connector is, is white I'm. Assuming that it didn't get wet down, there got my down the bottom of the phone, so I'm gonna, pull out the charge board down the bottom and have a bit of a look now down the bottom here. I'm disconnecting is what I believed to be the in screen. Fingerprint reader learn tile is sure not sure if this and this model has that.
But that would be my guess. With this one disconnect the antenna cable go now. I should be able to lift out this daughter board now I'll be suspecting the majority of issues I do see on this phone will ever be crack screens or this charging port having issues but anyway, as I'm looking at this I've noticed that the LC or the display connector there's a bit of black on there on the right hand, side halfway down that connector, so what I'm going to be doing there and that's the same on the display connect down the bottom here. So what I'm going to do from here? It's give it a bit of a claim of some isopropyl alcohol and inspect the rest of the board and reassemble it from there. So did it off-screen swap be fairly similar to what I've already done, except you'll also be removing the main board and the battery and migrating that, hopefully to a new display frame assembly, or you may have been fully removing their display and reinstalling in the existing frame.
So there are possibilities of this repair anyway, I'm gonna head off and let the video play out from here it would be the rest of the reassembly and also given these a clean I was able to stick it on charge. It was sitting it around actually was sitting on 0% this phone, so as soon as I plugged it in on the charge it lit up said it was charging and since turned on and seems to be reasonably functional, haven't tried out, microphones or anything like that, but it is powering up perfectly fine. The touch interface is going. Ok, the display is ok, so from there I'm, assuming the rest of it should be fine, but yeah. A quick, successful repair anyway.
I'll see you later and catch you in the next one bye. You.
Source : Ricks Tech
Phones In This Article

Related Articles


Comments are disabled
Latest Articles


