Samsung Galaxy A52 Disassembly Teardown Repair Video Review By PBKreviews
You're watching the Samsung Galaxy a52 disassembly. If you need any tools, there are links in the description. First, we need to remove the sim tray next we're going to use a hair, dryer or a heat gun to apply heat to the backplate. So we can loosen up the adhesive underneath, and then we're going to use a plastic pry tool to pry the backplate off. So here's your plastic backplate. There are 16 Phillips screws which need to be removed once the screws are removed.
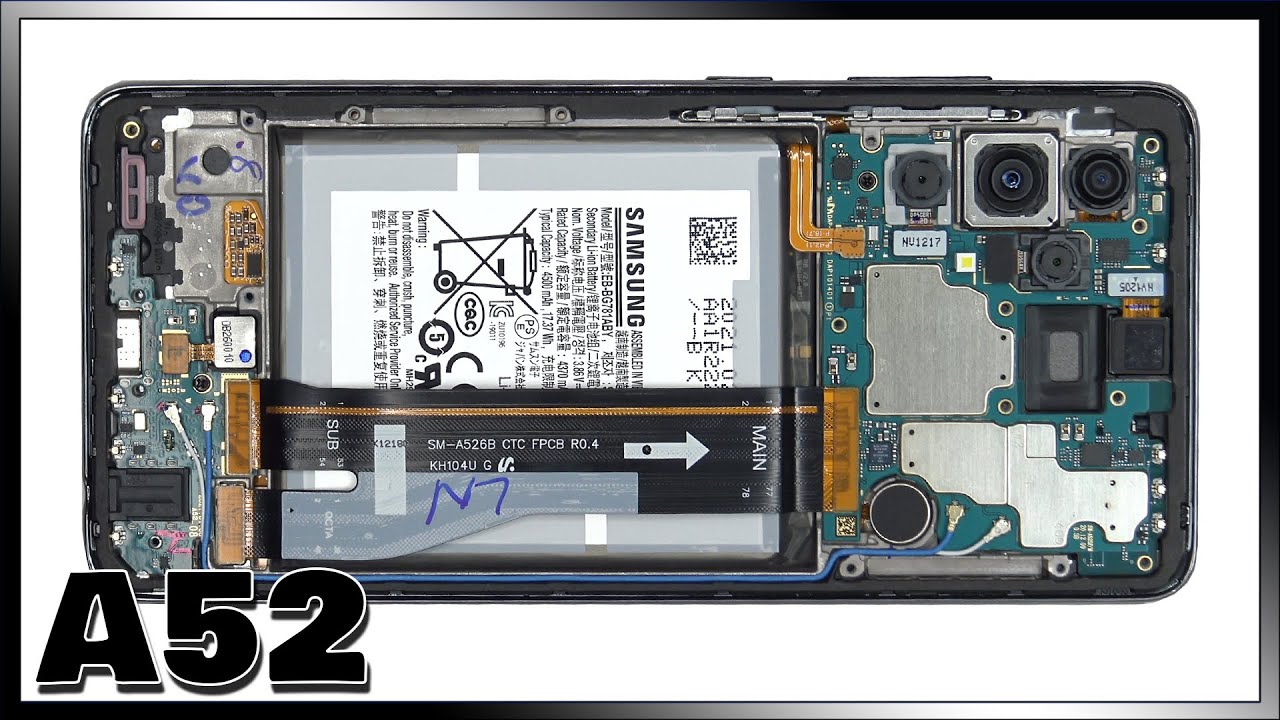
We can lift and remove the top plastic cover. Your NFC anthem is located over here. On the other side, you have a large graphite sheet over here and what that graphite sheet does it help transfer heat, and you have your earpiece speaker located over here now. The first thing we want to do is disconnect the battery cable. Once that's disconnected, we can go ahead and remove the speaker assembly on the bottom.
Here's a better look at your speaker assembly. Next, we're going to disconnect this flex cable over here, which connects your main board to your sub board on bottom, as well as your screen cable over here in the corner, there are two wire cables we need to disconnect by popping them off both on top and on bottom now, we're going to disconnect the front-facing camera. Let's go ahead and disconnect the fingerprint reader cable over here now there are two Phillips screws which need to be removed. One is located over here holding on the main board and one over here holding down the charger part board. Now we can lift and remove the main board.
Taking a look at your cameras, your top lens over here is your 12 megapixel ultra-wide lens. This is going to be your 64 megapixel, main lens, which has is or optical image stabilization. This bottom lens over here is going to be your 5 megapixel depth camera, and this is your 5 megapixel macro camera. You have your LED flash located right here and your secondary microphones located right here. Taking a look at the back.
You have your proximity sensor located over here. Your sim card memory card reader is located right here and the other two camera connectors are located over here on the back and those can be disconnected by just popping them off. You also have a graphite pad over here on top of the shield on the back once the graphite pad is peeled back. We can see two thermal pads one over here and one over here which sit on top of the processor and the chip over here. Now we're going to go ahead and remove the charger port board.
You have your headphone jack located right here. Your main microphone is over here and your charger ports right here and here's a look at the other side. If you need to remove your fingerprint sensor, it's just held on with adhesive, so you just have to heat it up and pry it out. Moving on to the battery, there are no easy pull tabs to help you pry it off. So you're going to have to use isopropyl alcohol, or you're going to have to apply some heat to the front side of the phone where the screen is, so you can loosen up the adhesive underneath the battery to make it easier to pry off here's a better look at your battery.
Once the battery is removed, we can see a copper heat pipe located underneath which runs all the way underneath the battery and underneath the main board over here. Here's a better look at that copper heat pipe. So as far as replacing your screen goes, most replacement screens will come with the mid-frame attached and if it doesn't, and you need to pry your screen off from the mid-frame, all you have to do is heat up the front of the phone where the screen is to loosen up the adhesive underneath and then basically just pry the screen off making sure you run your cable over here for the screen through the opening over here, and then you get your new screen apply new adhesive and reapply your new screen over the mid-frame. You have your vibrator motor located over here and the flex table favorite volume key and power buttons over here. There's a metal bracket over here, holding the buttons down, so you'd have to pull up the metal bracket in order to be able to remove the buttons there's.
Also, a rubber gasket, with mesh filter over here over the speaker, opening all right. Now, I'm going to go ahead and put the phone back together. Once all the screws are back in place, apply new adhesive and reapply your backplate flip over your phone power it on, and you're done. As far as repairability goes, I give this phone a 9 out of 10. It's pretty easy to take apart and all the parts are pretty much replaceable.
The only downside is replacing the battery. It doesn't come with easy pull tabs, so you are going to need some isopropyl, alcohol, or you're going to need to apply some heat to make it easier to pry the battery off. I hope you guys enjoyed the video and, if you guys want to see more videos like this make sure you like subscribe and click on the notification bell. So you'll be notified the next time I upload a video thanks again for watching guys, and I'll see you guys in the next video you.
Source : PBKreviews
Phones In This Article

Related Articles


Comments are disabled
Latest Articles


