Samsung Galaxy A32 (4G Model) Camera Tips and Features! By Kevin Breeze
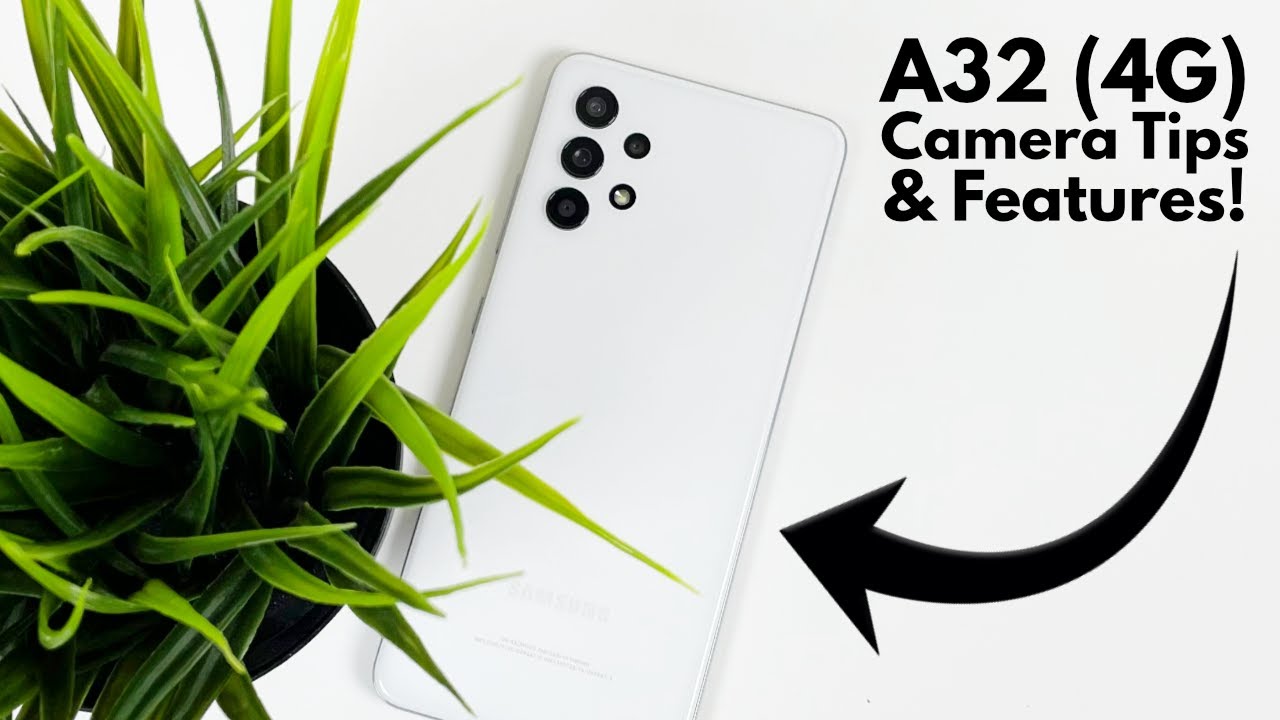
Hey everybody- this is Andre here with the Kevin breeze channel, and this is camera tips and tricks for the Samsung Galaxy a32 4g, let's get started so. The first thing I want to show you guys is a really easy way to open the camera. So all you need to do is double tap the power key and the camera is going to open right up. You can also reprogram this to open an app of your choice. So if you use a different app like Snapchat or open camera, or anything else that uses the camera, you can use that app instead, and then it'll open on that when you double tap the power key. Instead, it's a really convenient way to do it and by default it is activated.
So it is going to open this camera app whenever you press the power button. The next thing I want to show you guys is called the scene optimizer to view this we're going to go into settings and right here you can see by default. The scene optimizer is activated, so you don't really have to do anything, but I do want to point it out, because it's such a cool feature, what it does is uses AI to analyze. What's in the frame of the camera, and it'll, adjust the lighting and exposure to fit what you're taking a picture of, so it helps ensure that you get the best possible picture of whatever you're. Taking a picture of, I think it's a really cool feature, and it's a good one to know about the next thing I'm going to show you guys is how to take high efficiency photos.
Now a high efficiency photo is basically a different type of file to store photos as it takes up less space if you're coming from an iPhone. You've probably seen this before, because iPhones do use these, but one drawback of this type of photo is that they're not compatible with every program or website so definitely check to make sure if what you're trying to take a picture for is compatible with a high efficiency picture. Before doing this now to get a high efficiency photo or video, because you can take high efficiency videos as well go to settings and for photos, it's right here, just toggle this button on, and it's going to take high efficiency pictures in this file format and for videos. It's simply just down a little in the video section, and you can toggle that on as well, and that's going to give you that high efficiency file format for the videos. This is perfect.
If you're trying to save some space but again just make sure the compatibility is there now. The next thing I'm going to show you guys is a pretty simple trick. It's the grid lines, if you're ever trying to line something up in the frame and want to make sure that it's centered or if it's level the grid lines are definitely useful for this. All you got to do is hit the settings and see the grid lines. You just want to activate it right there, and once you go back to the camera frame, the grid lines are going to be there really easy to use and really useful.
In certain situations, when you want to turn them off, just go back to settings, go back down to grid lines and turn it off, and you should be good so when you're in the camera, when you press a volume key by default, it's going to activate the shutter. But let me show you some other things it can do, so we're going to go up to settings go down until you see shooting methods. So right here and our first option press volume keys to right. Now it's set to take a picture record video. You can also have it zoom in and out or control the system volume.
Now, if you're listening to music or something while you're taking a picture, then that's one time you could use it, but I think the first two are the most useful. So for this we're going to hit zoom in or out and now when you press your volume, keys, you're, gonna, zoom in and then out. I think this is a really cool one, but I myself personally prefer the shutter, but definitely play around with it and decide which one works best for you now. The other thing in shooting methods I wanted to mention is the floating shutter button. This is really useful if you're trying to take a picture at a different angle, so the floating shutter button is literally exactly what it sounds like it's a floating, shutter button right here.
You can place it anywhere on the screen you want so, for example, if you're holding the camera like this and can't comfortably reach the normal shutter button, you can have this floating shutter button right here, so you can take the picture like that, and it'll be just like normal. This is really useful if you're trying to do something like take a selfie where you can only use one hand, and you don't want to risk, dropping your phone or moving it out of position, you can definitely use the floating shutter button and make it a lot more convenient and comfortable, and in some cases this is the only way you can even get the shot. So it's definitely a good thing that this phone has it again. This is in the settings, shooting methods at the bottom and floating shutter button. The next thing I want to talk about is how the front facing camera mirrors things.
Now some people like this, because it prevents something from being backwards. If you're trying to show something like writing, if you're taking pictures for content creation purposes and need to have the specific logo of a brand or something legible, then this is a perfect feature, but for other people it can be annoying, because when it's inverted, the picture does look the opposite of what you think it looks because it is mirrored, but by default this phone is set to save selfies as previewed. So it's basically going to mirror the picture to the point where, whatever you see on the frame when you're taking the selfie is going to show up exactly like that in the camera library. Now, if you don't want it like this, maybe you'd want it to look the way it would as if you took the picture with a rear camera. So all you need to do is go into the camera settings scroll down to where it says, save selfies as previewed and just turn this off.
And then it's going to have the pictures show up the exact way they would in a rear camera, and this could be good if you want something like writing, or something really specific, like a specific pattern to show up exactly how you see it otherwise, having the selfies save as previewed is nice, because then you know exactly what it looks like when you're taking the picture in the frame. Now the next thing I'm going to show you is how to get to night mode now. This is one of those budget phones that actually does have a decent night mode, which is great. Obviously, if you're trying to take pictures at night, a lot of phones around a similar price range. Don't really have a usable night mode, if any at all.
So it's good that this phone does, and it's really easy to get to as well. All you need to do is hit more and then activate night mode right here, it's going to go into night mode, and then you'll be able to take your pictures in the dark or with poor lighting and still have them turn out good. The next thing I'm going to show you is how to use macro mode. This phone's macro camera is really usable, and I really like it again. All you need to do is hit more in macro mode is right here, then you can get those close-up pictures and, as this little message says right here be sure your picture is taken close enough to the subject, but not too close just have it between three and five centimeters just at the optimal distance.
So it still looks good like this. Now, the next thing I'm going to show you is how to use the ultra white camera, and this is super easy, just one. Click of a button- all you need to do is press this button right here, this icon, and it's going to turn on and then to get back to the normal view. Do the same thing now, the last thing I'm going to show you is how to customize this little bar right here now. Maybe you use night mode a lot and never use portrait mode, or maybe you want the macro camera to be right here, where it's convenient to access.
All you need to do is hit more and hit this plus right here, and now you can drag whatever you want in here. Say you like to use pro mode. We're going to put that right next to photo, and maybe you like to use macro mode a lot too, once everything is how you like it, go ahead and hit save, and now you have all the modes you want on this bottom bar, where you can easily and conveniently access them, but this is tips, tricks and hidden features for the Samsung Galaxy a32 4g. I hope you guys enjoyed the video, and hopefully you learned something new as well. If you did be sure to leave a thumbs up and subscribe, and I will see you guys in the next video.
Source : Kevin Breeze
Phones In This Article

Related Articles

![Xiaomi Redmi 9A Review | ENTRY LEVEL KILLER? [English Subtitles]](https://img.youtube.com/vi/ummXmCgKdo4/maxresdefault.jpg )


Comments are disabled
Latest Articles


