Realme 7 Pro Detailed Camera Review With Gcam Samples By TecworkZ
Hey guys, its Sagar from TecworkZ, and in this video, let us check out the cameras on this Realme 7 Pro. Now as good as the Realme 6 Pro was, its cameras were not up to the mark. Somewhere Realme knew this, and they have greatly improved the camera performance on this 7 Pro. If you guys want to watch my videos in Hindi, you can click on this card, that appeared on the top right corner of your screen, or on the link in the description section. Lot of you guys have been asking me to do it, so I finally started a hindi channel. If you guys understand hindi, then click on the link in the description and show me some love and support by hitting the subscribe button.
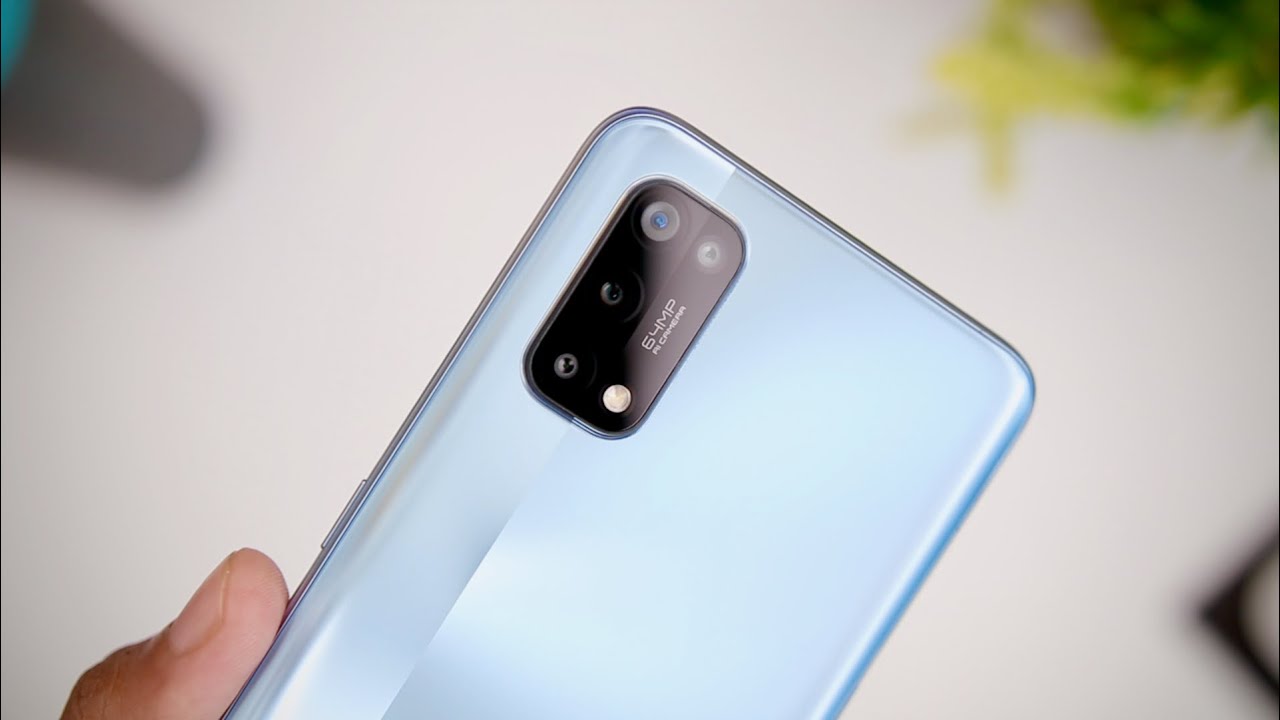
I have over 90 image and video samples to show you guys, Including a few Gcam samples, so without wasting any time, let us check out the cameras we are working with. Realme 7 Pro gets a quad camera setup on its back. Primary camera gets a 64 megapixel Sony IMX682 sensor, with F/1.8 aperture and 26mm lens. Then there is an 8 megapixel camera with F/2.3 aperture and a 16mm ultra wide angle lens. Next up, there is a 2 megapixel sensor with F/2.4 aperture and a macro lens. Followed by another 2 megapixel black and white depth sensor, again with F/2.4 aperture. With the main camera, you can take 4K videos at 30fps, 1080p videos at 30, 60, and 120fps, and 720p videos at 30, 60 and 240fps.
With he wide lens, you can take 720 and 1080p videos at 30fps. At the front there is a 32 megapixel sensor with F/2.5 aperture and 24mm wide lens. Now while the 2 megapixel macro camera is just as useless, as it is on other phones. The 2 megapixel depth sensor seem to be doing its job. It also lets you take portrait mode videos.
Well actually the front facing camera can also portrait mode videos, just with the help of software. So I am sure, if they wanted to, they could have just as easily done it without the depth sensor on the back as well. Anyways, the camera interface is pretty straightforward. You can switch between the lenses by tapping on these dots, above the shutter button. You can swipe to to the left or right to switch modes, and a few more modes are hidden under this more tab.
The Pro or Expert mode lets you adjust all settings like ISO, Shutter speed, White balance, Focus and exposure. You can also switch between the main and the wide lens, and shoot your images in RAW format. With all of that out of the way, let us now get to the image and video samples. Starting with the ones which I took in Daytime. It is still monsoon season in my city, so I don’t have any images in bright sunny lighting conditions.
But looking at how good the main camera is, even in these diffused lighting conditions, I am sure, it performs even better in those conditions. These are plenty of details in these shots. You can see that, as I zoom in on some of the shots. Instead of making a separate video with Gcam samples, I have includes a few of them in this video itself. Here is the image from the Gcam compared side by side with the one from the stock camera app.
First thing you might notice is that Gcam’s image has a cooler tone, while the Stock camera app shows warmer tones. Gcam is also capturing more contrast in some shots, which doesn’t always look good. As we zoom in 4-5 times, there are clearly more details in the shot from Gcam. But the difference is so little and you have to zoom in so much to see that mute difference, that really, in these daylighting conditions, it doesn’t really matter which app you took the images with. Zoomed out, they look equally good from both.
In this image, you can see se the extra contrast in Gcam’s shot. It is also showing a bit muted colours. Speaking of colours, they end up looking a bit more saturated and punch in these images, than they actually were. Normally I like natural looking colours in my images, but these punchy images are definitely better for uploading to social media platforms. Everyone perceives colours in a different way, so in the end, wether you like these images or not, will depend on your personal preference.
Coming to the HDR shots. Now, here is my hand in front of a bright light, and we can barely see any details on my hands. I took this shot with HDR turned off, and here is the same shot with HDR turned on. Just look at the difference. Everything else was the same, only thing that changed was, I turned on the HDR mode.
Now since this does such a great job, I left the HDR mode on auto for all of my shots. In this shot, the bright sun in the background is not overblowing the entire sky, you can see a lot of details in the sky and also in the water tank. In this shot, we can see the details in this tong and yet the sky in the background is perfectly exposed. In this shot, it was extremely bright outside, and super dark indoor, but the Realme 7 Pro managed to bring up the shadows inside, and still show us some details from outside the windows. People use Gcam for taking better HDR shots, because the stock camera app generally doesn’t do the best job.
But in this case, when I put the HDR shot form the stock camera app and Gcam side by side, I actually prefer the one from the stock app. You can see more details in the shadows and the highlights in its image compared to Gcam’s. So as I said before, In the daytime, you don’t really need to use the Gcam on this Realme 7 Pro. Here is a quick focusing speed test, before we move on to the close up and macro shots. You can see that it is quick at switching the focus from a new to far object.
But the shift in focus is very sudden and abrupt. This isn’t an issue while clicking images, but while shooting videos, this looks really bad. Once the focus is set, the close up shots look really good. If the camera sets the focus by itself on the nearest object, the images turn out very good, but if you tap on a particular object, then the camera tends to over expose the images. So if you do that, don’t forget to pull the brightness slider down a bit, so the images are not too bright or overexposed.
The main subjects are in perfect sharp focus and thanks to the larger sensor and wide aperture, the background in these close up shots gets a very nice optical blur. You can see some distortion around your main subject, but that is just the price we have to pay while taking close up shots with these big sensor cameras. If you want to reduce this distortion in your images, just move your camera a few inches away from your subject. If you want to get even closer to the subject, and capture every little detail in it, you get a dedicated macro lens for it. Now, this sounds cool in theory, but the actual macro camera, just gets a 2 megapixel sensor, so these macro shots barely have any details in them.
No matter how much light you add to these shots, they just won’t look very good. You are better off, taking 2-3x digitally zoomed in images with the main camera instead. Look at these images side by side and decide for yourself, which look better, ones from the macro camera or the digitally zoomed in ones from the main camera. Coming back to the main camera, here is how much of the scene the 26mm lens lets you capture. And now, here is how much more of the scene the 16mm ultra wide lens lets you capture.
This lens comes in very handy, when you want to capture a larger scene, but you don’t have enough space to move back. If we zoom in on both these shots, you can see that the wide lens doesn’t capture nearly as many details or as good of a dynamic range as the main camera does. But it is still nice to have this lens, so every once on a while, you can click an image with a different perspective. There is also a big shift in the colour temperature and white balance, when you switch from normal to wide lens. Now the Realme 7 Pro doesn’t get a telephoto lens, but in the camera app, you still get the option to take 2 or 5x digitally zoomed in images.
I would say the 2x zoomed in shots look pretty good, but I don’t think the 5x shots are usable. They are very soft, and have a lot of noise in them. So if you plan on taking zoomed in shots, stick to the 2x option. Till now, all the images form the primary camera were 16 megapixel pixel binned ones, and they look really good. But if you want to take higher resolution images, you can switch to the 64 megapixel mode.
When we compare these images side by side, you might not notice a big difference straight away, but as I zoom in on both these shots, you can see the 64 megapixel one being more detailed. But this higher resolution mode is not the best at handling high dynamic range or lower lighting situations, so just be aware about that. These 64 megapixel images are 4-5 times larger than the 16 megapixel ones in terms of file size, and you notice the difference in details only when you you zoom in 5-6 times. So really, I don’t think there is any need to click most of your images in this mode. For most situations, I would suggest you guys to just stick with the default 16 megapixel mode.
Coming to the portrait shots. Now I don’t know how much of the work the depth sensor is really putting in, because even after covering that sensor, software does well to detect the edges of the subject, and separate it from the background. The edge detection is not perfect, but this always gets better with software updates over time, so I am not going to worry too much about it, right now. The skin is a bit smooth, even with the beauty mode turned off, but other than that, these portrait shots are looking really good. The dynamic range is also very while taking some of the portrait shots, as you can see here, but in the very next one, it blew up the sky in the background.
So the results are not very consistent. This phone has the potential to take amazing portraits, Realme just need to refine the software a bit with a couple of updates. The edge detection gets surprisingly better while taking portraits of objects. Even if the scene is dark, the camera does very well and detects the edges accurately. Is it just me? or do you guys also like to take portrait mode images of objects? let me know in the comments.
With that, let us move on to the images that I took in indoor, artificial and lower lighting conditions. Primary camera has a massive sensor which captures more light, and a wide aperture which lets in more light onto that sensor. All of this helps the Realme 7 Pro capture good images in these indoor lower lighting conditions. These images are not as detailed as the ones shot in daytime, or in bright outdoor lighting conditions, but they are not too bad either. If you want to take even better images indoors, switch to the night mode, and see the difference in the detail level.
You don’t just have to use the night mode in very dark, you can use it indoors as well to get sharper and more detailed images. If we get to even lower lighting situations, Realme 7 Pro still manages to take good usable images. But switching to the Night mode makes these images look so much better. The night mode images are a bit zoomed in for some reason, so keep that in mind. Sometimes, in very low light, the main camera finds it a bit difficult to set the focus accurately, but switching to the night mode takes care of that issue.
As you can see, Night mode images have significantly lower noise in them. Now the Night mode is also available on the wide lens, so if you are struck in a situation where there is not enough light, and you want to take a wide shot, make sure to switch to the night mode, and see that lens capture much sharper elements. Before this, I always refrained myself from using this lens if the light was anything less than ideal, but now, I don’t have to worry about that. Again, these images are not as sharp as daytime shots, but they still look so much better. Low light is one of the areas where people love to use the Gcam app instead of the stock camera app, to get better images.
But the Realme 7 Pro is doing so good on itself, that I don’t think you need to go through the hassle of downloading and installing the Gcam apk on this phone. Some of you guys will still want to see the difference, so here are some of the low light images from the stock camera app, compared with the ones taken with gcam. Without the night mode, stock camera image is brighter and slightly better looking in my opinion. Even with the Night mode turned on, on both the apps, I think stock cameras image is just as good as the one from gcam. Here are other set of images, and 90% of them show the same thing.1 time out of 10, Gcam’s image is noticeably better, but for these odds, I don’t think you need to install the Gcam on your Realme 7 Pro. It takes just as good images without it.
And this is a huge compliment for this phone. These images were taken in extreme low light, and you could barely see anything with your eyes, but the phone did very well to show us show much of the scene. So that’s the reason you see noise in this image. So all in all, the Realme 7 Pro’s camera is amazing in lower light. When I say this, you should also know that I mean in its price segment.
Now don’t go and get this phone, expecting it give you flagship level low light performance. Its performance is really good, for its price range. There is ultra night mode for shooting videos as well. Here is how it compares against normal video mode in lower light. I don’t think it looks very good, because all it is doing is increasing the ISO, which also means adding a lot, and I mean a lot of noise in the video.
That brings us to the front facing camera. The images are detailed and crisp. Colours, are a bit more natural from the front facing camera compared to the rear cameras. Like I said with the OnePlus Nord, these selfies look good, but they are not as detailed as you would expect a 32 megapixel image to be. That being said, most average users will be happy with selfie camera.
When light does down, you can still take usable selfies if there is some ambient light around. If you go into much darker conditions, you can barely see anything in these selfies, but there is a night mode to help you in these cases. While it does add some more light to your low light selfies, I don’t think I am going to use this mode, because night mode just takes too long, and I am sure, no-one wants to be steady with the phone in their hand in this position for so long. Anyways, even without a depth sensor at the front, you can take portrait selfies. The edge detection is taken care via software, and it is very good at it.
Edge detection for these portrait selfies is actually better than the edge detection with the rear facing cameras. Here is a video from the front facing camera of the Realme 7 Pro. You can see how it handles the overall colours of the scene, exposure and stabilisation when I am walking around with it. This phone lets you take portrait videos, where you are in focus and everything else is blurred out. You can do this with the main camera on the back, and with the selfie camera as well.
You can shoot 4k 30fps videos with the primary rear camera. As you can see, the video is pretty stable, thanks to electronic stabilisation. As always, colours are a bit more saturated in this 4K video. I don’t know if you noticed or not, but there are a few dropped frames when shooting 4K videos. If you reduce the resolution to 1080p, this problem goes away, and the colours also look more natural.
The only downside is, the videos are not as detailed. While this phone can take usage videos, if your primary concern is shooting videos, I won’t ask you to have this as your 1st option. So with that, we have seen over 90 image and video samples. And what we learned is, the main camera performa really well in daytime, the dynamic range is really good, colours are a bit saturated, but that comes down to personal preference, Portrait mode performance is also good, and can get even better with some refining. Low light performance is really good for the price range, and night mode is just a life saver.
Video is not the strong suite of this phone, but for most people, it gets the job done and features like bokeh video sets it apart from others in the same price range. All in all the Realme 7 Pro gets great set of cameras for a 20K Rs. smartphone. As I said at the start, it is a step up from the Raelme 6 Pro. But how does it compare to the others like the Samsung Galaxy M51, POCO X3 or even the OnePlus Nord? well I will be making separate videos for that, so make sure you have notifications for the channel turned on.
Well you guys saw the images too, so what do you think about the cameras on this Realme 7 Pro. Let me know in the comments. If you like these images, and if you want to purchase this phone, I will really appreciate if you get it form links in the description section. That is it for this video guys. Please hit the like button if this video helped you, and subscribe to the channel for more quality tech videos like this.
You can also check out some of the other videos from this channel. This has been Sagar, and I will catch you guys in the next video. Take care.
Source : TecworkZ
Phones In This Article

Related Articles


![LG Q92 Unboxing: A Velvet Lite?? [4K]](https://img.youtube.com/vi/Vo4zRxiTscQ/maxresdefault.jpg )


Comments are disabled
Latest Articles


