Microsoft Word for iPad Tutorial 2019 By Bit By Byte
This video is a tutorial for Microsoft Word for the iPad. Now, if we go back in time, the very first video on this channel was a tutorial for Microsoft Word on the iPad, and that was nearly 5 years ago. It is 5 years in November and a lot has changed to the app. In that time, lots of new features have been added, so that original tutorial is very out of date, so this one will be a lot more in-depth and go through all the latest features that have been added since then now Microsoft Word for the iPad is very powerful. It has a lot of the features found in the desktop version. However, there are still some bits and pieces that are frustratingly and inexplicably missing.
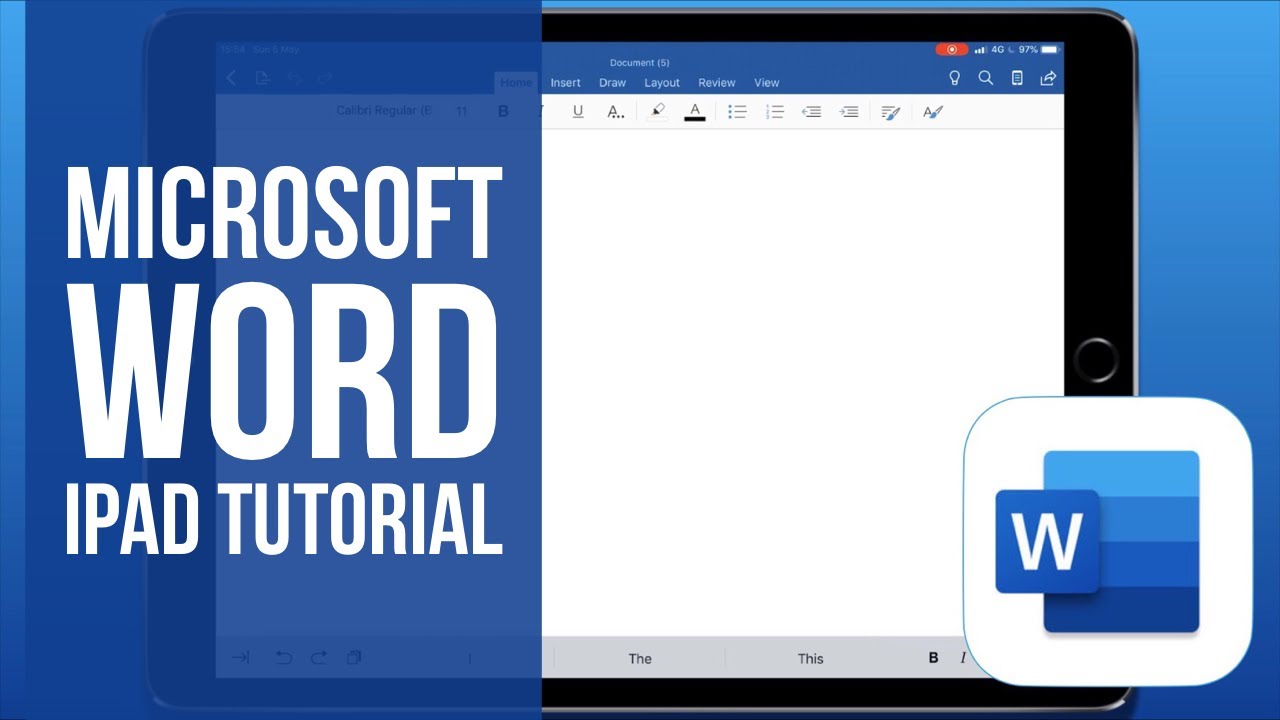
For example, the biggest one I found so far is the lack of table of contents. You can't automatically add a table of contents based on the contents of your document. If you want a table of contents on your document using the iPad, you have to do that manually, which is a bit silly to miss that out, so that they know it's not perfect, but it's still very powerful. So when you open up Microsoft Word, you are greeted with this screen. You can see a list of templates which we can come to in a moment, but down the side on the Left.
We have a few different options: we're going to start the bottom, which is settings, and if you tap on that icon, you can choose which account you're logged into there are various bits and pieces to send feedback to Microsoft. Based on your experiences, you can turn on or off push notifications, Auto formatting, as you type you can turn that off and with the Apple Pencil. If you have one of those, you can set that to always draw ink I'll come to you what that means in that in a little while, but essentially it can either. You can either use it to sort of select objects or to draw, so you're, basically selecting what it does by default. So the next one up is to open a document, and it will show you whatever stored in your OneDrive by defaults.
However, there are other locations you can add when you want to save or download documents, so you'll notice that there's a recovered drafts' folder. So what happened earlier I was doing a test run of this tutorial. It crashed so any drafts that you might think you've lost might be in this folder. However, underneath we have documents that are actually stored on the iPad itself below that, if you tap on more, it will give you access to your iCloud Drive, so you can save documents into there very easily and if you choose to add a place, there are numerous cloud services that Microsoft Word and the other apps from Microsoft will run with. So you can just sign in on that account, Dropbox or whatever I think Google Drive is missing from this one, but OneDrive Dropbox, Box, etc.
A lot of the big ones will work with Microsoft Word, above that you can access your shared documents, anything you're working on collaboratively recent documents above that, and then we'll start with new, which is our original screen. So, as you can see, I can choose between a blank document and there are several templates we can choose from. If that's what you want to do, however, what I'm going to do is go straight in with a blank document, what's good about Microsoft Word for the iPad, when we compare it to apples pages or Google Docs. Is that everything you need is in front of you, so we have various different tabs displayed along the top, which is what we're going to go through in this tutorial, but every but- and everything here is what you get, so there's no sort of hidden menu combinations you have to get through to find the bit you're looking for, so you know it really is quite straightforward: you'll notice there's also a strip along the bottom, which we will talk about a little as well, so we just got a strip at a top strip at the bottom and your work in the middle. The first thing we'll look at is how to save this file so in the top left corner, I have an arrow, and next to that, I have a picture of a page of three dots and if I tap on that, we have the Save button.
So I can tap on that, and then I can give the document a name. If I go back into this menu, I can now choose whether I want autosave turned on or not so, I usually recommend. You would turn this on. I. Don't see why you wouldn't, but if you want, sir, if you're someone who wants to manually save you can turn it off just go to this menu and hit save every time now the rest of the items on this menu.
Actually, let's take a look at a little later on. So here is our Microsoft Word document, it's just a single white page at the moment, and you can navigate just by swiping up or down, and if you want to adjust the zoom level, you can just pinch to zoom, so you can view the minimum size, or you can go right into maximum or somewhere in the middle, as you can see, it says fits on the page, so that is the full width of the page. Is now everything you're seeing, so before we add anything to the document. I think it's important. We just set the document up.
So if we go to layout, which is on the tab at the top, we can choose the margins of the document, so we can choose normal or narrow, and you can have custom margins. If you want, we can set the orientation of the page wherever you want portrait or landscape, and then you can choose the size, several templates for you to choose from there next, along from that, we have columns. So if you're creating a document where you want columns of text, you know two or three or four different columns per page. You can set that up here, so I'm going to just choose two, so you'll notice when I start typing I'll, just type loaded, gobbledygook, you'll notice, this cutting off about halfway through now, if I just hit enter until I get to the bottom of the page, it doesn't go on to the next page. What it will do is go to the next available column, and it can begin typing here as well, so that can just be set up right from beginning under the Layout tab, the next bit along from that is for breaks.
So at any point, if you want to insert a page break a column break, you want to sort of sort out. Your text wrapping, or you want to add various different section breaks, and you can do that from the breaks button underneath the layout menu so to enter text. You can just tap on the page and begin typing I'm using a physical keyboard at the moment. But if you were to have you know just the digital, only the on-screen keyboard will appear, and you can just type like this. So now they look at how to edit text if I double tap on a word, it will select that word if I triple tap.
It will select a paragraph. So with this paragraph selected I'm going to show you some options on the Home tab. The first thing we see is our text formatting options. The first option is to choose a typeface, as you can see, there are plenty to choose from. Some will need to be downloaded, but you can do that as and when you need them.
Office compatible fonts are listed at the top and, if you scroll all the way down to the bottom, you'll find all the iOS fonts as well such as Helvetica, which I'm going to choose here, so I've just put in a title at the top, and now I'm going to show you a different way of selecting text if I just double tap on a word, you can see that there's a blue circle in the top left and bottom right of that selection, I, can just drag the essential handle, so I could just tap, hold and drag and make my selection exactly as I need it to be to increase the font size I'm just going to tap on the number at the top of this menu and I can do it manually by hitting the plus sign or choose from a preset font size. I'm going to say make it bold, it can be underlined, and then I have some additional text. Formatting options. I can do a strike through, and we can do subscript or superscript. You can also change the case of any word.
It doesn't have to be a title. So if we can convert the text all into uppercase, if that's what you want to do and to change the color of the text, we can tap on the font, color icon and there are numerous shades. There's lots of presets here. If you want to be really specific on the color, you can go to more colors, and it gives you this rainbow strip, and you can choose exactly the color that you want it to have now. If we have a look at the strip at the bottom of the screen, you'll see that we've got a few additional buttons, and I'm.
Just going to move my cursor to this paragraph over here now the first one is indents, so we can actually indent the start point of the line or the paragraph. Then we have undone and redo buttons and then, if you have copied something to your clipboard, you can just paste it here and if you select a word, we can see that we now have the cuts, copy and paste options available to us here as well. Next to that we have a set of predicted text option. So if I begin, typing you'll see the three words they'll all change, based on what I'm typing now that can be quite useful. If you just need to save a bit of time and you, you know, it picks up on the kind of sentences you're constructing you'll, also see in the bottom right corner.
We have the bold and the underline options, just as we do at the top now I'm going to select my title once again, and I'm going to choose the more formatting menu and at the bottom here we have something called word: art styles, so you might remember word art from old versions of Microsoft words, bits of that are in here, and it just gives you some templates which make the text that 3d or add shadows and things like that. So that's available as well. If you want to clear the formatting, you can just select the text, you want to go back into that menu and go clear formatting. To put it like the rest of the text. Highlighting options are also available.
So if there's a particular word or sentence that you want to highlight, you can just double tap on that to select the word or triple tap, to select the sentence or paragraph and then next around more formatting options. We have highlights color, so I can choose for one of the many preset, colors, or I can, if you want to get rid of that, you can just choose no color under this whole menu at the top. We also have options to make lists, so we can have bulleted lists and to do that. I can just tap on bullets, and then I can choose a style of bullets that I'd like to have. You can also have numbered lists, and you can choose whether that would be sort of Roman, numeral type numbers or numbers of brackets numbers with dots or letters.
So that's all here as well, now I'm going to triple tap on the top paragraph and show you the paragraph editing options which can be found by tapping the second icon. From the end, the top four give us some alignment options, and then we can choose special indents where we can decide if we want the first line to be indented or if we want a hanging indent like this from here. We can also choose the line spacing and if we want to see paragraph marks, we can turn that on from this menu too and finally, we can add spaces before or after the paragraph text. Stars are also available in Microsoft Word I'm, going to just select this subtitle I have here. The last icon is for text styles and, as you can see, we have titles and different things that we can choose which all based on presets the next menu along is insert, and there are a ton of different options available to us here as well.
First is to add a page break which you can do at anytime, just by tapping that first icon and next an app we can add a table in Microsoft Word. It functions very similar to its desktop counterpart, in that, if you have an item in your document selected, it's a new tab at the end, as you can see, this table is currently selected and the last tab here it says table, and it's from here that we can customize the look of our table. The first two icons allow us to delete or insert additional rows or columns and by double-tapping we can select multiple rows and hit merge. The split option is also found under this menu to the button in the middle is called table. Styles, and here we have a number of different presets to change the color scheme, the look of our overall table.
If we go to style options just to the left of it, we can determine whether our table as a header row or not, and whether we want banded rows, which is where different rows are slightly alternate shades of color between each row. We can also choose if you want a first column or a last column, and if we want banded columns so as we move from left to right, the shading of the columns alternates as well, so just the shading of a particular sale or group of cells, we can just make our selection and go to shading at the top, and then we can have very specific colors in our table. The next icon, along gives us some alignment options for left center or right, and if we have quite a large cell, we can have vertical alignment as well for top middle and bottom. The next icon along allows us to choose the rotation of the text, so we can choose to have a varying 90 degree angles now to adjust the size of the table. You'll notice, when I've got the table selected, I have a square in the bottom right corner of the screen, with two arrows and if I tap and hold on that, I can adjust the size in terms of width and height you'll, also notice around the edge I've got these white boxes and these help us determine the width of the column.
So if I just tap on one of those, the first one to select the first column, you'll see there are two lines at the end of that selection, that's op and if I just happen hold I can adjust the width of the columns and the same works with rows. If I tap on top row and got those two lines at the edge there, so I can just drag it down now. The last three options on this new table menu have appeared all relate to size as well. So if I just tap on auto-fit, I can also fit the table to the width of the page or the width of the contents of the page or set a fixed column width. So I'm just going to choose auto-fit page.
We can see now that it's kind of in line with everything else I can also choose to distribute my rows and columns evenly, and I can choose the cell size, which is the last option here back on the insert menu. The third option is to insert a photo. If you tap on this, you can choose a photo from your library to insert into your document now I've inserted an image into the document. You can see a new tab, as appeared at the end called picture, and it's from here. We can edit this image with my image selected I can resize it by dragging one of the circular handles in one of the corners and I can tap and hold to move it to a different part of the page.
Under this pictures' menu. The first option is Styles here, a number of presets, which will add a border or shadow or some sort of reflection. The second option allows us to add a shadow, and that can be an out of shadow in a shadow or some sort of perspective shadow. The third option allows us to add a reflection which is a sort of repetition of the image below it. The fourth option, along is called wrap text, and this allows us to choose how our image sits in amongst the text and the rest of our document.
If I choose, this I've got a few different options, including having text behind or in front of the image I'm going to choose. The second option down call its height, you'll notice. Now I can move this image, and my text moves around it. If I have numerous images or shapes on my document on top of each other, I can choose the order that they sit by sending things forward or backwards with my next two options. Next, to that, I have rotated, I can rotate it so right, left or flip it vertically or horizontally.
I can also crop the image and notice that a contextual menu appears allowing me to choose an aspect. Ratio for the crop. I can also reset any adjustments that I've made to the image, and finally, alt text allows us to add a title in the description of the image to the document back on the insert menu. The next option along is called camera. This allows me to use the devices inbuilt camera to take a photo and immediately place it inside the document.
Next, to that, we have shaped the number of preset shapes are available for us to insert into the document and just like when I insert an image or a table into the document. Menu appears at the top at the end, and this one is called shape, just like your images and tables I can tap and hold and move it to a different part of the screen and use one of the handles to resize it. Under this shape, menu I can insert other shapes or choose a preset shape style. I can also choose the fill color and the border color. If you double tap on a shape, you can actually enter in text inside it a bit like a text box using the word art styles.
You can also customize the look. The next button is called text, and this allows me to adjust the vertical and horizontal alignment. I can also adjust the text direction. Wrap text also functions similarly to the menu item we saw before if I choose, tight, I can move the image in amongst the text and the text will automatically adjust itself, so it's still readable and just like with an image if I have multiple different layers, I can send each one forward or backwards. I can also rotate.
The image and I can also add a description and a title back under the insert menu. The next option is to add a text box just like shapes and images. These are resizable and can be moved around the screen. It has the same menu as shapes as we can see at the top, which allows us to have the same editing functions as we saw previously. Next, to that we have icons.
You have a number of different icons to insert into your document at the top. Is a drop-down menu to let you choose a category with this icon selected, a new graphics. Tab is added through our menu at the top. The first option allows us to choose a graphic style, and we can change the fill color and the outline color. We can also wrap the text around the image, adjust the placement in terms of layers, rotate crop and add a title, a description just as we mentioned previously further along on the insert menu.
The next option is to insert a hyperlink if I double tap a word, to select some text and choose hyperlink, we can add the address of the website. We want it to link to the next icon allows us to insert the comment. When you add the comments, a comment icon appears on the right-hand side of the page. The next icon is an image of a sheet with two yellow boxes at the top and bottom, and this is our header and footer. We can choose this icon and choose edit Heather, and then we can edit the footer.
The last two options allow us to have a different header and footer on the first page, as well as differing headers and footers on ODS and even numbered pages. The next icon allows us to insert a page number: we can choose whereabouts that is on the screen. Then we have a few other different options. Format page numbers allows us to edit the style or choose a letter or a Roman numeral. We can also include a page count, and if you want to remove page numbers, then you need that bottom option there.
The next icon has a capital A for a by a lowercase B, followed by one. This is our footnotes I'm going to move my cursor to where I want my first footnote to appear and choose that option, as you can see, number appears next to the word iPad and that's referenced at the bottom of the page. Next, to that we can also add endnotes function very similarly to footnotes, except these are usually found at the end of a document or the end of a chapter. The next tab, along on our menu, was designed very much with Apple Pencil in mind. This allows us to draw different shapes or objects or to annotate a document.
If you have an Apple Pencil and use it on this document, it automatically starts drawing. If you want to use your Apple Pencil to select items on the page, and you need the first option, and you can use your Apple Pencil to navigate around the document and make selections if I tap on a pin, you can see that arrow appears underneath if it's up on that arrow, and you have a few different formatting options, including the size of the pen and its color. You also have a few different texture based colors to choose from this error appears underneath each of our different pens, highlighting text can be particularly useful for research. At the end of our pens list. We have a plus icon.
If I tap on this, we can add a pencil pen or a highlighter. This is good if you frequently need to use the different types of pen- and you don't want to have to change the color every time, I'm going to choose highlighter and choose a different color. Your custom pen icons can be rearranged. If what's happened, hold on this highlighter I can drag it, so it sits. Next to the others, then I can quickly switch between them.
If you don't have an Apple Pencil but still want to draw you can toggle draw or touch which allows you to use your finger to draw. Instead, drawings can become shapes if I tap on it. You can see that bits of my drawings can be selected. You can then drag it or resize them and notice. When I have a drawing selected, it brings up the shape menu at the top, which gives me some shape, editing options that I had before the review.
Tab allows us to make general adjustments to the document. The first icon is for spell checking, and we can choose a proofing language from the first option. We can also turn off the spellcheck completely. The next icon is for smart lookup I'm, going to select some text and tap on smart lookup. This runs a search on Wikipedia and other websites.
For the word I've selected notice. There are two tabs at the top explore and define defiant acts as a dictionary if I tap on a link or an image. It takes me through to Safari, where I can view more information. The next icon allows me to view the page count and the word count. I can also toggle whether I want the word count to be shown by default notice when I scroll through the document.
The page count on word camp automatically appears at the bottom. The next few icons allow me to add a comment or remove one. If you're working, collaboratively or editing a document for somebody else, you can turn on track. Changes display for review allows us to change what we see we can see all the markup no markup or the original. We can then choose what elements of the markup we want to see whether his comments or insertions or any formatting changes.
Once you've received a document as had changes made. The last few icons allow you to approve them a more in the top right of the screen. The second icon in we have something called mobile view. This gives us a simplified view of the Word document, which allows us to focus more on reading its content notice that the look of the app is far more simplified and we no longer have individual pages. The next tab along is called view and again this allows us to choose between looking at a print layout or the mobile view.
We can also choose whether we want to see our ruler displayed at the top and whether you want to see an entire page on our screen or fits our width in the top right of our screen. Again, we have a magnifying glass icon if I tap on that, we can search for text the settings rule next to it allows us to activate Find and Replace. We can also choose whether our search matches the case or the whole words in the top right of the screen again. The last icon is called share and allows us to invite people to edit document. Sharing.
Options can also be found in the top left of the screen back where we chose our saving options. The additional options allow us to save a copy of the document or to send it. We can also export to ODT format or PDF. The next option allows us to print the document from here. We can choose wherever we're going to use an Imprint compatible printer or prints, using an app from the app store which allows us to print to any wireless printer.
Other options include viewing the files, history or the properties of the document. The fourth icon in the top right is a picture of a light bulb. If were unsure where to find a particular function, we can actually just type what we want it to do here and finally is possible to install add-ons into Microsoft Word, although it is from a limited selection on the insert menu. The last icon is for add-ins we can see which ones we've recently installed or choose to see all the available options. So that's it for this tutorial on Microsoft Word for the iPads.
If you found this video useful, please like comment and subscribe, and I'll be back soon with some more iPad tutorials. You.
Source : Bit By Byte
Phones In This Article
Related Articles


Comments are disabled
Latest Articles


