iPhone SE (2020): How to Do Everything By The Apple Circle
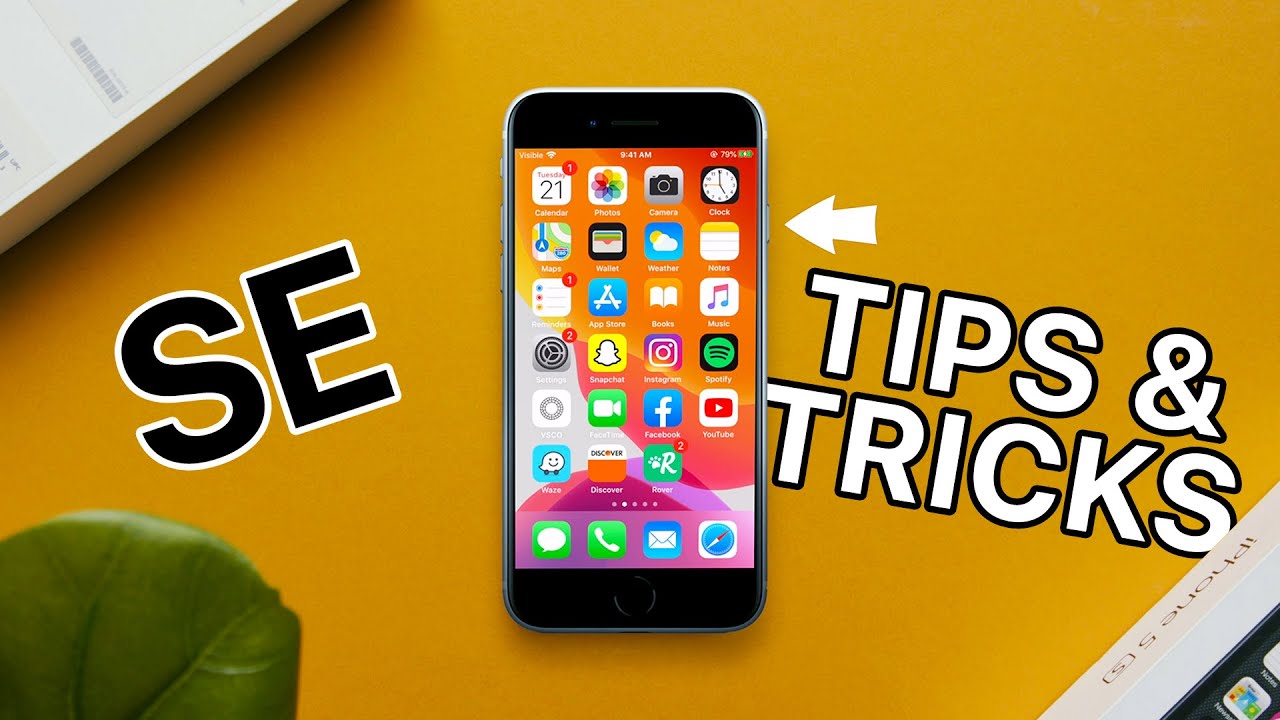
The 20/20 iPhone SE is a tremendous value for its 400, our price, that you are getting so much value and so much from the higher end, iPhone 11 and 11 Pro in this phone that costs $400 and whether you're kind of on the fence, you're kind of doing your research on the iPhone SE on whether you should buy it, or you just got this phone, and you got out of the box of the first time. Let me help you all out. These are kind of 15 tips and tricks things you should do when you first get this phone to kind of learn your way around your new phone learned your way around the operating system and make the phone a little more like your honor. So let's go ahead and jump right into it with tip number one, and that is adding more fingers to touch ID touch. I'd is a great way to easily unlock your phone and authenticate purchases, but the one thing car you already set up during the initial setup process is nice, but you probably want to add more. Let me show you how to do that so to do this head into settings.
It is the kind of the gear looking icon on your home, page, tap on that and then tap on word says: touch ID and passcode. Then you'll see a bunch of options. You're going to want to select the one that says, add a finger. This is basically going to walk you through the same process that you went through when you first set up the phone, but this time, instead of going with the initial thumb that you set up with go with something else, maybe your other thumb or your index finger your pinky finger, whatever is most comfortable for you and you'll basically be able to unlock your phone with whatever fingers you put into the system. This also actually works with friends and family.
So if you have a spouse or a loved one or a family member that you want to have access to your phone, and you trust them, you can add their fingers into the touch ID system as well, and they will also be able to unlock your phone and authenticate purchases. So now that you've got that set up tip number two is another essential one: it's how to change your wallpaper. Let's face it, the Apple wallpapers look beautiful, and it looked nice, but they're not exactly custom and personal to you. So let's fix that, so jump back into that settings app and then go to the wallpaper icon and then next you'll have the option to choose a new wallpaper from here. You can select from one of the Apple default ones.
There are dynamic wallpapers that kind of move slightly when you turn on the phone there's the live, wallpapers that move. If you press down and hold on the screen and then there are just still images that Apple has in there that are nice, but again not super personal below that, though, you'll have the option any photo. You want that's either currently on your device or it's synced through iCloud photo library. If you have that turned on, you choose a picture to changes. Your wallpaper you're going to want to select that photo and then feel free to kind of drag it around get a place just right, and then, when you like what you have and what you see just hit the set button- and you are all done next up- is dark mode.
Not only is it easier on the eyes to kind of read through things and read articles and go through apps, but also kind of gives it a little of a cool, unique look. Let me show you how to turn that on we're going to go back into the Settings app this time that we're going to go under display and brightness and then under the appearance section you can switch between light mode and dark mode. You also have the option here to transition from one to the other automatically when the Sun sets or at a custom time of your choosing. So if you want to go in the dark mode at 2:00 p. m.
for whatever reason he had the option to do that right within the Settings app and while we're already here, let's talk about tip number four and that is toggling on and off the true tone display. So your iPhone SE has what's called a true tone display which basically allows you to change the whites and the color temperature of the display, based on the room that you're in, so it might be a little warmer. It might be a little cooler depending on whether you're inside you're, outside or whatever light happens to be in that room. Some people love this feature and some people absolutely hate it. Luckily, you can easily toggle it on and off right here within the settings.
Next up. Let's change the default ringtone that comes with your iPhone SE. To do this again, we're jumping back into that Settings app, and we're going to go to sounds and haptics, and from here you can change the sounds that play for. Basically everything on your phone from when you get a new text to a new incoming email. You can customize all those sounds right here in this menu to change the ringtone tap on where it says, ringtone and then choose a new sound.
You can go through the list and kind of tap on different options to get a short preview, find one that you like and what works for you. Furthermore, you also have the option to purchase songs from the iTunes Store to be able to use as your ringtone. That's also a super nice option, but at this point here, let's just go with something built in this. One sounds pretty good once you're all done, and you like what you've selected just hit the home button to go back home, and you are all done next tip- is all about screenshotting. So if you have ever been in an instance where you have something on your, you want to share to someone- or maybe you want to circle a specific thing on a webpage, but you're, just not sure how to do it.
Luckily, screen sharing on the iPhone I see is super, super simple. Let me show you how to do just that, so to take a screenshot press, both the home button and the power button quickly kind of together so like just two seconds on both of them. You'll see your screen kind of flash with a little of a bright white light and once you've done that you'll see a small, tiny preview image in the bottom left-hand corner. That shows you what you just screenshot it by default. This will disappear after a few seconds, and it'll actually go and be automatically saved in your photos.
But if you do want to kind of adjust this, you can tap on that preview, and then you get the option here to crop the image you can draw. You can mark up the image circle things you can do whatever your heart desires once they're done, and you've made those changes, you can hit the done button in the upper left and then hit save to photos. It's hard to see the true power of that a13 Bionic processor, inside the iPhone SE, but one of the instances that were actually works out really well. You can kind of see its power is with multitasking if you ever need to jump back and forth between a couple of apps. At the same time, multitasking is the way to go so, let's say, for example, you're in Safari you're looking at a webpage, but you want to copy some text from an email to do this.
You want to go ahead and double tap the home button to bring up the multitasking menu. This kind of gives you a preview of all the different apps open on your iPhone, and you can use your finger to slide through and go back to any particular app. So if we want to go back to our mail client, for instance, we can tap on it, we can go right back into the mail client, and we're basically picking up right where we left off. You also have the option, when you're in this multitasking kind of menu to force close apps, so kind of bonus tip if an app is stuck or something is not working, you can slide from the bottom to the top. Basically flicking that window away.
That will manually force the app to close and once you real launch if it's going to relaunch basically from scratch. Next tip is one of my favorite iPhone features ever and that is control center waver needed access to the flash layer. You want to turn Bluetooth on and off or Wi-Fi on or off in a moment's notice. Control center is where you're going to do that, and it actually is super simple to not only launch but also customize so to access control center, simply swipe up from the bottom of your to the top of your display, and you'll kind of see this translucent interface that pops up over whatever you're doing you know, have access to your volume controls your screen. Brightness your Wi-Fi controls.
There is a lot you can do in control center. You can even add more to this to make it even more useful to do that. Jump back into settings tap, word, says, control center and then go to customize controls. This allows you to see all the different icons that you can add a control center or remove, if you don't want them and while you're here, let's go ahead and add screen recording this is gonna, be very useful for our next tip perfect. Now that you've got that added.
Let's talk about screen recording on the iPhone. This is great if you want to capture some gameplay, or you're, trying to walk someone through how to do something step by step, maybe you're even recording some tutorial videos for YouTube like this one right now screen recording, is an awesome tool that lets you. Do this super easily right from the phone itself to start a screen recording, go ahead and slide up from the bottom to the top to go into control center and then tap on that little kind of what looks like a record button. It's kind of a white circle they're going to tap on that you'll get a count on 3, 2 1, it's going to turn red, and now you are screen, recording your phone, so go ahead and do whatever you're going to do on your phone. Do your action? Do your tutorial play your game and then, once you are done, recording, go ahead and tap on the red outline and then go ahead and hit stop recording that screen recording is automatically going to save rec to your photos, and you can edit it you can share it.
You can do whatever you want just as easy as that another one of my favorite features on the iPhone is Apple Pay. This is great. If you don't want to take credit cards out of your wallet, you don't want to take credit cards with you. If you want to secure and fast way to pay, Apple Pay is definitely the way to go. To set up.
Apple, pay head back into settings, goes ahead and scroll down to where it says, wallet and Apple Pay and tap on that and then tap the kind of blue lettering where it says add card, and now you have two options after you kind of hit continue, you can either automatically let the camera scan the card and get all the necessary information just right from the camera app automatically, or you can also manually, enter the card details right from within this app itself, and once you enter all that information and apples is going to do a quick check to verify with the cardholder like a bank or credit union. The information all matches up once that's correct, which usually takes about five or so seconds to authenticate and verify you're good to go. You can now use Apple Pay and when you're out of place that accepts Apple Pay just take your iPhone SE put it up to the reader, put your thumb or whatever finger. You have added to touch ID on the touch ID sensor to authenticate your purchase, and you're done you've now safely and securely major purchase, and you never had to take a card out of a wallet or purse. This next tip is all about the personal hotspot feature on your iPhone SE.
You might not use this tip today. You might not use it tomorrow, but I guarantee you that it will come in handy, at least once while you have your phone. So if you want to get online on a laptop or an iPad and there is no open Wi-Fi network available, or you want to share the cell data on your phone with someone else who has a different device, the personal hotspot feature is the way to do this, so to turn this on jump into settings and then go to where it says personal hotspot, you have the option here to set the Wi-Fi password. You also the option here to turn this on and off. If you want people to join or not join, and it's basically as simple as that and just a little bonus tip here, the name of the Wi-Fi hotspot is going to be whatever the phone is named, so it could be, in my case, Roberts iPhone SE, whatever your name is plus iPhone, SE is going to be the name of the Wi-Fi hotspot and just use the password you have set up to connect and join that Wi-Fi hotspot.
It's basically as simple as that, and it works really. Well, though, a word of warning here make sure you check with your carrier for any additional fees or any kind of limitations you could have. This is pretty standard amongst most carriers these days, but if you have a question, make sure you check with them before you turn this on and get any unwanted bill or any unwanted overage fees? Sometimes we just don't want to be bothered by texts or phone calls we're just so tired of our phone dinging and buzzing. We just want silence and rest. Luckily, Do Not Disturb is the perfect feature for this built right into the iPhone.
That is quite honestly, like a lifesaver sometimes, and something I use every single day so to take full advantage of this head into settings and go to where it says, do not disturb, and I know what kind of first glance there might be a lot of options here, a lot of different settings, but let me walk you through this and show you that it's really very simple to get up and running so first things. First, you can turn do not disturb mode on and off whenever you can either do it here by flipping the switch to on or you can do it by tapping the moon icon in control center, and that is going to silence any incoming calls and incoming messages. Basically, there will be nothing but peace and tranquility with your phone, but one of the better ways to use do not disturb is on a schedule. So in my case, at night, when I go to bed from 11:00 p. m.
to 6:00 a. m. I, don't want to be bothered by my phone buzzing or any incoming calls, or anything like that. So I can set it up. Just like this in settings and of course you can adjust this to whatever timetable you prefer below.
This is another option for silence. You can either select to have the phone always silent, or you can only have it silent when the phone is locked. So if you're, basically on your phone reading, an email and a call comes in it'll ring a normal volume and act as normal and only go in a silent mode when your phone is in fact off. This is something it's kind of personal preference. For me, when do not disturb mode is on I always want it on.
So your mileage is going to vary but set it. However, you would prefer another important option here is to allow phone calls to come in from select group. So in my case here, it's favorites, so I have a loved one. Family friends, my spouse in here I, want to make sure that if they call me I'll be able to answer it, even if you do not disturb mode is turned on. Another option here is for repeated calls.
If someone basically calls you twice within three minutes. Typically, that's an emergency, and you want them to bypass, do not disturb that's a toggle you can either choose to have on or off, depending on your preference and then below is done not disturb mode while driving. You can again turn this on or off, depending on your preference. Basically, if you get a text while you're driving your phone, has the option to automatically send that person back a message saying: hey, I'm, driving, and I will text you as soon as I get to my destination. The next step is all about saving battery on your iPhone I see.
Now your new phone should have pretty good battery. You should be able to last day or two days on a single charge, but if you really want to maximize the very most out of the battery inside your phone you're going to want to turn on low power mode, let's do that head into settings and go to the battery tab and inside here you'll see a toggle for low-power mode. If you switch this on your phone is going to basically act and operate as normal, but it won't do things in the background. So it will automatically fetch for emails, and it won't basically allow other tasks that are happening, the background to hog resources and take them away from what your phone needs to do. You can still play music in the background.
You can still watch videos and stuff like that. Furthermore, you shouldn't notice any big difference, but there's always little things happening in the background, like apps checking for email or apps, updating different things. That's all going to stop once low-power mode is on to keep your battery the most efficient and to give you the most juice out of the charge that you currently have. This next tip might be simple, but it's also very important at the same time, it's how to turn off your iPhone SE. So to do this, go ahead and press and hold the power button until you see a little pop-up that comes on the screen that says slide to power off.
If you slide from left to right, you're, basically powering off your phone you'll, see the display kind of dimmed down a little and then completely go to black once it's on. Basically, black and the screen is off, your phone is off, and it will not disturb you or ring and won't do anything like that to turn it back on, go ahead and press down on that power button on the side again wait a few seconds until you see the Apple logo. What's the Apple logo, pops up, the phone is basically restarting, and you should see your home screen in about 10 seconds or so and last but not least, probably the most important tip on here is all about backup and keeping your device safe. You don't want to lose contacts. You don't want to lose photos.
Furthermore, you don't want to lose anything on your phone. Furthermore, you want to make sure it is safely and securely backed up, and there are a couple of ways you can do this. Furthermore, you can either plug it in to your Mac or PC and manually back it up on your computer. Furthermore, you can use photo services like iCloud, photo library or Google photos to automatically backup just your photos, but if you want everything on your phone backed up and probably the easiest way to do this through Apple you're going to want to jump in to the iCloud settings to do that head into settings and then see where your name is in very large print right at the top go ahead and tap on that and then tap on. iCloud you'll see a bunch of different options here to back up certain things, but you're going to want to scroll down and make sure that iCloud backup is turned on.
This is gonna, backup everything on your phone and keep it secure, and it's going to do it automatically. So you never have to worry about it. Something to keep in mind is that you probably will have to pay for more iCloud storage. Just because what Apple gives you is so small. But there are other ways you can back up your phone, so you don't have to pay for iCloud storage.
You could do other things like I mentioned before, but backing up through iCloud is definitely the simplest. The easy, as it happens automatically, so it might be worth a couple of bucks for your peace of mind, and that is it that is 15 tips and tricks you're a brand-new iPhone SE, if you guys have any questions, you need some clarification, be sure to drop a comment down below. Also, if you have any tips that you want to share with other iPhone, SE owners drop them down below. Let's share some knowledge for everybody, so we all can enjoy this brand-new iPhone anyways, that's gonna! Do it for me guys! Thank you so much for watching this Apple Circle, video and I will see you in the next one.
Source : The Apple Circle
Phones In This Article
Related Articles
![Why iPad Mini 5 (2019) is a GREAT VALUE For Money! [Review]](https://img.youtube.com/vi/j02bkb8PtiM/maxresdefault.jpg )


![HUAWEI MATE 30 REVIEW IN 2020 | SKIP THE MATE 40??? [ML, Wildrift, COD, PUBG GAMING & CAMERA TEST]](https://img.youtube.com/vi/GYOjeRe5HEc/maxresdefault.jpg )

Comments are disabled
Latest Articles


