iPhone SE 2 (2020): how to force restart, enter recovery mode, enter DFU mode, etc By 9to5Mac
How's it going, ladies and gents, in this video I'm, going to show you how to force restart your iPhone SE also how to put your iPhone SE into recovery mode so that you can upgrade or restore directly from your Mac and a lot of other handy management tips as well. But first, a word from our sponsor. I'm amazing is the most popular iPhone manager for Mac, OS and Windows. With the free version you can shut down or restart your iPhone in a single click, access, advanced information about your battery and transfer files and media from your computer to your iPhone with drag and drop pie, amazing offers Time Machine style, Wireless backups to your own storage and supports Apple's backup encryption for Mac's privacy. You can even browse backup contents to recover deleted messages, notes in contacts. All of these features are available without registration just download and install from amazing calm.
You can always purchase a license later and unlock advanced features such as exporting your messages and WhatsApp chats to PDF order, spreadsheet reinstalling iOS without erasing your iPhone extracting any file from your backups and more visit amazing calm to make the most of your iPhone ok. So before we get started, we need to familiarize ourselves with the buttons on the iPhone SE. So on the right side, you have the side button. This works as sort of sleep wake button. Here this side button is going to be used in quite a few of our different tutorials here and then on the left side.
You have your volume up button and volume down button, so familiarize yourselves with those buttons as well, and you have your home button, but it's a solid state button, so we're not going to be using that in these tutorials. So the first tutorial here is how to shut down your iPhone. Se is super simple, super easy, just press and hold the side button. Until you see the software indicator here that says slide to power off and then all you do. Are you take your fingers slide there to power off your iPhone SE? Its super simple couldn't be easier, alright, so how to power it back on if it's off, how do you get it back on? Well, it's super simple.
All you do is press and hold the side button continue holding it until you see the Apple logo and then release like that. So eventually, this iPhone is going to power up we're just going to let it power up, so you can see exactly which you should see when you're doing the same thing on your iPhone I see all right. So just a few seconds and there we go okay, so now I'm going to show you how to shut down your iPhone SE without using any hardware buttons. So you want to go to the Settings app scroll down to general, then scroll, all the way down. Until you see the shutdown button, tap shutdown, that's going to bring the shutdown interface and then all you do is slide to power off like that.
We didn't touch any buttons to do that. Okay, so say your phone was acting weird. It wouldn't function right, and you want it to restart it. Well, I'm going to show you how to do so using hardware buttons only to force restart your iPhone, so what you're going to do is you want to press the volume up volume down and then press and hold the side button in that order, and it's important that you do so in quick succession, so I'm going to show you how I do it right now? Here we go volume up volume, down press and hold the side button continue holding the side button, don't release it, and eventually your phone goes off like that, and it forces restarts. You will see.
The Apple logo will come up eventually there we go so what we just did there. We forced our iPhone to restart using hardware buttons, so we didn't interface with the software at all. So if the software is acting a little weird, you can force your iPhone to restart using the hardware buttons only so this is something you definitely want to remember how to do for future reference. So now, I'm going to show you how to place your iPhone SE into recovery mode. The first thing you want to do is connect to your Mac, so here I have a lightning to USB cable.
We want to plug that into the Lightning port on the bottom of the iPhone. Se makes sure the opposite end of the cable is plugged into your Mac. Now before you get started, you're going to need to set up a trust relationship between your iPhone and your Mac. If this helps keep everything secure, so you should see something like this on your Mac. You want to just click where it says, trust the iPhone that you just plugged in.
So this keeps both your Mac and your iPhone data secure. So once we click trusts on our iPhone, we need to do the same thing, so you'll see where it says, trust this computer, and then you just want to tap where it says, trust, and then you just want to enter in your passcode for your iPhone. So now the trust relationship is established between your iPhone and your Mac. So you can see something that looks like that, and now we can go ahead and proceed, but one more little reminder if you've just plugged in your iPhone SE from the first time. You may see something like this.
That tells you a software update, is required to connect to your iOS device and that's basically saying that there's a newer version of iOS than what supported currently on your Mac. So in the finder under locations. You may see, like a little question, mark, indicating that this is sort of an unknown version of iOS. But once you install this small macOS update, everything should be good. Okay.
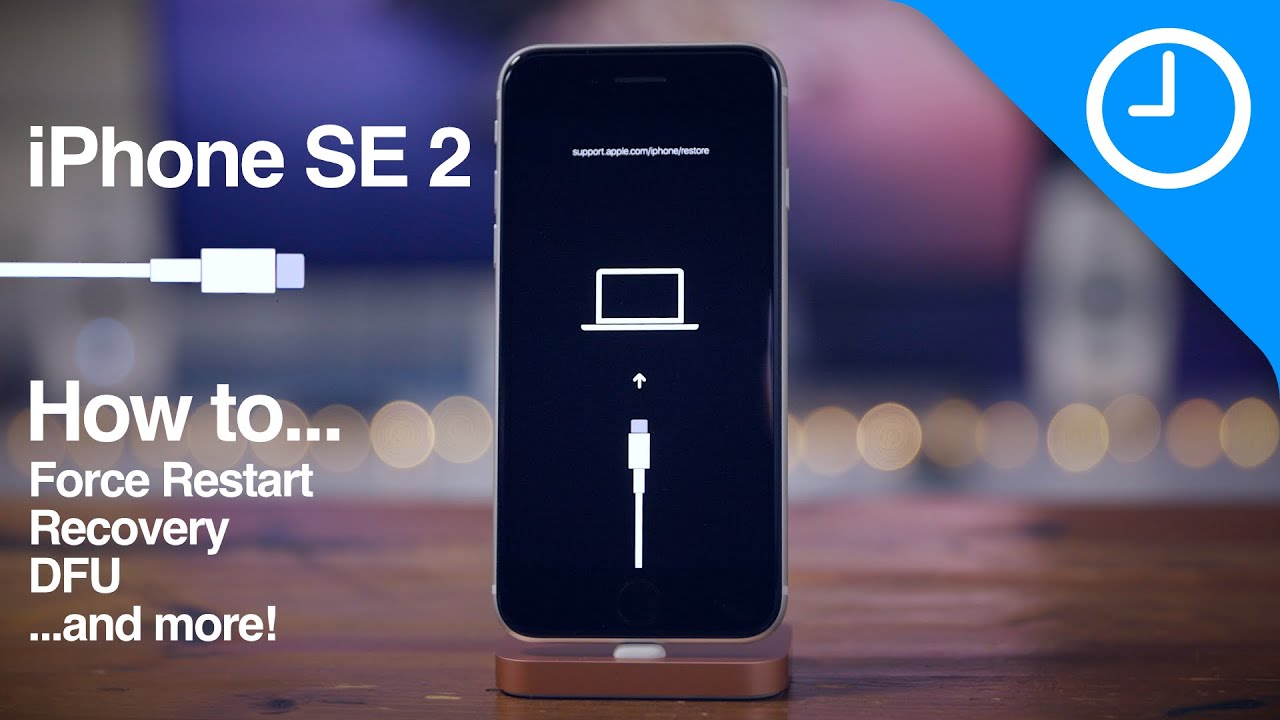
So now we have everything plugged in and fully recognized now it's time to enter recovery mode, so we're going to do a button combination using the volume buttons in the side button. So, let's get started, you want to press volume, up volume, down press and hold the side button and continue holding the side button without releasing it so continue holding it even when the phone powers off and goes to a black screen, and even when you see the Apple logo continue to hold the side button so keep holding it, don't let it go and then eventually in just a second you're gonna, see to connect to computer icon there. So basically telling you to connect to your Mac you're already connected. So you don't have to worry about that, and this is what you see on your Mac in the finder. So you may see a pop-up that says there's a problem with this iPhone that requires it to be updated or restored.
That's fine! You can either click update or restore right from that prompt there or click, cancel and use the update or restore buttons right here within the finder. Either way is fine and, as you can see, all this is occurring within the finder, because of course iTunes is no more. So all of this happens within the finder interface under the locations. Section of the sidebar is where you'll find your iPhone all right, so now, I'm going to show you how to exit out of recovery mode. The cool thing about this is that it is super easy all you do is press and hold the side button.
Just like this press and hold the side button and continue holding it into the screen goes black just like that. Now you should see the Apple logo appear, and your iPhone will slowly boot back up to the lock screen. So we'll just give it a second here, and we're almost there, and there were booted out of recovery mode now, I'm going to show you how to place your iPhone SE in a SFU mode, and this is a little more on the elaborate side. So you want to definitely pay close attention to the process here, we're going to use the same volume buttons and the side button to do this. So let's just do a cold walkthrough.
Here, we're going to press volume up volume down followed by holding the side button once your iPhone goes to a black screen press and hold the volume down button while still holding side and then after 5 seconds, release the side button. Okay, so let's go ahead and do this right now you ready alright, so press volume up volume, down press and hold the side button continue holding side and as soon as the screen goes black, you want to press and hold the volume down button while continuing to hold the side button, count 5 seconds and then release the side button, while still holding the volume down button and continue holding for another 10 seconds or so the screen should remain black throughout all this, you can release the volume down button there, and then you'll just see a black screen, but here's the thing on your Mac. You should see something that looks like this. Your Mac has detected an iPhone in recovery mode. You must restore this iPhone before it can be used.
So this is not the same as recovery mode. If you're having a serious issue, SFU mode allows you to recover from any state, okay, so how to exit out of SFU mode? Here's how you do it alright, so you want to just press the volume up button volume down button and then press and hold the side button, so volume up volume, down press and hold the side button and continue holding that side button. Until you see the Apple logo up here takes a little there we go, so now we can release the side button in our iPhone. Will boot back to the lock screen here in just a second. So let's give it a few, and we should be almost there at the lock screen there.
We go alright, so now I'm going to show you how to temporarily disable touch ID on your iPhone SE. So you just want to press and hold the volume up or volume down button and the side button, and then you'll see this screen and fill a vibration. Let go of those buttons now, and then you tap cancel. And now it's going to force you to enter your passcode touch. I'd is temporarily disabled.
Now this last one don't do this unless you actually have an emergency, so you want to do the same thing: press and hold one of the volume buttons along with a site button and continue holding those, and you'll see the timer countdown but, like I said, do not do this unless you actually have an emergency, because this will contact emergency authorities along with their emergency contact. So you only want to do this in case of a real emergency. Please don't abuse this feature and end up calling 911 authority number is by accident. So, ladies and gentlemen, I hope you were able to enjoy these tutorials. Let me know what you guys think down below in the comments section.
This is Jeff with nine-to-five Mac and a reminder special things to I'm amazing for sponsoring nine-to-five Mac. They create hands-down the best iPhone manager on Mac at Windows. You can perform time machine like backups wirelessly to your storage, location of choice, and you can use those backups to access things like messages, history and print them out to PDF. You can get amazing for free today visit amazing calm to check it out for more news, be sure to follow us on Twitter and Instagram and be sure to subscribe to the various 905 Mac podcasts for even more coverage check the links down below in the description to subscribe today.
Source : 9to5Mac
Phones In This Article

Related Articles


Comments are disabled
Latest Articles


