iPhone SE (1st Gen) Battery Replacement By RickMakes
Welcome in this video I'm going to be replacing the battery on my first generation iPhone SE- and this is the battery I'll be using, and if you find this video helpful I'll, put a link in the description to this battery on Amazon, and if you use that link, it helps me out a little and doesn't cost you anything extra. So this is my experience doing this. I just want to say this can be dangerous. You're dealing with glass here which could be broken. There's a lithium battery in here which, if you puncture, could start a fire and one slip you could ruin your phone forever. The touch ID part is pretty sensitive, so you can mess that up.
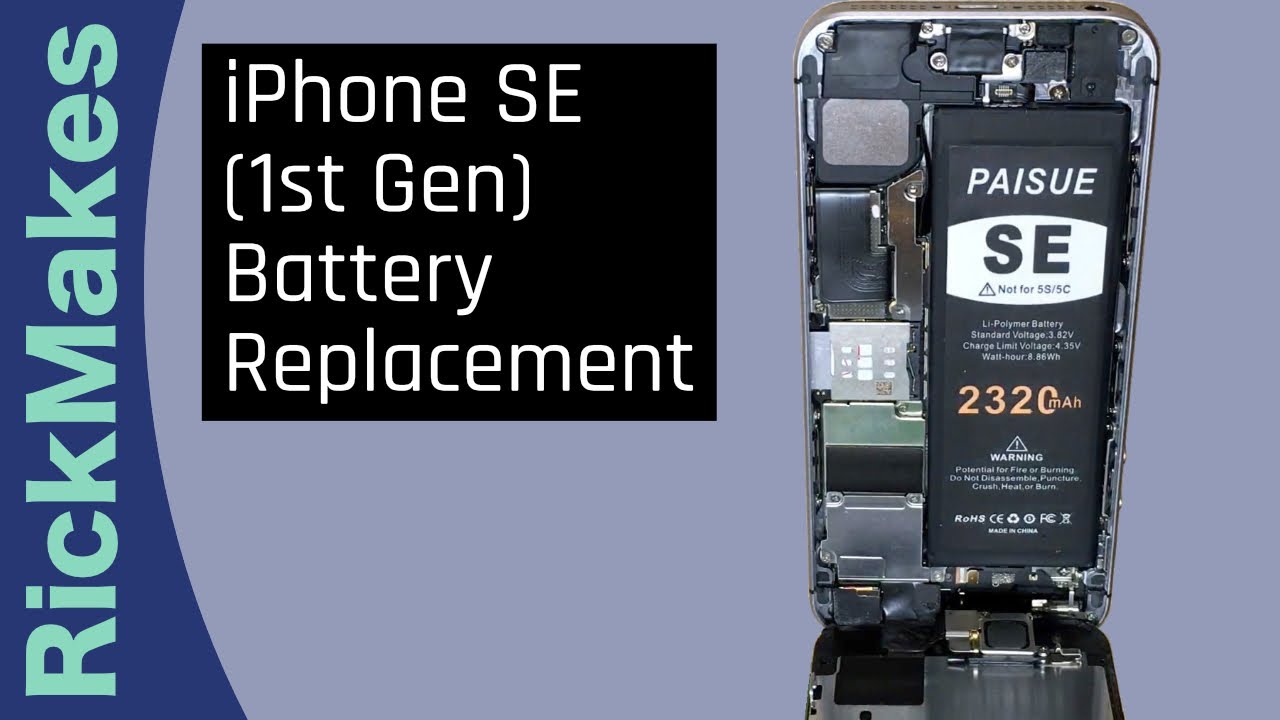
So let's get started. So I have this kit here, and this comes with a number of different things. Here. It comes with the battery. This is a 2320 William hour battery the battery in the phone right now is the original battery, and that was 1624 William hours.
So this is about a third larger, give or take, and then we have a spider in here we have a screwdriver tweezer, some bits. We have a guitar pick and a suction cup and below that we have the adhesive, so I'll get this stuff all taken out of the packages. Okay, the first step is actually to run down your battery, so I've run this down to 14. You don't want a full battery, because if you puncture it is'll have more energy in it, and you could have more chance of a fire, so I'll need to turn this off I'll, just hold down the power button, and I'll say slide the power off and that will shut it down. Next, I put the pantalone bit in the screwdriver, and I'll get a close-up of this, so this is the bit we'll be using.
It has five points on it. It's like a torn bit with five instead of six, so I'll take these two screws out, so these screws are the same I'll put these in the safe place. Next, I need to pry this open, and it came with a suction cup to put on here. So you want to clean this perfect. I put a little alcohol on a microfiber cloth and wipe it down.
Now you don't have to use this suction cup. Instead, you could use a larger suction cup. This is a phone mount. You can get suction cups all over the place, but I'll center that on the home button, I'll press down on it, and I'll lock it in place, and that gives me a little better handle, but I'll actually use the other one on the bottom to help hold it, so I'll pry this up, so I'm going to adjust this a little to get it closer to the home button, I'm actually overlapping the home button just a little okay. So I'm prying that you can see it's opening up here, I'll, stick in the pick and kind of pull that across carefully now.
This is where you could crack your glass, and you don't want to open this quickly. You could break a cable okay, so I have it all the way across. So now I'll pull this open a little more, but I don't want to pull it too much because there's a cable in here this cable right here, okay! So now we want to remove this cable. So I'll use my blue spider see if I can get this on camera. This is tricky, I'm going to stick it right under there and pop it out like so.
Okay now I can release this suction cup here, and I can lift the screen up to 90 degrees like so what I'm going to do is put a can here, and I have a piece of masking tape. I'm going to put the screen up like this I'll put the masking tape around it onto the can, and you can see this is very loose here. I don't want to adhere it to the can. Furthermore, I just want to hold it up. You certainly wouldn't want to use a gummy tape like duct tape.
This will easily release later next I'll, be removing this screw, and this screw, and I'll be using the triple zero Phillips bit. Okay, there are these screws, they're tiny, I'm setting these off to the side, and I'm putting them in order. The two case screws I put at the top, and then I put these below it. So when I go to put it back together, I can know which order they go in and sometimes screws are different lengths. So you need to pay attention to that too.
So I'll take off this metal here, and I set that next to the screws off to the side. Now I want to disconnect the battery I'll stick my spider in here, and you have to be careful. You don't want to break the circuit board there we go next, I'm going to remove these four screws, and these are three different sizes, so I'm going to take them out, and I'm going to set them to the side, and I'll keep them in the same orientation on my bench that they are in the phone, so this screw doesn't seem to want to pick up with the magnetic tip, so I'll use my tweezers here I'll, be very careful because, when you're holding with tweezers it can pop out and fly across the room, I didn't get the best view of that. So now I can remove this metal plate with the tweezers. So now I'm going to use the spider to remove these cables.
I'll start with the one on the right here then I'll go to this one in the middle and then this one that was hidden under both of those there we go now. This will separate from the screen next up, we'll be removing the adhesive. So there's this little black tab here, and we're going to pull that up. You want to make sure you don't puncture your battery like I just did right there, but I didn't get into it. So, okay, so there are two adhesive strips in here, so I'm actually going to cut this in half, so I can remove them separately.
These are flush cut pliers. Okay, so I need to pull these out, and they'll stretch really long and remove from the bottom of the battery. But first I want to heat this up a little. So in a previous video, I used a heating pad that you might use on a bed to heat it up, but I came up with a different idea and not everyone will have this option. So I have this 3d printer over here, I'm going to heat the bed on this to 60 degrees, and I'll, put the phone on it, and then I'll.
Let it heat up. You can also buy special heating pads to heat these up. You can buy it's like almost like a sock with rice in it. Furthermore, you can put in the microwave to heat it up, so there are different options here, but I think this one will work well for me. So I'm going to stop the video while I'm heating this up, because there's not much to look at, and then we'll come back, and we'll remove those pieces of adhesive okay.
So I got that heated up. I didn't put it on there for very long now. I can start pulling these strips out. You want to pull these at a low angle, and they're going to stretch a long ways, and you want to do it slowly. So I'm wrapping that around my finger and using it to kind of pry it out.
I'm making sure I don't let it drag on the back side. I think I got it all the way out. So you can see this is super stretchy. I think there's enough heat in here to take this one out. Otherwise, I could put it back on and heat it up a little more.
So if you break one of these, you can use some floss under the battery to try and release it. You could put a little alcohol under there using a syringe. You need to be careful. Furthermore, you don't puncture the battery, though okay, so now the battery should come out. Furthermore, you want to make sure you don't bend this battery.
It still seems to be stuck in here a little, so I'm going to use this plastic game card. It's like a credit card. Stick that under here looks like there might still be a tiny bit of adhesive under here. So I'm going to carefully pull this up slide this under. I have some dental floss here.
This is a glide floss, so it's not going to strand apart. I need to hook it around this corner. Okay, I got it under the battery. Well, I got it on one corner. I need to get it under the other corner.
Now I can pull this through to release any adhesive. That's still stuck in there. This floss is very, very slippery, so I think the adhesive on this side is gone, and I think it must have broken off on that side. And if I look down here, I can see where the adhesive broke off. Okay, I got hold of it, so I'm going to pull it out slowly.
Hopefully it doesn't break on me. Okay, I have hold of it with my fingers, and it's going to break. I can already tell there we go, so I did bend that a little. I think it's okay, but, as I said earlier, this can be kind of dangerous, so my best advice for taking this out is to pull it out as fast as, like an hour hand, moves on a clock or maybe slightly faster, but you want to go really, really slow and let that adhesive release and make sure it's not rubbing on anything. You can probably get all these out in one pole, okay, so we're ready to install the new battery, so I'll just make sure it lines up in here.
It looks like it does. We have the connector here, so I'll, keep it in that orientation I'll, take the adhesive strips, and I'll pull the blue side off like, so I'm going to set that down on my bench, and I'm going to place the battery on top of it here, and I'm going to align this edge with the junction between the white and the black, and you want to be pretty accurate centering. This, too, I did okay, I'm off to the side a little on the bottom. There now I'll, take this other blue part off, and I'll fold that up over onto the battery, like so okay, I'm going to peel this off, and I'll set it in here, and I'll make sure this connector is lined up with the connector on the phone I'm going to peel this off slowly! Okay! Now you have one chance with this. If this doesn't work, you'll have to get some new strips, so I'm hinging it off the outside of the case.
I'm holding it up with this thumb I'll get the battery connector, where it needs to go right about like that. Okay, I'll get that in there the battery connector lines up. I don't want to connect the battery up, yet there we go so now, I'm going to put this back together, the reverse of how I took it apart. So I still have my can here with my connectors I'll place this connector on this one, and then this one on the right so left to right. I may have to block the view to get these on.
You want to be careful. You do this properly and don't break anything now. Put the cover plate on this last screw is the one that was not magnetic. So it's the trickiest. I didn't tighten them all the way down when I got them in, I waited till I had all of them in, and then I tightened them down next I'll connect up the battery.
Okay, I'll put the cover on here. I have my two screws. Okay, this is ready to go back together now, so I need to put this connector on here. This is going to be a little tricky okay, so I had to get this up real close to my eye. So I wasn't able to film it so what I did was hook this connector on the edge of the iPhone and once I got lined up, then I pressed it in place and I used the spider to do that and I kind of manipulated this to make it fit.
So now I can press the phone back together, so there's a little tab here that fits in a notch near the FaceTime camera so make sure that gets in place. So I have to tip it up a little and stick it under there. Okay, then, the rest of it should fall back into place like so now before I put those screws in I'll see if it turns on there, we go okay, I'll see if the touch ID works. Okay, that works. That's good.
I can reinstall these two screws. So when I'm putting small screws in like this, what I'll do is I'll turn them the opposite way. Until I hear a click that way, I know the thread is lined up, and then I'll start tightening them down and that kind of helps keep them from cross threading. So the last thing to do now would be to calibrate the battery, so I'll charge it up to 100, and then I'll drain it down to zero until it shuts off, and then I'll charge it back to a hundred percent again and that will calibrate the battery. So I haven't done a tremendous number of these batteries.
That's why I like to make these videos to share what someone without the experience of doing hundreds of these has- and this was trickier than some of the other ones I did that adhesive broke. It would have been easier if I'd pulled slower. It takes a long time to put a battery in like this, but it also takes a lot of time to record it. So you know I was trying to rush things. I think and took it out a little too quick.
If I pulled that out slower that would have made it a lot easier. So that's all I'm going to cover in this video. If you have any questions, please leave them in the comments. If you like this video, please click like if you haven't subscribed to my channel I'd appreciate. If you could do that, and thanks for watching until next time, goodbye.
Source : RickMakes
Phones In This Article

Related Articles


Comments are disabled
Latest Articles


