iPhone 8 Teardown! - Screen and Battery Replacement Video By JerryRigEverything
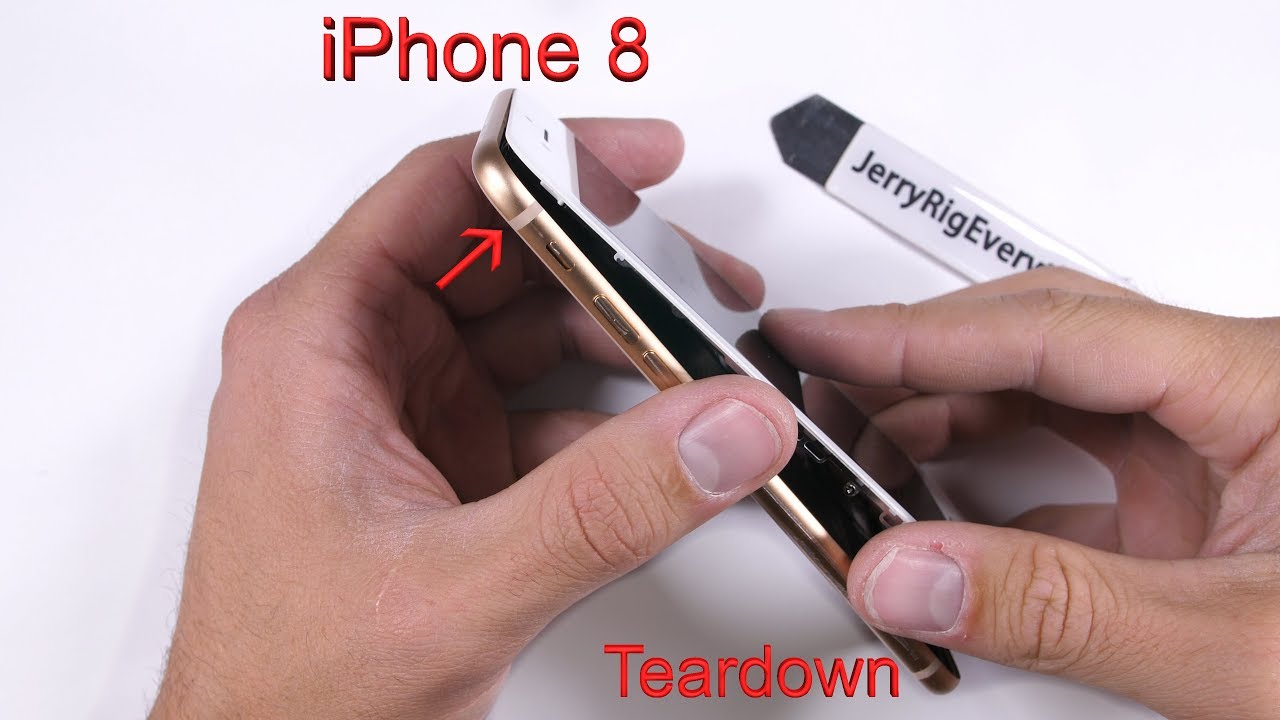
Well, I tried to make a clear back iPhone 8 like I've done with some of my Android phones, but unfortunately I failed. And I'll explain why as we tear this phone down. This video will show how to replace the screen and the battery on the iPhone 8. I'll have all the replacement parts and tools linked in the description, like always. Let's get started. The screen removal for this phone is very similar to the iPhone 7 with two proprietary pentalobe screws at the bottom of the phone.
Once those are out I'll grab my suction cup and lift up on the edge of the screen to release some of the tension on the frame. Then I slip my thin metal pry tool between the plastic edge of the screen and the metal frame of the phone. Now the iPhone 8 is IP67 water-resistant. Just one step behind the LG V30 and the Galaxy S8. But that means there's some adhesive holding the screen down to the frame, so I found it easier to slip in just the tip of my tool and slice through that adhesive.
It's excruciatingly important to not touch any of the fragile ribbon cables along the right side of the phone; they damage extremely easily. Also, your phone will not be water-resistant after this repair, but it's also not water-resistant with a cracked screen. Before the screen comes completely away, there's a series of clasps at the top of the screen. So I'll wiggle the display down just a smidgen to clear those and then I'll fold it open like a book. Now that the screen is lifted away, we want to disconnect the battery.
We'll find that connector under this metal plate with the four normal Philips head screws holding it down. Using my plastic pry tool, to not short anything out, I'll unclip the battery connector like a little Lego and then pop off the screen and home button ribbons; they unsnap like Legos as well. There's one more ribbon at the top of the phone for the front camera and sensor array. I'll unscrew these three Phillips head screws, making sure to keep them organized. All the screws are different sizes so it's important that they go back I the same hole they came from.
And then the top ribbon cable can disconnect like the others. Then the whole screen can pull away from the phone. There's quite a bit of black water-proofing adhesive around the whole edge of the screen. Now that the screen is out of our way, let's take a look at this battery. It looks a bit different than usual.
Instead of two magical pull tabs, we have 4, which is a good thing in my opinion. If you fail on one, it's not that big of a deal. Basically, with the magic pull tabs, you grab the lip of the little black tab and then pull it out from underneath the battery. As the adhesive stretches it loses its stickiness. Just repeat the process three more times with each of the little pull tabs.
These are seriously the best way to adhere a battery. No heat or violence required for removal. The four tab method also keeps the adhesive from sticking to the top of the wireless charging which you'll see here in a second. Now that the battery is out, you can see why a glass backed phone was impossible. The entire back is actually metal, except for the wireless charging pad in the center.
So there would be nothing to look at anyway, even if the glass could become clear. This metal frame is also probably what kept the phone so rigid during my durability test. The adhesive that holds the rear glass panel against this metal does not soften with heat like the Samsung phones do. It's a pretty permanent situation. I'll dive deeper into the wireless charging and waterproofing of the iPhone 8 in another video.
This is just the battery and screen replacement. I'll add some adhesive to keep the battery from rattling around inside the phone. And if a battery replacement is all you needed to do, just reattach the screen and you're good to go. But if you have a cracked or damaged screen, or you're bored and just want to watch the rest of this video, the iPhone 8 screen replacement portion starts now. Up at the top lies the earpiece which is also one of the dual stereo speakers.
This needs to be transferred over to the new display. There's a metal bracket with 3 Philips head screws holding it down. Remember to keep all those screws organized in a way that they can go back in the holes they came from. Pulling that front 7 megapixel camera out of the way reveals two more Philips head screws that hold down the speaker. After the speaker's out, there's nothing left but some adhesive holding down that upper sensor array.
It's important not to put too much pressure on the ribbons as you lift them up; these are about as fragile as paper and can tear. So if you want to keep things functional, go slow and be careful. Now the only thing between us and a new screen is a large metal plate covering the back of the LCD that we will most likely have to transfer over to the replacement display. This has Apple's usually proprietary white triple zero screws, also sometimes called the Y.6 tri-wing. It's funny that no matter how hard Apple tries to keep people from repairing their phones, the same people develop new tools to get around these barriers.
Speaking of barriers, remember that part where I said to keep your screws organized? That's especially important with the home button; this thing is finicky. There are three screws holding the bracket in place and one screw going down directly into the button itself. All of these are the same tri-wing screws we've been working with. After that bracket comes off, I'll pull up the fragile as paper ribbon cable from the frame of the screen, and then drop the home button out through the front glass. The large metal back plate can lift up from the screen at this point, except for the part that is adhered to the paper thin ribbon cables at the bottom.
Taking special care not to tear the ribbon cables, I'll pry them off the metal plate with a plastic pry tool. And this is probably what your replacement screen is going to look like. Just make sure your new screen has everything that your old screen used to have on it. Now at this point, you're either exhausted and stressed out from opening up your expensive phone, or maybe asleep from listening to me talk, as long as you've kept your screws organized and haven't sneezed them off the table yet, the assembly process is pretty simple. Tuck the screen and home button ribbon cables back up underneath that metal plate and screw it down with the three screws on the left side and three screws on the right side.
After that, grab the finicky home button and push it through the front side of the screen, aligning the ribbon up with the screw holes and the pin on the frame. The metal plate goes on top of the home button and the three screws around the edge are fine. But it's important not to torque down the center home button screw too far. Don't even make it tight. It needs to be snug and firm of course, but screw it in too tight and the home button might not work anymore, so be careful.
Once the home button's in place, we go up to the top for the accordion-like sensor array ribbon. I'll start with the right more box sensor. Plop it into the square hole and then fold the whole thing over to the left, lining everything back up with the grooves they came from. The golden circular pads at the bottom that give signal to the speaker line up with the two pins to keep them in the correct location. The top speaker gets put down before the camera and screwed in with the bottom two screws.
Then the camera itself gets folded over the top of the speaker and set down into the circular hole it came from. Then the middle bracket with its three screws holds everything down tight. It should fit naturally at this point. They won't need to be forced into place if you origami'd everything into the correct position. Now that the screen is assembled, it's probably easiest to plug in the top ribbon into the motherboard first since it's at a weird angle.
And then the bottom LCD and home button ribbons clip in after that – just like little Legos. The battery is the last thing you want to plug in. I usually test the phone at this point to make sure the new screen functions. If there are lines going through your screen, or it doesn't turn on or look right, it might be a bad connection with the motherboard or it could just be a bad replacement screen. Double check the connection first.
If that still doesn't work, maybe you screwed something up during the repair. Things can always go wrong with a phone as complex as this. The metal brackets that cover the connections keep everything down tight. Just in case you ever drop your phone, nothing will come loose. Three screws on the top metal bracket and four screws on the bottom metal bracket; all different sizes.
So make sure the screws get back in the right hole. After all the screws are back into place, the phone folds shut like a book and the top of the screen lines up with the metal frame first. And then the sides clamp in all the way down to the base of the phone which clamps in last and has the bottom two screws. And everything works. I'm kind of surprised myself.
I'm going to do a complete wireless charging tear down and water-proofing analysis in my next video, so subscribe for that and come hang out with me on Twitter. I'll have replacement parts and tools linked in the video description of this video if you're going to attempt this yourself. And thanks a ton for watching. I'll see you around.
Source : JerryRigEverything
Phones In This Article

Related Articles


Comments are disabled
Latest Articles


