iPad pro A1876 3rd 12 9" Screen replacement - What's involved By NorthridgeFix
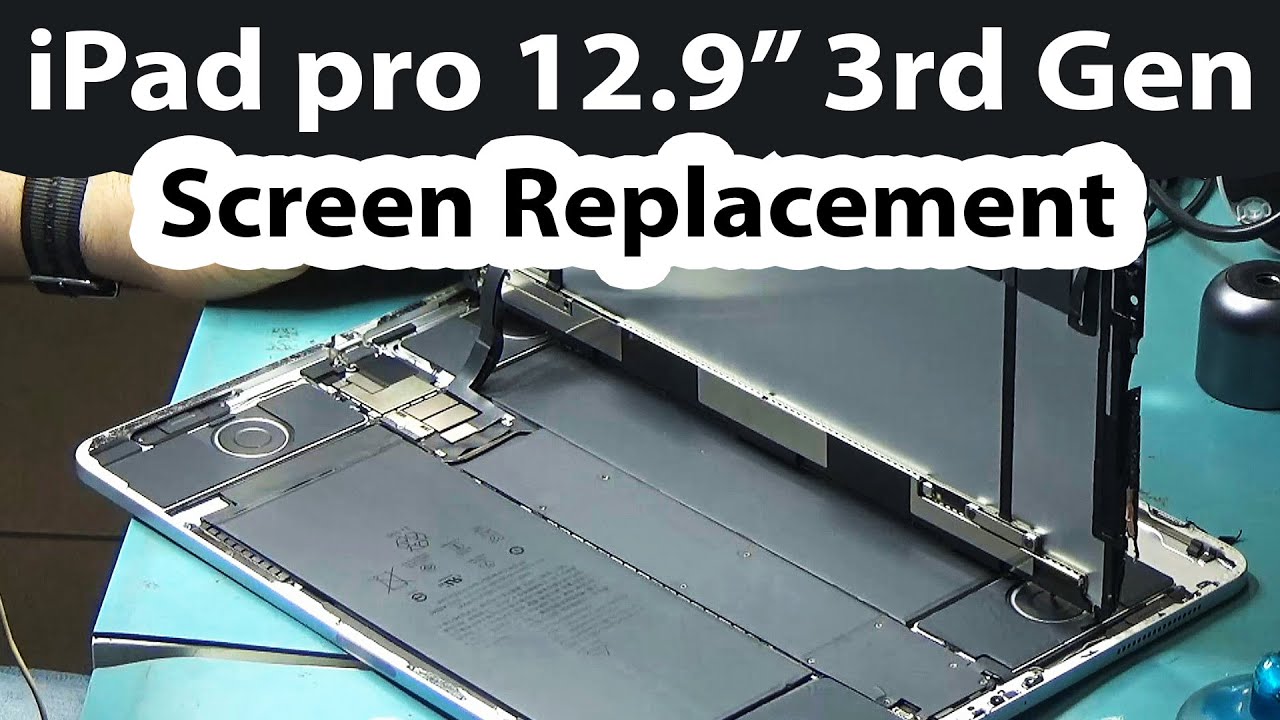
Okay we have a customer that brought in an iPad for third gen twelve point nine inches and the screen is slightly cracked on the bottom and customer wants. The screen changed screen is not cheap, it's expensive, but he wants to change the crack. As you can see it's from the top here and that's it, the rest of the screen is good. First thing we want to do is use the hot air guns, so we can heat up the edges and pry it open in the iPad. Pro is a big surface, so it's going to absorb all the heat, and it's going to take a while before the corners get hot. Now on this iPad, you have to be careful because we have the face ID on the top, and the screen is connected on the bottom.
I've done this once before, but I did not see many videos on this on YouTube, so I thought. Let me do one on it. Okay, so there's a crack here and the cord is getting stuck between the cracks. So we have to gently lift this up a bit. I mean even if the screen is cracked from here, there's no reason to rip off and break the screen.
We can probably use it for testing if the customer does not need it, so we try to keep the screen in as best shape as possible. Okay, this area is gonna, be hard to slip the cord under because it's badly cracked and this area here. So let's go back to the rest of the iPad and just go over it. One more time and I think just use a little of heat, and we should be able to fly this team open. Let's see, see it's starting to open up from all edges now, it's going to be difficult to keep it in a good shape from the top-left area, because it's badly cracked, but let's see what we can do.
I mean the iPad is cracked at the touch ID area of the tablet. We are working on this as safe as possible, so we can keep everything intact and nothing gets damaged during the operation, but I want to show you the condition of the crack from here. So this is what I'm dealing with right now. This is the only place that's stuck to the tablet now I want to release the broken area without affecting that flex, cable under it to face ID and I think we should be good. Yes, we are good, and we did this as safe as possible.
The camera may not be close, but right now all I'm doing is just fine. The screen open, I'm not doing anything delicate so far, I'm going to be using this awesome, electric screwdriver I was going to do a full video on this because it's so amazing comes with 64 precision bits, and it lights up. So if you press on the front button it screws and the back button it unscrews. It also comes with this magnetic mat that we can put the screws on. It's really an awesome.
Screwdriver we're going to be posting this for sale on our website in the next few days. Let's not screw this, you Rachel great tool, I, never thought I would be using electric screwdrivers, but this one is amazing. The nice thing about this magnetic math is it's not too big. It doesn't take a lot of desk space, so I was looking for those I said to myself: I need more than one. If we are working on five six devices at once, we can easily put those mats on the bench and each one is for a device after I used this magnetic screw, math I really loved it.
I thought you know what it would be great to have more than one of those mats on the bench here. If we are working on a couple of devices, they are narrow and small. They do not take room and space like this. One that we used to use I have a couple of those. This one is convenient, and it has a grid, so you can organize the screws in whichever way you want.
I was looking for those mats and I thought it would be great if we can buy and sell those mats, so I was able to locate them, and we have a huge batch of them and one mat is never enough. We'll be posting. Those on the website, as well, probably today or tomorrow, we're going to disconnect this idea from you. Like so and we're going to disconnect the screen, I did this once before, so I really have to look inside to see the location of the flux cables of the screen and that's the flex. People right here we're going to have to remove this shield.
Here we have one two three four five screws, and then we're going to have to remove the screw from the battery disconnect the battery, and then we can pry the screen off the board. So, let's start by taking those screws out you and the battery is over here batteries through I'm going to put it up here now we need to separate the battery from the board. We have one tiny cable here that we have to be careful not to damage just move it on to the side a bit and, let's separate the battery from the board, okay, and we should be good. Let's turn it on and see. If this tablet power on it should not, and as you can see, we disconnected power now we can safely remove the screen, and we have this cable.
So we have how many cables four to four and face idea is out here, so we have to remove it. Let's put this on the side and focus on the face. I'd blocks, cable here you do not want to force it. If this face ID flex, cable gets damaged it's game over. The tablet is not a half face, ID anymore, and so all we have to do is remove it from the center here.
I need to apply that tiny little piece here. That's the cable right there, and now we're going to have to put the flux cable on the new screen and put that screen back on the tablet. Okay, so the flex cable is installed on there nicely. We have one window here, one here, one here and one here, so all of those must be pointing to the circles on the screen. If you look at the screen here, it has two flex cables.
Actually it has one flex cable with two connectors: okay, one flex, cable with two connectors. We should have one more flexible with two connectors. We have to remove it off the old screen and put it on the new screen. Apple doesn't make it easy one minute we have one screw here from the old screen and those screws, I'm going to put them on top of the math here and that's what I like about the math is. It has a grid, so we can put this course any way we like on the math and still be able to tell which screw is for what we have to remove two flex cables.
That's one of them here, and we have to remove this one here, and we have to put this cable before this cable, because this one sits on top of the other. So let's remove this cable. We have to be careful when removing that cable, and we can appear it on the new screen, and we're going to put the second cable, and now we have to return that plate that we removed, so the cables not get loose. I love the screwdriver I use this every day and I have not charged it for the past two weeks. Okay, very good you! Maybe we should try it first before we put everything together.
I just want to connect the face. I'd here, okay face ID is in and let's turn it on. Maybe I should sue multi-bit. Oh, we need to remove the separator between the battery and the mother. Would great I'm not going to put in the wrong password? Okay, so awesome.
So now that we verified the tablet is working. We're gonna, put the fight back put the screw. Is the battery screw we're going to seal? It clamps it and call the customer in about 3-4 hours to come and pick up. That's it for this. Video I hope you enjoyed it, don't forget to Like and subscribe leave a comment.
Have any questions, and we'll do something else in the next video you.
Source : NorthridgeFix
Phones In This Article

Related Articles


Comments are disabled
Latest Articles


