ipad Pro 12.9 - LCD Glass Replacement GUIDE - How To Fix By Jose Morales
What, a mess all right, much better, hey guys, welcome good morning got evening good afternoon to everybody. Welcome to another repair. Today we got here these humongous iPad iPad Pro 12.9. So, as you guys can see, he's messed up the bird to meet us. They don't wanna these iPod to look like that. They want to fix it.
Also, when it turns on you can't see anything, it's just lines, so we went and bought the new part when you order the new part, let me tell you something make sure it comes with these boards. You guys can see these little board right here, because sometimes they don't come with these exactly, and it's cheaper, and they sell you only the LCD with these cables right here. So then you're going to have to go and do extra soldering on it. If you don't know how to do that, ain't gonna, be you're, not gonna, be able to fix it. Okay put these on the side, as you guys can see.
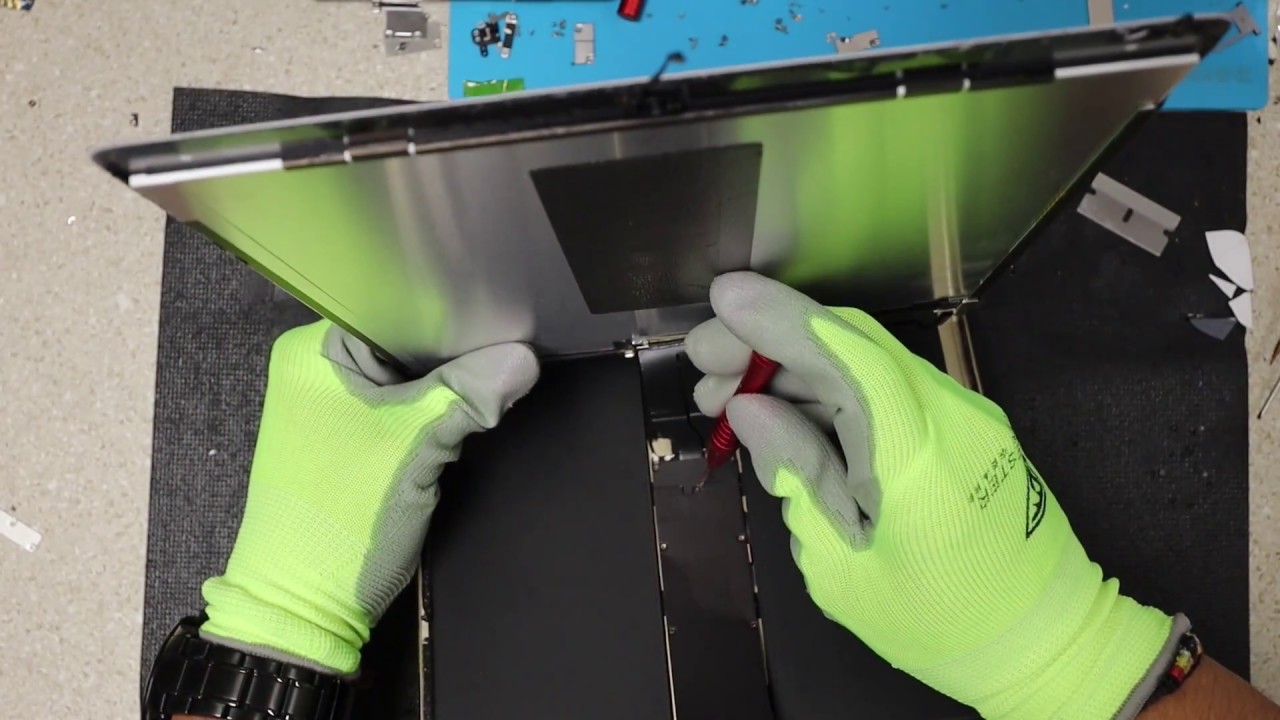
Does the new screen we're going to be putting on this I'm gonna? Put it on this side, make sure we don't break it. We're gonna start by grabbing our heat gun, yeah I'm, using gloves today, I know, and I'm using gloves, I'm not used to it, but he's going to require a lot of heat and I. Don't want to get burned, okay, we're going to apply heat all over the place when I start using my razor blade, and I'm going to start from the top, and I'm gonna kind of I'm gonna kind of open in this and I have this tool, and it's going to be very helpful. Okay, I'm going to go ahead and put this one right here. You see so that way I can play with that like that, meanwhile, we're going to be applying more and more yeah.
We're going to play our way there you go through there. That's why I like the razor blade, because it's very thin, and we can play our way inside in between the metal and the glass. So we can lift that screen easier. If you use something too thick, it's not gonna work out from here, I'm gonna, just switch it like this, and probably I can have a view of what I'm doing here inside here there you go. I can hear the glue splitting you see, I'm doing good so far, I thought it was going to be more difficult to extract these LCD, but I.
Guess not there you go. Oh, we have a good I feel opening here. So what I'm going to do I'm, not gonna, let it get cold, so don't let it get full I'm going to be double careful on the bottom, which we have a lot of connections on the bottom. All right, you see guys do I'm talking about clothes right away as I. Have these razor blade I can easily just bring it back, and I think it was a good idea to use gloves, because this thing is so big, then I can get burnt because I have to put extra heat all right.
This is the technique I like to use I hold it meanwhile I'm pushing the screen, and I'm pushing the frame the other way. So this is all about the heat you have to play with the heat have to know how much amount of heat you have you have to use, C we're not going. We don't hold it again more than a minute just to avoid extra damage there we go I'm going to use the stronger one. It's coming now, just slide it to the bottom. Whew I didn't want that to happen, see let's just crack more and when that happened, it's just a little harder to remove it.
That was way too fast. If you can go slower, I bet you, you got you're going to have better results, but no problem so guys you can see. We have a good gap, already look and that's what we're trying to achieve. Okay, this basically we're we're halfway and which is the hard part. Usually the bottom part is here, because we already lift this whole part on the top, because some are a little more, so you guys can see what I'm doing even I have that mess around see.
How big this thing is there we go. Going to keep open this to the bottom and okay. Here's want to be extra. Careful I can take a quick look inside, see, how's it going see if we're lifting any cable I think we're doing pretty good. I'm gonna just apply more heat, this cable it goes inside there.
So that was my concern. This cable but I, don't see it, so it goes inside here. That's what I see here, and I see the other cables here. What we're going to do is twist these a little like this is just hold by a few screws. Let me just assume it: we have four screws right, not three I'm, sorry, much better! We have three screws, and I'm going to open these, as you guys can see, is a little complicated.
What we're going to do we're gonna, pull it to the top. Let me show you that I'm going to pull it to it up like this, and so we have been that table right there. Mother this way, so you guys can watch, and so we can. We can take this cover out what I, what I want to do? First is get to the battery connector. If you guys can see over that just one more.
It's hard to show this. This thing right here but I'm gonna, show for you guys. Okay, there we go it's this shield you guys can see and what we're going to do is we're going to unplug the battery which the battery connector is, is right. There, okay, you're gonna, be extra careful with these things right here for us there you go. We have successfully unscrewed the battery right there, and now we're going to take three screws right here, which are they the screws, the two connectors for the LCD and I guess digitizer is three of them.
Let me look for another screwdriver, because here we go smaller there we go he's out, took it out and then we just going to go ahead and unplug. The cable remember we're going to use these because we already disconnect the battery we're not going to cause there any other short or anything. You see these two cables on the motherboard and there we go. We have successfully opened this iPad iPad Pro 12.9. All right now we're going to proceed.
I'm gonna, put it on the side. We're going to use that later, and I'm going to show you why? Okay, we have we're going to inspect our surface okay. So, as you can see, we need to clean this up perfect, all right after you do that I always like to clean it with a toothbrush or any other brushes. You have something better than this now probably doesn't make any difference. Just we have to make sure all the surface is clean, because when we go and put our new screen this, that screen is very expensive to be just playing around with this.
So if you're planning to do this by yourself, I advise you to watch the video first, if you didn't understand something watch it again. So that way at the moment of star disrepair, you know what you're doing. Okay, see it's nice and clean. Now we're going to go ahead, and what we could not do here is test. The screen do never install.
This is what I never do I, never install any screen. Any part with a previous test. I've to find its true all right. Actually, I just put this the screw for the battery and I know this is dead, so I'm going to go ahead and put it into the charger, and I'll be right. Back I'm going to charter a little all right, guys, I, went and charged these iPod a little as you guys can see um it has like 13 percent charge, and we're going to go ahead and test this screen.
We can go ahead and touch the function of some keys. We can rotate the screen, so I give you a chance to test the top and also, if we rotate it to the other side. It's going to do the same thing. Okay, now we know this screen is good, always, always test all every single screen, you're getting stealth. That will save you from the headache of things telling screen, and it's not going to work.
So now, I'm going to unplug the battery, so I don't create any short unplug. This screen, and I'm going to get it ready for installation. Okay, it's a few things. Then we need to get this screen ready for installation. First, we have to go back and grab our old screen here.
We go it's right here we have our old screen. We need some components from this one like the camera, so we can Center the camera on the right spot and one of the most important things do not lose the home button. Even when you're on assembling this, this iPod, you have to pay attention. If you're trying to open this from the bottom, you might 90% gonna ripped off this home, but I mean you know how Apple home bottoms are. Lately you break them.
You cannot even replace them sometimes. So what we going to do to remove this one safe is we're. Going to use our heat gun right here. I'm going to supply some heat, so that folder will look a little. I'm going to use the razor blade to extract that home bottom and fingerprint sensor.
Everything on one I avoid applying heat directly to the home bottom I go like around like in circles like this. You can do it differently. You know everybody finds their own way to work like this. Alright I'm gonna now try to there. You go.
You see how easy came very easy. If you give it the right amount of heat, it will come out just like that. Just later and from here we can also lift I'm using my finger now, but just to show you I'm gonna. Do it like this because it's already loose because the heat we apply, they lose the adhesive. Okay, we push from the bottom to from the front to the back, and this whole bottom is gonna.
Come out just like this, you see and from here the same thing we have this little board here. I know my cameras acting we're now: okay, and we just lifted, and here we have a little clamp holding the cable. Let me see if I can get rid of that there. You go open the lira nail and boom. That's our! You know this folder, that's our home, but you see saved and not ripped.
That's what we need to do. I'm going to go ahead and grab the LCD, the new LCD, so we're going to apply that home button on the LCD. Put this on the side. All right! This is very easy. Just the same way, we did to take it out loudest.
We just do it backwards. First, I'm going to align these this home bottom. There you go he's in ok, and I'm. Going to connect the cable right here, where it belongs all right, yeah, I'm, going to cut it here. I'm going to keep working trying to give me a little of fight, but I'm, not gonna, win over me, I'm, just too powerful laughs just kidding okay case.
We got it in. Let me just make sure. Okay, all right, that looks better okay, and this will just stick to the screen all right, just trying to get it online the best I. Can this shine? Is it's not working good with my camera all right? There we go just mapping there. We go now we're going to grab.
Of course, the screen and the little holder, the home bottom holder, and we're going to apply a little of B 9000 on each side. It's going to help it to not get to not get loose and what I'm going to do small little clamp and just hold it for a little. I'm going to leave it there for a few SECS broadly like a few minutes. All right, I think is by now. This is dry, and we're gonna just check so just clicking pretty good, then something then I learned whatever is shiny, that mean that is contacting their who, so I'm going to save myself some travel, and I'm going to cover the part with some tape.
There we have it. We have it ready for installation. So now we're going to bring the iPad to have it right here and first thing. We're going to do is connect these cables for the LCD and digitizer in there. It's pretty tough, don't leave me too much space.
Just take your time, make sure you align those cables perfect. You don't want to damage either of those which, in the long way on the long run, is going to cost you more money just be patient. Sometimes it's a little harder to there you go. We have both of them in place, and now we're going to put this holder for those cables. Now I have this.
This cable secure, as you guys, can see over there we're going to connect the battery put this metal back just gonna kind of flip it you can you in here, and we're gonna, put all the little screws back in place. Gonna, do it from the side, so you guys can see, and there we go. We have everything back in place as you guys can see. All the cables are connected before you before I put any glue or anything because I haven't put the glue yet, as you guys can see, I'm going to turn on this iPad. All right after this.
All we have left is to glue down these into the frame. As you guys can see you guys could say: oh wow, it's finished now it's gonna, it's gonna, open like this, and the screen is gonna, fall down all right. We're gonna, put some glue and for this we're going to use I, always use like B 9000 for any of my LCD's and digitizer and stuff I like it. It works good okay. So we have to play our way around this because we already have the screen install.
So what I'm going to do is some I'm gonna just you know very easy, go all the way around with this glue, all right, and basically we're done. We're going to close this down like this, given the iPad find its own way, and we're going to put a few of these clamps, and we can leave it there for like 10-15 minutes, there's no problem.20 minutes one hour, it's up to you the longer, the better, okay, guys, we're going to finish this video here. I hope you, like it, I hope you enjoy it like I, want to show you again. You see everything working, perfect and don't forget to subscribe. Give me a like give me a thumbs up if you liked it.
If it's not just any question, just leave it a comment down below and thank you guys, I'll see you in the next video bye. You.
Source : Jose Morales
Phones In This Article

Related Articles


Comments are disabled
Latest Articles


