ipad pro 10.5 battery charging problems 1% to 100% By Microsoldering
All right I have an iPad, Pro 10.5 here that the see everything was working, fine screen, repair and now the battery goes from one percent to 100 percent. It just kind of restarts every once in a while or all the time, I guess um we had one of these coming before, which was a no fix for us and I, think I. Think I think. Maybe we found a solution to this thing, but I'm not a hard percent certain right now, so I'm going to fix this, and hopefully this is the issue. Okay. So let's do this so with any kind of rebooting.
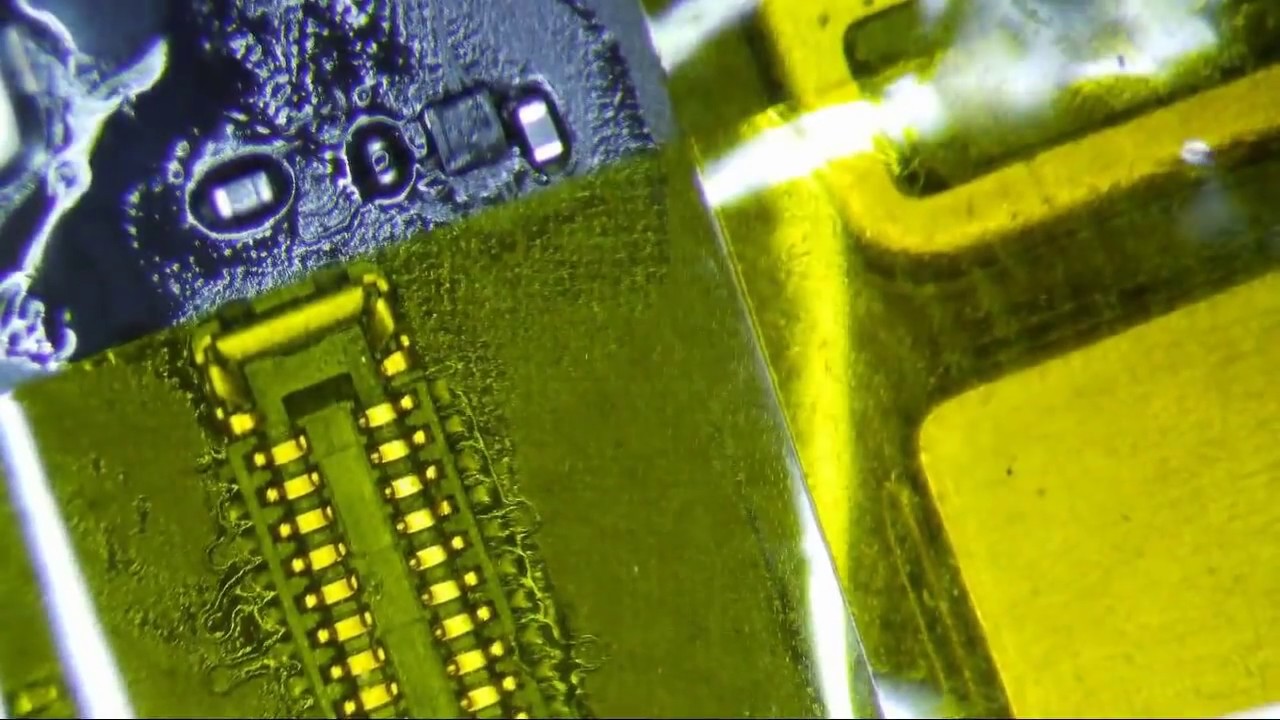
After let's say two minutes, you know you're able to boot the device up, iPhone or iPad it everything works and then two minutes later boom. It just reboots, that's almost always related to the gas gauge on the battery. So what I mean by the gas gauge is basically there's. There are several pins on the battery connector that handled that handle the battery percentage. Basically, it sends a signal to the CPU and CPU says: okay, there's 50% battery life left, and so that's what we call the battery gas gauge pins so on the iPad Pro's, it's going to be these three pins right here.
One is actually for the main power battery power and then once for the battery switch lighter the gas gauge line is what we call it: okay, so in this instance the iPad Pro 10.5. So this is ground right here and what I? Normally what I do is I. Just make sure that you know what often happens is that these pins break okay, because they're very tight for some reason on these iPad. The new iPad, pro's and people try to slide the old guitar picks on them, and they break the actual pins. But in this instance the pins not actually broke.
So you can check that by diode boding, this thing, okay. So when I'd,, I've made this, I get 0.63. I ROG mote, this I get 0.73, and I died mode. This one I get! Oh well, okay! So that's that's! That's a problem! Okay! I have an iPad for 10-point, our 12.9 here, okay, this is just the iCloud lock board that I have donor board. I'm going to check the battery.
Ask each pins on this one, this one's point, four, eight, this one's point, nine, nine and then this one is one point. Actually, maybe that's not okay, yeah that that wasn't looks like this one, the ground for some reason, maybe 0.7, 0.7, three point: six! Four! Okay! So point is every single one of these pins should have a diode memory. This one does not okay, so next step is, is the pin broken? Well, doesn't look broken right, it doesn't look broken at all and there we don't have schematics, for these things is the PW tool. So we need to trace this sucker ourselves. So what you can do is you can see there's a pad that connects to each pin here.
So you just check with continuity, know from pad to pin and yes, I'm getting continuity. So we know it's not that we know it's, not the connector okay, so we're not going to place the connector now, where the hell is, this pin go well. There's not a lot here, I mean you got this metal shield, which I believe somewhere under here. The Tristan is hidden so, but I'm not gonna. Take that off, because if you look right here, there's a little, there's a little fit right here.
That I believe is for the gas gauge. Okay, there's almost always a fit field emitting transistor. You know somebody asked me what a MOS FET was, and I didn't. Look it up, I didn't Google it, which would be a easy way yeah, but I did learn in school and I believe what it is: MOS FET Moshe t, metal oxide semiconductor field emitting transistor anyways, maybe I'm wrong. It's been about 20 years, so anyways no schematics, but we can go to the iPad Pro 12.9 schematics, and we look at the gas gauge pin, which is right here and what does it connect to looks like a fat can't really tell for certain, but this looks like I guess they called the gate, and then these are two. You know whatever it's called I, don't know what it's called.
What controller-based? Something like that me! Don't know what it's called, but anyways they're, usually three pins. So what we're looking for is with it, and it just so happens that there's a FET right there well close to everything. You see it, and it looks like maybe it's been worked on or something I'm not exactly sure, but look at this well I can move something's, not right with that and look it's broken. Man truck is broken. It says I'm connected so 100%.
This is the issue a hundred percent working solution, bro, please bro anyways, so uh, okay. So how do we fix this thing without knowing what the hell? This part is in without note, without any donor boards? I don't know, but first that first step is: let's take it off. Let's take it off and let's take it off without burning anything. That's that's number one and then number two is: let's see if we can find a replacement for it. So just do that.
You know what I'm going to cover up this battery connector to you, because it's plastic, okay. So that's good! That's good, good! Alright! So we're just going to use a little heat. Get this sucker off kept on us all too close I could just use my earn to get it off, but maybe I should but anyways whatever pretty comfortable my heating on now. So just make note that you know this is well there's going to be two pins. I went on one set one end, and you know a bigger pin on the other, so kind of hard to put these the wrong way.
Alright, so oh looks, like he's already tried to fix it interesting. He didn't do a very good job. That's for sure, so, um I think I lost that damn thing too, but anyways I think it was already broken, I believe, regardless it blew away, so I don't think I'll be able to salvage it anyways. Although I think the pin is broken, yeah so anyways. So let's do this.
Alright, mm-hmm didn't tell me you did this all right? Well, you might be watching the video, but he knows who he is. Okay, wish he had told me he did this, but maybe he wants to keep it interesting, okay, so, okay, so I guess what we can do is maybe just take it off of this donor board. This iPad Pro donor board that we have I hate doing that. But well, let's see, if it sees we have it on this. If we do, then we'll just take it off of this okay, because this actually works.
This iCloud life board works, but leave it's under here somewhere I believe so, let's see if we can pry it off there, we go all that just for a little fit which I don't know if it's the same size or not, but it should work. So we'll just do that once you grab this mother and use it, we could probably use the Fed off, but you know what we probably use a Fed off of 8 as well, or something maybe see well, no, there's one off of 8 I'm, pretty sure that let's double-check that which I may have stolen early or is it 8 plus or something well, Megaton I thought it was like Harrison bear, but maybe I'm wrong. Oh well, anyways, let's just go back and steal from them that iPad Pro then won't need it anyways. We can probably look up if this works, then we can look it up. Look up this part.
Maybe if it has it and just grab this from digikey. com, but it should work. So that's you know a little flux tin these mothers, these mothers and then see. Well, let's start there. The other two ends first and see how that goes.
So, let's download these two parts 0.39 like four zero. This is a capacitor here, 0.4, zero and point three, nine okay, so once we put the fit in, then we should get up to about point seven, which is what the real things supposed to be, so hopefully we'll be able to get this on without any problems. I feel like I want to use a bit. Thicker wire, though, who cares I need to take a lawyer, because that looks so thin, I mean I, didn't stick, or maybe I should just tack it on first, let's do that. Oh, it broke no, no, no, it didn't break.
It looks very flimsy, though yeah, let's put our own on man. Just use this cheap stuff can't use this cheap stuff. Dude come on man, the hell are you doing now: I'll use the thin I'll use the thin 0.1 millimeter, so the shaky looks look a little better. Another stuff, you guys, okay, so we'll just do this shouldn't take too long. Hopefully a nobody doesn't like you well hold on.
This is too thick I think we're going to have to shave this off or something here. This is too wide actually in this Federer. So we have to move this cab. Don't leave this here, hide it under the Tapton, and then it'll kind of go like this with it. We might probably don't need jumper wire, really well yeah, all right.
Where were we well? We're gonna, put this sucker back and then hook that jumper wire to the all right, so before we go any further. Let's dive know that jumper wire 0.67, that's good okay! So now, let's get our oh where'd, our capacitor go no dammit, always loose stuff. Well, our capacitor is m. I. a think here it's got to be in here somewhere right.
Well, let's take this off. There's nice, alright, okay! So let's put this capacitor back onto the jumper wire being, and we should be good to go. My friend put a little green stuff on maybe not necessary yeah. This is a capacitor I. Think, let's just is that the core of the capacitor earlier it looks like it anyways, whatever just a little dabble of flux.
I, don't need that much flux! I, like nice, shiny joints me a nice shiny joint. There yeah that's pretty doing right there. Okay, so that's good, and the last step is to download the connector we're getting 0.67, and we should be back in business back in business Larry. So it's done this first 0.61 171 and now the big reveal point seven, three: okay, we're in business. So what we're going to do is finish this up and then not tell anybody about how to fix it.
So you can keep this closed service no I'm, just kidding sometimes I. Think about that, though, like I'm going to help people and then, like you know, it kills. That doesn't kill the business, but it changes in my business right. But that's just stingy right. If you do that.
That was called stingy, because I guess I take as well. I take from other people steal from other people right, so I'd be a thief idea thief, but in contribute. Are you a thief, or are you a helper okay? So we will do this in business and then think maybe well wait a few weeks to post this. That's so bad! Okay! Uh! Let me take a look at this iPhone 8 with saying iPhone 8 with audio I see disease. You heard it all right, I'm, going to show you in a second give you a little taste of what I'm working on come on.
We need to go through the setup process. Okay. This is done well test in a second here, but let me show you this iPhone 8 with audio I see disease, real quick. You just go through the setup process, and then I'll show you see what I'm working on real, quick, okay, well, I, don't know if it picks it so maybe yep look! No audio device is found. I thought, eight.
Okay, so that's just a preview! Look what I'm working on right we'll get back to this in another episode? Okay! So, let's see we can hide this now make it so that he doesn't know what we did to it so that he should keep sending us stuff that he boxes up, no I'm just kidding kind of okay, so you can't see that there you go. I should tell people to make sure that they pry. You know next to the battery connector. That way, this will happen again. Um, okay! So not a lot to this.
My throat feel all better now, since the beginning of this episode, I got a, got a few videos here that I should probably share, but I've been really lazy, I'm really busy, and we're in a middle of a move which I think I talked about in an earlier episode that I have yet to publish, but I also like I, don't think I get a lot of views anymore. So is anybody watching anymore I'm sure, okay, um, sometimes I bore myself, so they're going to get people to watch. If you bore yourself right, the hell am I doing man come on. Maybe I should edit this and cut this sucker out. Man K.
This is so boring just trying to put this back together about breaking anything you day. So we are almost a business. Major issue was the charging, so that's all I'm really going to focus on, but let's make sure I connect everything properly. So there's a little flap here. I need to get it.
Okay, good! It's like the iPhone 5s, where you forget like to connect the antenna in the back and again disassemble everything again peep. It okay, we're nearing completion. I am confident that I'm going to put everything back together, knowing that I won't have to renew it. Look under her scope. Put this back so I'm damaged it.
These things are fragile man. These things are fragile. Okay, so take put tape over it. The business clean up this back really make these so firms. You don't get that okay, so that's taped! This is good flip that over, and then we just need to put the screen on now and test it.
Then we add business all right. So, let's test it make sure everything's good do not forget to isolate your battery. Otherwise, you will be in for a world of hurt later so always isolate your battery. Now, let's put this back, and then we'll test it. Okay, so I was like it was this part of the did it give me a battery screw mercy in this? Can you finish good? Well, I'm not very organized here, but let me see grab a battery screw here right hook, it in Apple logo clean up a little, maybe buy some of these fits that's like a clear picture of my head.
Okay, it still says 100 cent. So let's see what the basket is. You know what mother offers didn't send me a pitch kid. Well, it's hurting at 0.39 inch, okay, so I guess maybe we can just let it go and let us sit here for a few days and see what happens apologize if that's your face on the video anyways I'm, just going to say that that's fixed now, because it has to be alright. So that's how you fix iPad Pro 10.5 that the battery gave us from 1% to a hundred percent and back and forth, and that's what it is. Okay, if it's wrong, then I won't post this video yeah.
If it's right, then it will be posted, but I'm not going to confirm that. Okay, all right thanks for watching hey, so I just want to say thank you for watching this channel and I wanted to promote our online micro soldering course. We have it hosted at Udemy, calm, and it's at this point. It's four hours of video instruction. The reviews are pretty good, and we talked about everything from the basics of an iPhone logic board, and then we have a section on new tools.
We have a little section how to set up your hot air rework station in your micro soldering station and how to use diode mode. The third part is the three most common repairs, which is no touch. No backlight no charge in the fourth part, is all about data recovery. So if you go to our website, it's a hundred bucks and some people say that learning online is not the best way of doing things, or you can't learn. Microsoft online I beg to differ.
I, don't know about you guys, but I started watching YouTube videos when I first started about three years ago, and that's how I learned it and not only that. But you know you go to a live course. Some people like live courses, but not everybody, has three thousand dollars to spend on a live course right so and then yes, you're right, you can go to YouTube and watch all these videos, but you're not gonna. When people make these videos they don't go from A to Z, they usually start from somewhere in the middle because they assume that you watched something earlier on or one of their earlier videos. So this course is all-encompassing.
It has everything from A to Z to help you get started in my croissant, and we are adding stuff on a weekly, maybe monthly basis, and we're gonna. Just going to keep adding this thing. And so, if you want to get started, just I mean you can also take a class, but you know to get your feet wet. I think this is the best thing to do right here, and I vouch for thanks for watching the video I was also gonna, say in order to buy it with a discount $50 discount, she's, gonna micro, soldering, calm, click on store, and then it's going to be the first item on here. You click on body, Udemy and they'll.
Give you the $50 off, thanks.
Source : Microsoldering
Phones In This Article

Related Articles


![[HINDI/URDU] HTC U20 5G :- 48MP 🔘🔘🔘🔘 | 8GB | 256GB | 5,000Mah | SD765G | Price | Launch Date..?](https://img.youtube.com/vi/j9KCHiteSSQ/maxresdefault.jpg )


Comments are disabled
Latest Articles


