Install Chrome OS On Your Laptop / PC Access Google Play and Linux on Chrome! By ETA PRIME
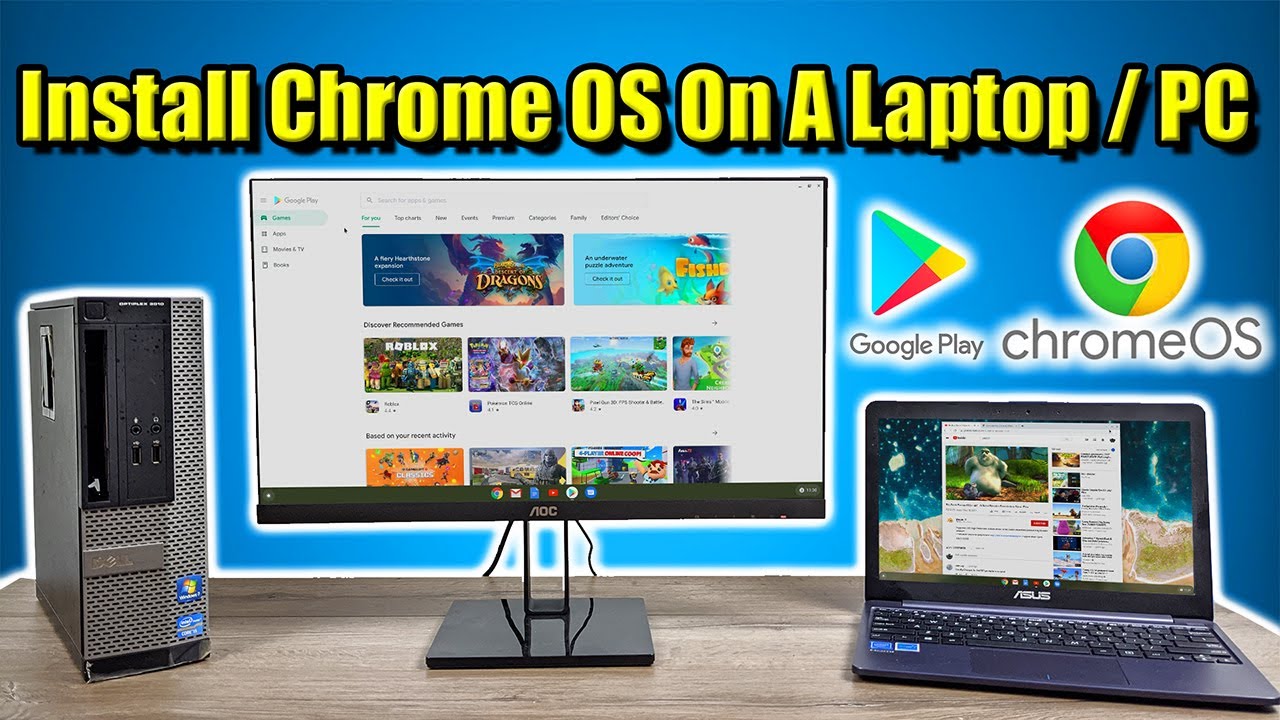
Hey, what's going on guys this ETA prime back here again today, I'm going to show you how to install full chrome OS with access to Android from within Chrome OS on an old laptop or an old PC, and this isn't using chromium, OS cloud OS or fade OS. This is Chrome OS that you can install on pretty much any Intel based PC. Now personally, the oldest computer, that I tried it on. Was this older OptiPlex that I have here, which has a third gen Intel CPU, but I suspect this would work on a 2nd gen Intel CPU on up I've also installed it on this little Asus laptop here. This has 2 gigs of RAM, 32, gigabytes of storage and a dual-core in 4,000. CPU I picked these up around Black Friday for a hundred bucks every year, so yeah this is full chrome OS for your laptop or your desktop.
We also have access to Android and the Google Play Store and you can install Linux apps, just like you can, with most of the newer Chromebooks out there, but before we get started here. I do want to give a big shout-out to radar Nimbler he's over here on YouTube I'll leave a link to his channel in the top of the description and at the end of the video him and a few other devs came up with this method, and it works. Amazingly he's actually created a full tutorial, and I'll leave a link for that in the description, if you're interested in checking that out, but I figured I'd go ahead and tackle it also because I'm really impressed by this. So this is actually really easy to install, and I'll. Give you a quick rundown first thing: you're gonna need is a USB Drive, 16 gigabytes or larger I'm using a 32 gigabyte, Drive USB 3.0 is recommended to get the speed out of it. What we're going to do is install Linux Mint on this USB Drive, so you can run it live.
We're also going to transfer our Chrome OS installation files to that USB and basically, what we're going to do is start up. Linux Mint running, live from the USB and then install Chrome OS to the PC. We're running this all on the method I'm going to show you in this video, we'll wipe the internal drive of the PC, we're going to be installing this on. So if you have Windows installed on your PC and you use it every day, don't go doing this, but if you have an extra laptop or an old desktop lying around, you could definitely try it in this video I'm going to be using a separate, Windows, 10 PC to get my USB drive set up, but you could always do this on Linux or Mac. Some of the applications we're going to use will be different on those operating systems, but if you're ready to get Chrome OS installed on your laptop or PC, let's go ahead and get started all right.
So let's go ahead and download everything. We need we're going to get this image set up on a USB Drive, and then we can install it on set PC like I mentioned. This was actually brought to my attention by radar, Nimbler I. Think that's his last name over here on YouTube I'm gonna, leave links to his YouTube channel in the description. He's got a few other tutorials on how to triple boot this up now.
The first thing you'll need is that USB Drive I do recommend at least the 16 gigabyte Drive I'm, using a 32 gigabyte drive here it's plugged into my PC. All links for everything mentioned in this video will be in the description. First thing we need to do is download Linux Mint, and we're just gonna use this as a live USB. So we can install Chrome OS using this operating system. We're going to run this all from the USB I'm going to get the 64-bit version, and you can find a download link here next on the list.
We need to pick up roughest or Rufus. However, you want to pronounce it. This is going to allow us to flash that image to a USB Drive. Unfortunately, etcher won't work with this method. Now we need to download a few files from GitHub get the latest version right now.
The latest version is 4.19 stable, we're gonna, download, brunch right here, our 81. Now we actually need to get the Chrome OS image and, from this link, you're going to find Ramps right here. We're going to go all the way over here and get the latest version which is 80 as making this video, but it could be higher in the future. That's the largest file, we're gonna, be downloading, it's 1.2 gigabytes, and we need to extract it, and the final thing we'll need is the installation sh. So from this page here, right click save as, and I'm just going to save it to my desktop.
It's going to save as an installation dot SH, so I'm going to go ahead and let this finish up, and then I'm going to play some all my desktop for easy access. All right, so I have everything downloaded. We have Linux Mint, we have Rufus Brunch, Chrome OS and the installed SH first thing we need to do is flash our drive with Linux man. We're gonna start up Rufus from within this application. Furthermore, we need to make sure that we have our USB drive chosen.
Just make sure it is the correct USB I'm, using a 32 gigabyte, Drive select we're gonna, navigate to where we have the Linux Mint image. I place mine on my desktop right here: Linux Mint and finally, we'll click start. This is going to flash Linux Mint to that USB drive, so we can boot it up, live on our PC. You get a couple warnings, yes, and we want to write this in an ISO image mode click OK. All the data on the USB Drive will be destroyed.
I, don't mind that, so I'm going to click OK. We just want Linux Mint installed on that USB. We're going to go ahead and let this finish up, and we're now done flashing Linux Mint to our USB Drive. Now it's time to get the other files we downloaded ready to go, so I'm going to create a folder on my desktop called Chrome OS and inside this folder I'm going to put the installed Sh that we downloaded. We also need to extract both of these, so I'm going to right-click on the brunch, and I'm going to extract it to its own folder.
So now we have brunch over here I'm, going to snap it to the right hand, side, and we have 4 files that we need to put in that Chrome OS folder. We created on our desktop we're just going to take these place them right in here and finally, we need to extract the chrome, OS image. Right click extract. This is going to take a little longer, so we now have the Chrome OS image extracted we're gonna, open this up and toss it over here to the right-hand side. We need to rename this file Ramps recovery dot been so a renamed is actually already in here.
Ramps underscore recovery, dot, Ben, we're gonna, take this and put it in our Chrome OS folder, so I'm going to open that folder up we created. We now have six files inside here root, C ram mus, underscore recovery been installed, sh EFI, secure, EFI legacy and the Chrome OS installed SH. Now what we're going to do is open up our USB Drive that we flash Linux Mint to should be listed as Linux Mint, and we're going to place this whole folder that we created right on the USB Drive. Give it some time to finish up all right. We now have our USB drive ready, but there's one last thing that I want to show you inside this USB Drive.
We put that Chrome OS folder and inside here we have the installed a sage. I'm gonna, open this up with notepad plus I, do recommend using notepad plus to edit this at the very end here, you'll see SDA. This is the hard drive we're going to be installing to on some computers. It's not known as SDA 99% of the time. If you're, using a real internal hard drive or a 2.5 inch SSD, it will be known as SDA, but on some newer, low-end computers, it's going to be known as mm CB, lk0, that's what it was on one of my little netbooks. You can actually change this right here, using notepad plus, and you may need to do that, depending on the name of your hard drive.
I'll show you how to find out your name once we boot into Linux Mint and start the installation. So now we're going to grab our USB Drive move over to the PC. We want to install this on and get it set up, alright, so here's a little cheap, Windows machine that I already installed it on, but for this video I will be installing it to this old OptiPlex back here. So in order to get this running correctly, we will need to disable secure boot on our PC and enable UEFI booting, and to do that, you will have to get into your BIOS on this specific machine when I'm booting it up. If I press f2 a couple of times, it'll bring me to my BIOS on other machines, it's f12, f10, f9 or even escape.
Your best bet is to do a quick google search and find out what key brings you in to your BIOS when you're starting your machine up, so I've now accessed the BIOS on this little machine. I'm going to move the camera a bit closer, so we can get a better look. So this machine's using a newer BIOS yours, might look a little different, but the option should be the same. So from here we have main advanced boot, we're going to go to boot and inside here on an older PC you'll have the option from legacy to UEFI, for your boot option make sure it's changed to UEFI on newer machines. Most of the time it will be automatically from UEFI, but if you have the option here make sure it's set to that instead of legacy.
The next thing we need to do is disable secure boot. Under security, you have an option called secure boot, make sure it's disabled once you have that done, make sure you save the settings and exit we're now going to boot from that USB Drive, so we're going to go ahead and grab that USB drive. We created on our other PC we're going to plug it into the laptop or desktop that we're using, and we're going to enter the boot menu again. Different manufacturers use different keys for this one here, it's escape, but it could be f7. F9 f12 do a Google search to find out when a power the unit on press escape to get to my boot menu, and this is gonna.
Allow me to boot from my internal hard drive or the USB I have plugged in, so I'm going to select my USB Drive and press enter, and now we want to choose the very top option: we're going to boot into Linux Mint. This is all going to be running, live from the USB Drive and from within Linux Mint. Then we can install Chrome OS to our internal drive, so we're now running, Linux Mint I'm going to go ahead and plug this into a game capture device. So we can get a better look at the screen, and then we'll install Chrome OS. It's actually really easy from here on.
Okay, so here we are running Linux Mint, let's go ahead and get Chrome OS installed. First thing we need to do is make sure we're online I'm connected over Ethernet, because this PC that I'm using doesn't have Wi-Fi built in. But if you have Wi-Fi down in the bottom corner, you'll see a little Wi-Fi icon, and you can connect from there now, like I mention. We do need to find out the name of our hard drive most of the time it's going to be SDA, but sometimes it won't be, so we're going to go to the bottom left-hand corner to the Linux Mint icon and from here we're gonna type in parted. We're going to open up parted, and this is going to give us a list of disks attached to our PC.
So I have a 250 gigabyte SSD in this thing and I also have my USB drive it's 32 gigabytes. This is my internal hard drive. The name is SDA, so I'm good to go. If this is a different name, you will have to move back over to Windows and edit that Sh file and name it exactly what it says right here, but mine's, SDA and 99% of the time it will be SDA. So let's get the installation going really easy to do.
We're going to open up our home folder or any kind of file browser we're going to go to file system and from here we're going to find that Chrome OS folder we created this is the one here we're gonna, open it up and inside we'll see we have that installed SH. We need to run that, and we're going to run it from terminal we're going to right click inside this folder open in terminal, and we're gonna type in sudo, SH install Sh press Enter. It's going to download some dependencies. You need to be online for this to work, make sure you subscribe to Ken, DAYS, YouTube channel, and now it's time to do the installation. This is gonna, wipe the internal drive, our SD, a nothing's going to be left on it, except for Chrome OS.
Now, like I mentioned, kinder, does have a couple videos showing you how to triple boot. A system like this, but personally I, don't deal with that, because somebody's going to end up messing their windows, installation that they had work on, and then it's my fault. So what we're going to be doing is just installing to this internal hard drive. We're going to make this PC into a strictly Chrome OS PC. So if you're ready to wipe that drive and install Chrome OS type, yes, we're going to give this a little time.
It usually takes anywhere from three to 10 minutes, depending on your internet connection and the speed of your hard drive. The installation is now finished. We can type sudo reboot, or you can reboot from right here, restart we're gonna, pull that USB drive out now and there we have it. We can start Chrome OS from here, or it'll automatically start after five seconds. It's going to run through a little of a setup, slash update process at first.
So let this finish. We now have Chrome OS installed on our PC, we're going to click. Let's go like I mention I'm just connected to Ethernet with this one here go ahead and agree to all the terms. It's gonna check for updates. You have to sign in just like you would with any other Chromebook, and you got Chrome OS up and running along with Android 9.
So this is a fully functional, Chrome, OS, desktop or laptop, depending on what you installed it on, and here it is so yeah I mean everything works pretty well in here, we'll just head over to YouTube real quick. We also have Google, Play, and I'm going to install one application just to show you that this is running on that PC got four gigs of RAM here, and I have the i5 3450. So that's on the OptiPlex desktop that I showed you using built in Intel, HD, graphics, and it's super smooth. You can also install the Linux beta if you'd like to I'm gonna, go ahead and turn this on, so we can run Linux apps in Chrome OS, but that's pretty much it for this. One I really appreciate you watching, and I do want to give another big shoutout to guitar for coming up with this link for his channel is in the description.
He goes into a little more detail on different things about this, so definitely check his channel out. All links for everything mentioned in this video are in the description. If you have any questions, let me know in the comments below and like always thanks for watching you.
Source : ETA PRIME
Phones In This Article
Related Articles

![How to Recover Deleted Text Messages on Android? [3 Ways]](https://img.youtube.com/vi/LdEHPv4TEyY/maxresdefault.jpg )


Comments are disabled
Latest Articles


