How To: Replace the Battery in your iPhone 7 Plus in 4 Minutes By DirectFix
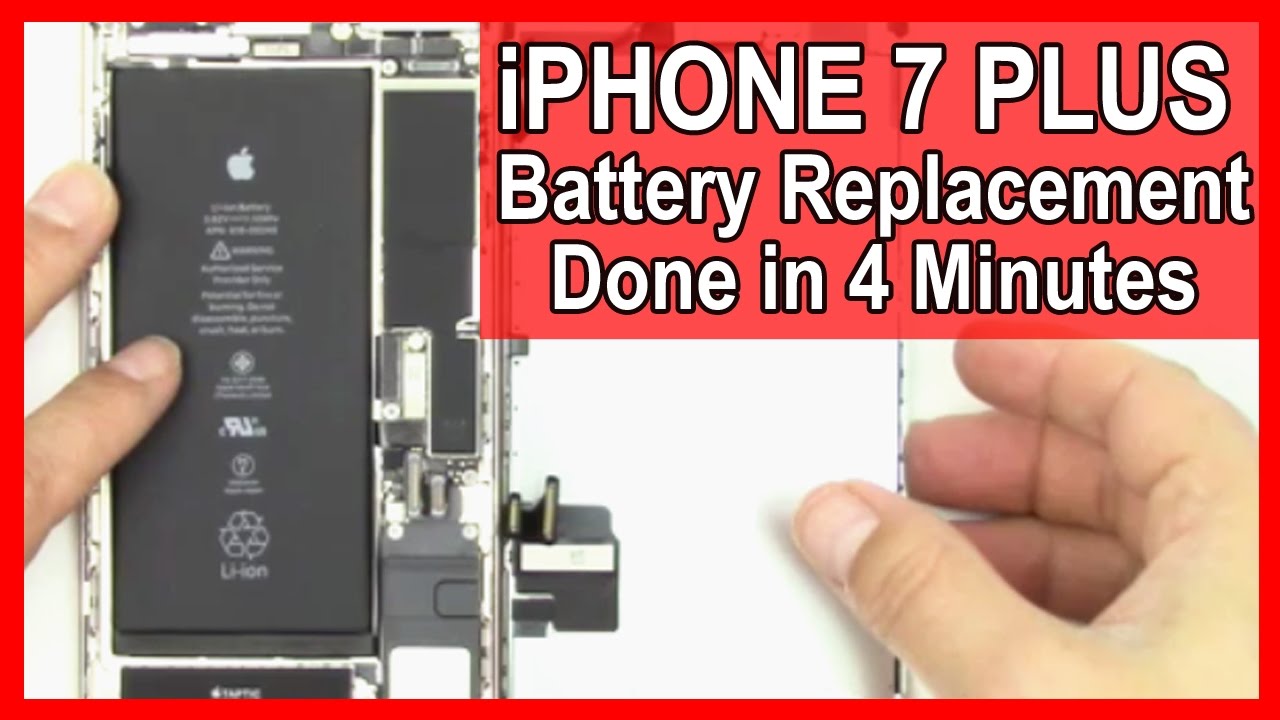
Direct fix. Com presents the iPhone seven battery repair and replacement done in four minutes warning. Please pause this video and read the entire warning before proceeding with these repairs, please be sure to subscribe to our channel and leave a comment or suggestion in the comment box below using a pantalone screwdriver, remove the two pantalone screws on the bottom of the iPhone attach a suction cup tool to the lower half of the display assembly just above the home button be sure the suction cup does not overlap with the home button, as this will prevent a seal from forming when the suction cup has created a small gap. Insert the plastic pry tool between the gap slide. The pry tool to the left along the lower edge of the iPhone now go ahead and remove the suction cup tool you're going to need to loosen all the watertight seal before you can remove the screen. There is a clip at the top so slide down and open the screen carefully.
There's still ribbon cables attached, pull the display edge slightly away from the top to disengage the clip and carefully open. Now remove the four TRI point screws. One of them is longer it's the one in orange. Please keep track of it. Now, with the pro-tip screws removed, you can use some tweezers and remove the cover plate that covers the screen.
Connectors you're, now going to lift the battery connector ribbon, cable you're, now going to remove the three Phillips screws holding the tactic engine in place. Do not remove the tactic engine all the way, just send it back. It's still connected you're now going to start peeling off the adhesive, that's connected to the battery and runs underneath the battery. The adhesive needs to be removed before the battery can be removed from the iPhone. Now that the adhesive is lifted start pulling it straight out underneath the battery now, with the's have removed, you can remove the battery from the iPhone 7 plus, if available with your battery, now install the adhesives that go on the back of the battery to hold it down in place in the iPhone 7.
There should be two tabs that come up and around make sure you have the bottom of the battery. With the adhesives installed on the battery. You can now reinstall the battery make sure it's lined correctly before installation into the iPhone 7 plus put the tactic engine back in place. So that way you can reinstall it with the three Phillips screws. You can now reinstall the three Phillips screws that hold the tactic engine in place.
You're now going to reattach the battery connector to the main board. Please don't forget, while installing the four try why tipped screws the one in orange is the longer one you're now gonna carefully bring the screen down. Remember at the top near the earpiece there's a clip that needs to slide in before you're able to make a seal all the way around the phone now go ahead and reinstall the two pantalone screws at the bottom once you've sealed the screen all the way. With the last panel of screw installed, you can now start the phone you've now completed the installation of the iPhone 7 plus screen. Thank you for watching our video, please be sure to watch some of our other videos subscribe to our Channel and buy parts from our website.
Source : DirectFix
Phones In This Article

Related Articles


Comments are disabled
Latest Articles


