How to change the screen on Lenovo Yoga 2 By Tino Perez
How, you can do this Dino from la piecing working into the'm gonna. Give you a tutorial how to replace the screen on a Lenovo yoga -. If I don't know if you can see that this computer is actually broken, the screen is broken from this area, so really doesn't have image and all that. So what I want to do, I'm going to replace the screen, and I'm going to put a new one. So to do this we can add a couple tools: pretty basic tools. You can a balloon: spatula knife tweezers and your regular Phillips driver, okay.
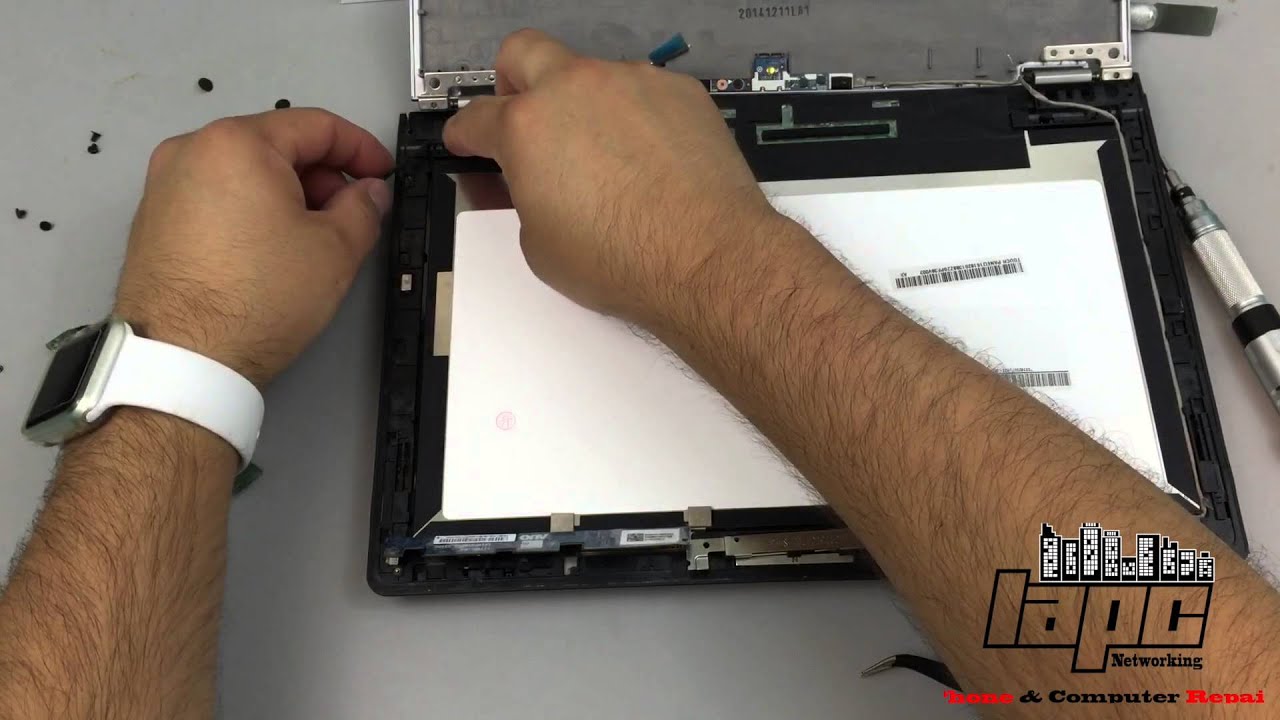
So the first thing that we're going to do and getting here so right away. The first thing that we're going to do we're gonna, remove this little square pieces and, as you can see this one's behind this is a couple screws. It's one here and one of the other side, so I'll remove down. I, put it on the side right here on the computer. So after you do that you're going to remove the two screws this one on the side second screen and then what you gonna, do it you're going to push it all.
The way down, and you're gonna you're going to use a flood in the spatula to create a little pressure right here on the corner, be gentle I'm, going to hear a little crack once you do that little crack! You already separate this area, so you're going to start lifting, and if you see it's just this little plastic all the way, so I'm going to start lifting you can open it move it up with your fingers. Just nicely: don't worry about the button. It's not attached! It doesn't have any cables now in case. If it doesn't do it all the way, help with the little spatula research help it with a little spatula over here and then, if you see this is completely removed, and it has little teeth right here. Can you see a 1/2 this corner so once you do that you're going to remove these two screws on the side, MMM, then two and then, when they do that you're going to remove this other two on each side with the little metal frame? Okay, just hold your screen on place, because one day you remove the last one is going to fail.
It's going to follow me. So if you see every separate from here now, okay, so now, let me tell you be careful, because one that you remove this last screw stake go down so now what we're going to have to do it? You have to push up a little because they have a clip. They have Clipped the screen. He has Cheese clips to release and then once they push up will be available to release it. Here we go here.
We go now I'm going to go on the back and remove the short LCD, connector lbs connector. That is this one here, you'll leave this little blue plastic, and then you're going to pull it slowly, and then we're going to remove this cable. That is goes all the way here goes connected here and this other cable here for the new screen. Okay, so we're going to pull it out. Slowly, just be careful, try to not pinch the cable or anything like that and stop right here, because right here it has um little cables connected.
So you have these two screws holding that piece and I remove one, and then you're going to remove 31, and then you're going to have two other screws in this area. We're moving the whole frame now you're going to do the same thing with your creases on the other side, you're going to remove the cable move it to the side like this out of the clips. Here we go, and then you can leave this piece. This thing has a clip so kind of like pull it. This way really, really careful over here to not rip the cables.
Okay and now yeah. We can go pretty slow because it has it's attached to double side tape. Okay, let me see. Oh, it's Kool-Aid, okay, so right here, I'm going to leave this brown clips up so that you can just connect the ash of the screen, and then you can put a cable to the side and the other one too, and your screen is completely removed here. All right so then we're going to get the brand-new piece.
If you see already like this, one already has good magnets and everything and the connector here, so first we're going to start touching this connector you once we get in this area. This area is going to be to put their taste in it there this little board has two little holes in this area next to the screws, so just make sure that you are lining with those little holes, and then you can come through the screws, one screw the screw, and then you're going to release this tape. Then you're going to put the camera continue. Touching the cable here remember to the camera, I told you have a little intro clip, so you're going to be kinda like lift it. This way, insert it, and then you're going to put it down.
Okay, now we're going to leave it a little lifted so like that we can connect the other side. When do we get it here? You can either remove the original or you can put the one that you can just do it. You know you can use this one. That is here so in this case I'm going to disconnect this one I'm going to put it over. You know back alright, so you're going to see the little white lines right here today disappear once you align it, okay, and then we're just going to close this I'm going to push it down.
You can use the existing tape from the other piece to attach this board. That's the case does what we do not use the existing tape. I put it here, and then I'm going to put it down, and then I put this board. Then we're going to use the other two screws to attach this there, yet one holding the camera frame and the other one this corner once you have all that secured just make sure that is not pinching the cable or anything make sure that they are completely nice and flat in all the areas. And then we can a connect.
Descale, lbs, connector or the screen. Connector it'll be TS, make sure the're careful here and push it all the way when that is all the way and you're going to push the tape down, and then you're going to lift it just slowly. You're going to go behind, cannot move the back. If you see graphic, and I still see the back is over here, so we're going to have to align it first and then push it down, and then you're going to move it up. Okay, once that you do that, you're gonna eyeliner again and pick put the actual big screw first, the wider one try to do used to do this with one hand- let's say: let's say here you go and then just don't let it go.
Okay, hold it and then get the white screw, we'll see like whatever color. Do you think that is this is the longest one, and then you can let go that side, and then you're going to go on the other side and put the silver one first, because it's longer and then do a touch this bigger one? Once you touch the bigger one, we're going to touch the two little ones from this way and then the other two. On the other side, you can align the cables behind the little tip right here you once you do that. If you want, you can turn it on to verify the works. So if you see we have image right there so and then let's turn it on so right now what I'm going to do I'm going to put the other piece.
Now we have the image right there we're going to put this piece and this one like a toy just clips inside. Let me remove this, so this one you're, going to look alike, face like this. Okay, now I'll just clip. It now is careful on this part, because the screen is super thin. So if you push it too much, you can crack the screen.
Okay, I'm going to put just one screw. First, on this side, see this is holding in place and then, on the other side, whether it is like in place. Okay touch the last piece. Let me see if it works, and then we can get this little black princess put it in place this one over here. So if you see everything is working, I hope you liked this video.
Please comment subscribe and if you want to do any requests, please let me know thank you so much guys enjoy.
Source : Tino Perez
Phones In This Article
Related Articles


Comments are disabled
Latest Articles


