Google Pixel Teardown - Screen Repair Battery Replacement Fix By JerryRigEverything
Today, we are going to find out what is inside a Pixel; The latest Android phone from Google. Ill show a screen replacement, how to swap the battery, and even how to take out the charging port. Lets get started. While this phone is glued shut, the screen replacement is surprisingly easy. Especially if you don't care about your original screen anymore. I'm using heat to soften the adhesive around the inside edges.
Then using a very thin metal pry tool to slide between the glass and the metal frame of the phone. A good rule of thumb, is to just not plan on your screen surviving this process. BUT if all you need to do is replace a battery or something, and want to keep your screen, make sure the metal does not touch the black part of the screen under the glass. The black part is the display or, LED. The top glass of the screen can handle some abuse, but the LED underneath is like a potato chip, and will crack and crumble if you even look at it the wrong way.
You'll see the ribbon cables to avoid here in a second as well. They have the strength of paper. So try not to rip them either. I'm heating up the screen about every 20 to 30 seconds, keeping the glass barely too hot to touch. This keeps the adhesive that holds the glass to the frame soft and pliable.
Each time I stick my tool under the glass, I keep it away from the display underneath. After removing the adhesive all the way around the frame, the screen lifts off exposing one long ribbon cable. I tested my screen at this point to see if I was successful during the removal process. Luckily I was able to remove the screen in one piece. I turned the phone off again.
And then loosened up the two T5 screws holding the silver bracket in place over the ribbon cable connection. Then using a plastic pry tool, I can unsnap the display from the phone. Just like a little Lego. And this is the entire display. The glass layer and the LED layer make up the 'Screen'.
Look how thin it is. I will link the replacement screens in the video description right below this video. I imagine they will come with a preinstalled adhesive making the installation fairly easy. If all you came for was the screen repair, just plop the new one back on and you are good to go! I'm going to continue delving deeper into into this device. There are 9 more T5 screws around the mid-plate.
And it's always good practice to keep your screws organized, even if they all appear to be the same size. Put the screws back in the hole they came from. The midframe has a little gap at the bottom, perfect for a little pry tool. There is no more adhesive under this frame, it is just wedged into the metal of the phone. After the clasps are released, the midframe folds up with one more little ribbon cable at the top for the earpiece holding it to the phone body, Ill unclip that and set it off to the side, and unplug the battery.
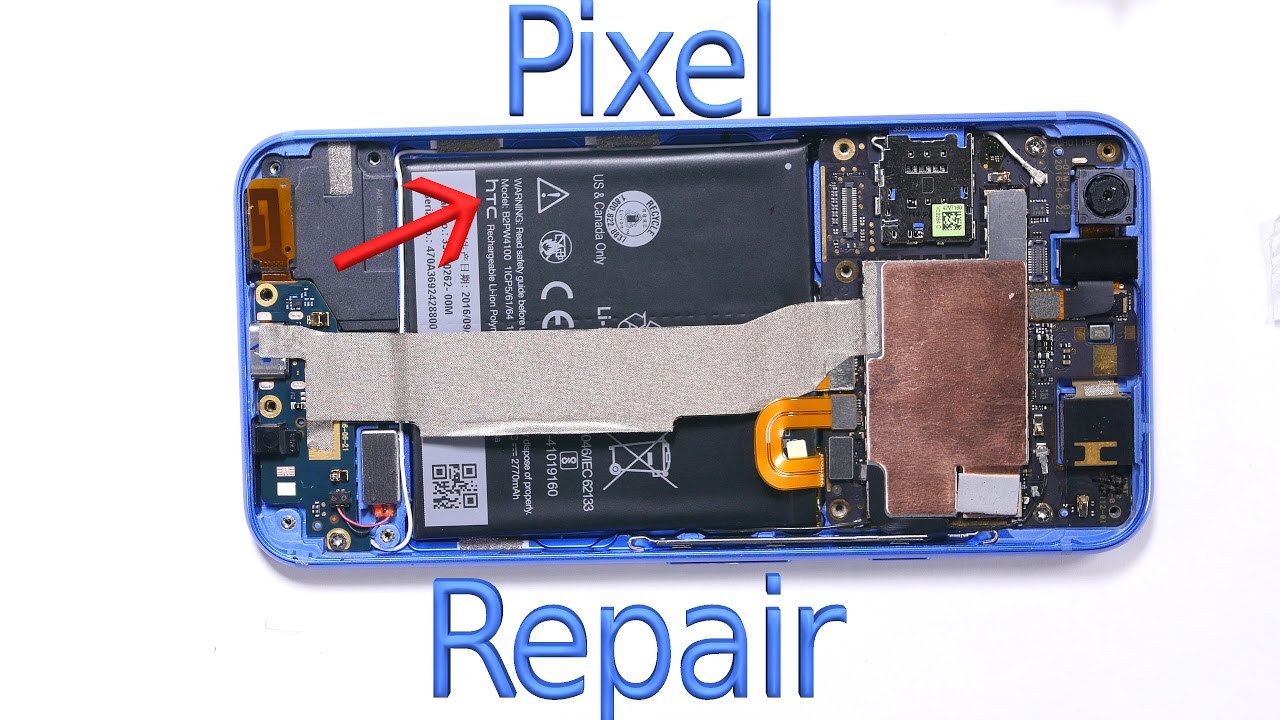
This helps keep anything else from frying as I'm working on the phone. There is a long extension ribbon cable going from the main board to the charging port. The tape is shaped a little bit different on each of the ends, it is imperative that this gets connected back oriented the same direction it started in. So stay organized and remember how it looks before you take it off. It looks like the battery has a long strip right down the middle that can be turned into a pull tab.
Rip the battery, and pull it out. But since I am going to reuse my battery, Ill pop it out the old fashion way, with a little bit of leverage. DO NOT PUNCTURE this battery, or it will start on fire. Watch my Note 7 battery exploding video for that visual. As always, replacement batteries for this phone will be linked in the video description right below this video.
It is fun that the aluminum frame of this phone is as blue on the inside as it Is on the outside. It really is really blue. There is one T5 screw holding down the USB C charging port into place. The vibrator motor comes out with it. Make sure to detach the 2 round signal wires from the bottom as well.
Here is the charging port, If you are replacing your charging port and your new one doesn not come with the rubber microphone housing or vibrator, make sure to transfer those components over to your new port. This is the loud speaker. It gets its signal from the little two golden rectangle contact pads there at the edge. It is held in place by that same metallic tape you see in other places on this phone. Moving up around the motherboard, it has two T5 screws holding it to the frame.
And a two more of those round signal wires. Ill unclip the power and volume ribbon cable, and pop out the sim card trey, which I should have done before opening the phone earlier. But its OK, because on this sim card trey we find a little Easter egg. This includes the address of Google headquarters. Kinda fun.
After that sim card trey is out the motherboard can be lifted up. This part is only useful if you are going to be replacing your fingerprint scanner. Which is plugged in with the same lego like connection as everything else. As we saw from my durability test video, the scanner is pretty durable, but nothing is invincible and someday might need replacing. The scanner can be pushed into the phone from the outside.
Now here is the back glass panel. Which can probably be removed using the same heating method that we used with the front glass. I'm wondering if the curved edge of this glass is refracting light into the camera unit contributing to the halo effect some people are seeing on their camera pictures. Here is the motherboard. The copper tape is probably there to help heat dissipation.
Ill be removing the front and rear cameras. Both are plugged in with the little lego connections. This close up of the camera lenses show that neither of them are using any hardware stabilization. Or OIS. Only electronic stabilization is being used with this phone.
Which isn't always my favorite. The HTC 10 had OIS or 'Hardware Stabilization' on both the front and rear cameras. Ill have to do a camera test of my own on this Pixel to get a better opinion. The cameras clip back into place easy enough. Just line up the little connector and you'll feel it snap in, right there next to the beautiful, and always useful, and very much appreciated, headphone jack.
Make sure you are plugging the fingerprint scanner into the non copper colored side of the motherboard. And when you put the motherboard into place, make sure nothing is trapped underneath. Like the power button ribbon, or the two round signal wires. The loud speaker drops into place, and then Ill plug the signal wires into the bottom of the charging port and set the charging port into place inside the frame next to the little vibrator. There is one screw on the charging port, and two more screws on the motherboard that need to be tightened.
Ill set the battery into place. But I'm not going to plug it in just yet. Before that happens, ill take care of the extension ribbon cable. Making sure that it is oriented in the correct direction. Look at the shape of the tape on the ends.
The phone will not function if you plug this in backwards, ask me how I know. After the extension ribbon, the power ribbon, battery ribbon and the midplate earpiece ribbon are connected, take that midframe and tuck the top end into the phone first, before pressing down the sides. Then use nine T5 screws to hold that down. And then we can test out our new screen. Make sure it functions before finishing the installation.
The screen is plugged into place, get the little silver metal bracket over the top with its two screws, and it looks like everything is functioning so far. The new screen will sit flush with the outer edge of the phone. I'm just reinstalling my old screen so its not looking as pretty. But the new screens will look much better. I'm most active on twitter, and Instagram.
So if you want to see my future projects, and behind the scenes, head over there, and if you enjoyed this video, or it helped you, let me know in the comments, and hit that subscribe button. I always appreciate it. Thanks a ton for watching! Ill see you around.
Source : JerryRigEverything
Phones In This Article


Related Articles


Comments are disabled
Latest Articles


