GOOGLE Pixel 4A Camera Top Tricks – Use Advanced Camera’s Features By HardReset.Info
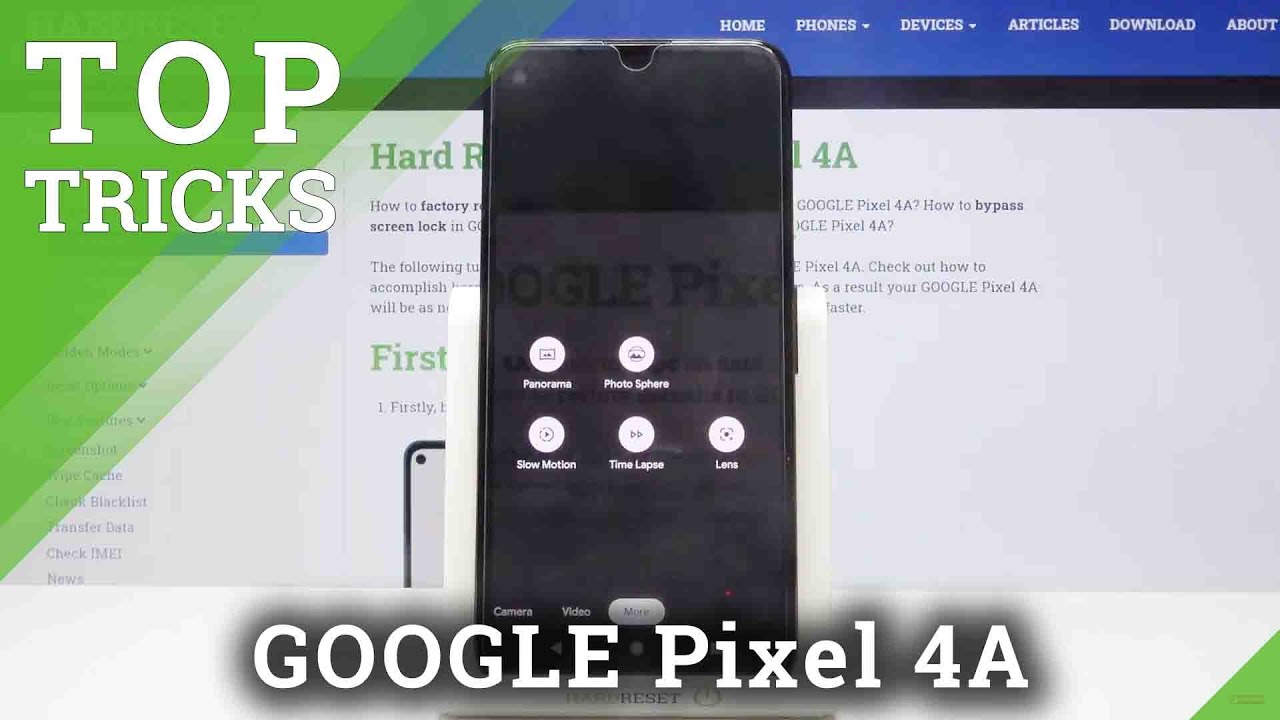
Welcome here I've got Google Pixel 4a, and I'm going to show you the top tricks of its camera. So, let's start by tapping on the camera button to open it, and for now we are in the standard photo mode. Let's see what we've got here. Let me start with this settings bar here. By going to the left or right, we can change the modes of this camera, so we have the night side, portrait standard, camera mode, video and by going to the right tomorrow, we get access to panoramic photos, fire, slow motion, time-lapse and lens. So this is a lot.
I don't have much time to speak about all of these moves. Now I suggest you to making experiments with that and just have a good fun. I will stay on this standard camera mode, and here let me start by tapping at the screen anywhere. As you can see now we have this ring. So this is the focusing ring.
We can pick the focusing area anywhere at our picture. We need- and this is connected with this slider switch up here from the right. The first one here allows us to control the exposure compensation, so we can manage the light of our photo. By going up, we can make it more bright. By going down, we can make it more dark, as you can see, and the second one allows us to control the shadows of our picture, so we can give it fewer shadows by going up and more shadows by going down.
We can also tap here to lock the settings, and now it stays like that, and we can of course tap anywhere to go back to the auto settings with that now, let's have a look at this slider which appears here we can manage the zoom, so we can get closer to the subject and also go back. We can use Zoom also by using two fingers like that, but I think that when we do it by tapping on the slider, we can be more precisely and now, let's move to this button at the center, when we tap here, we can get access to more options about the camera we can manage. Let's start with the first one flash here. We can turn it off turn it on the auto, so the camera should recognize now when it's needed when it's too dark. We can also turn it on every time we take a picture now.
Let me keep this turn it on. Let's move to the next one option motion photo. We can of course, turn it off at the center of the settings bar here. We can turn it on the outer, so the camera should recognize the best possible settings to the motion photo and from the right. Furthermore, we can turn it on every time we take a picture.
So let's stay on this now, because I want to show you how it works. Now, when we tap on the shutter button, which is here and take a picture, we can get two in one the photo and the short clip. So let me show you how it works by taking a picture to see it. Let's move to this button from the right when we tap here, we can get quick access to the gallery, and this is our photo. Let's play it by tapping on this button.
As you can see, this is how it works. We have the short clip and the picture when we stub it now, let's go back to the camera, the step again at the center here, let's stay on motion photo turn it off and move to the camera timer. Here we can change the delay of taking picture now. Let's turn it off at the center. We have three seconds of delay and from the right we have 10 seconds.
So let me stay on three seconds and, as you can see, it appears also here with the free number. When we tap now on the shutter, we can see the countdown and now the photo was taken with three seconds of delay, so, let's tap in the center. Once again, let's turn off the camera timer and move to the next one option: the ratio of our picture. Now we are in 4 and 3 the full image ratio. When we tap here, we can change it to 16 to 9 with white crop.
As you can see, the background has changed to this view. Let's stop here once again at the center. Let's go back to foreign free aspect ratio and now, let's pick this button from the right, when we tap here, we can open the advanced camera settings as you can see, there's a lot of them. So let me show you a few: let's start with save location option. By using this button, we can turn it off and turn it on like that, as we need this option allow us to save the information about the place where we take a picture in the details about it.
Also, here the important information is that to make it work correctly, when we want to save the actual location of our photo, we have to be connected with the internet, for example with the Wi-Fi, and we have to turn on the location of this device, so remember about these two parameters to make it work now, let me keep turning it on of the settings. Let's go back to the camera to take another picture, let's move again to the right to the gallery, and this is our photo to check it location. We have to just simply slide a little down and, as you can see here, we have access to more details about it with the map and the full address, so greetings from crack of Poland. Now, let's go back to the camera. Let's stop at the center once again and to this button in the right and move to the camera sounds here.
We can of course adjust the sounds of our camera. By using this button we can turn them off and turn them on like that as we need, and now let's have a look at save selfie as preview option. By using this button, we can turn it on and also turn it off. This kind of mirror effect of this camera and, of course, remember that this only works with the front camera. Now, let's have a look at the gestures option.
By tapping on this, we can get access to two things: volume key action. So let's start with that, when we pick here this one, we can decide what our volume keys, which are here in this camera, do with the cooperation with the camera. So, of course, with the device not with the camera, with the device in standard usage, these buttons allow us to control the volume of all the smartphone and with the camera we can pick from shutter zoom volume, or we can turn them off. So let me pick shutter to show you how it works. Let's go back to the camera now and when I tap on this now, I can easily take a picture.
So this is one extra button now to take a photo. Now, let's move again to the center to the settings in the right. Let's move again to the gestures and let's move to the double tap action here we can decide what we do when we double tap to the camera. We can pick zoom or switch camera or turn them off. Let me stay on the zoom.
Let's go back and now when we double tap, we can get closer to the subject and also go back. So this is really cool thing. Also, now, let's go back to the settings. Let's slide down to the grid type. Here we can adjust some grid lines to our camera preview.
We can pick from three and three grid lines: four and four and golden ratio. Let me pick three and three: now: let's go back to the camera to see them, and we have these lines. This is useful, for example, when we want to use the rule of thirds in photography, let's tap again at the center to this button in the right. Let's pick the grid type and change it to 4 and 4 in the camera. Preview, 4 and 4 looks like that.
So there's more of these lines. This is also useful when we want to make experiments with composition of our picture when we tap in the center and to the right and pick once again grid type, we can also add the golden ratio in the camera preview. It looks like that and also remember that all of these lines are not divisible at the real picture. So when I take a photo when I go again to the gallery to the right, we can't see them, so the grid lines are only to help us to take better photos and of course we can tap on the center then to the right and pick the grid type to turn them off here and now the grid lines have gone here in the camera preview. So let's go back to the settings.
Let's slide a little down and let's pick the advanced settings here we have some intelligent camera settings. I want to show you one thing: ref plus JPG control. When we tap here, we can turn on saving our picture in the rough format and also the JPEG. So this is really pro option, because draft format is used by professional photographers by taking pictures with more details and post protecting them in graphic programs. So this is really cool thing here and when you need this, you can turn it on and also turn it off here.
Now, let's go back here and let's move to the photo settings with the camera photo resolution. Here we can decide about some quality of our picture. We can pick the full resolution and also the medium resolution, the lower one and, of course, I suggest you to keep this on dab as possible. The full one- and that's all thanks for watching, subscribe our channel and leave the thumbs up.
Source : HardReset.Info
Phones In This Article
Related Articles
![Realme C11 Review | Watch this before you buy! [2020]](https://img.youtube.com/vi/eu-QtlwpKW4/maxresdefault.jpg )


Comments are disabled
Latest Articles


