Galaxy S21 Ultra Camera Tips and Tricks Part 2 By Jonathan Casey
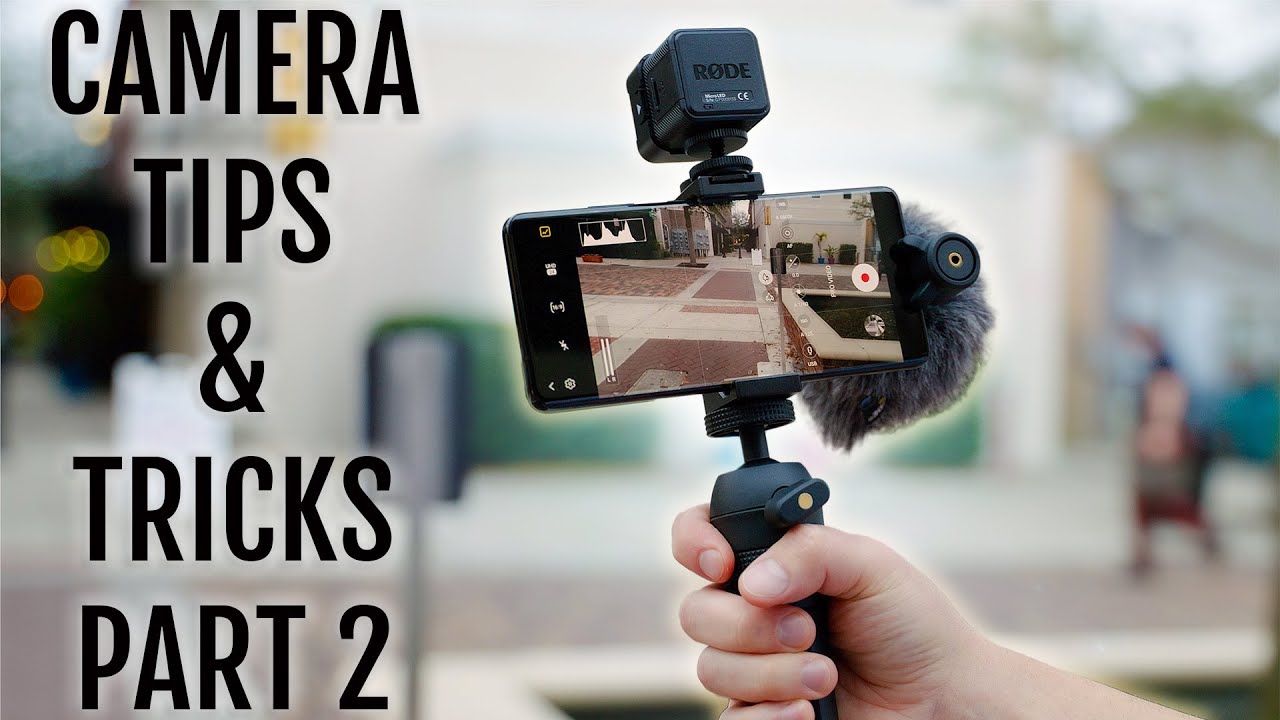
What up people- I hope you guys are good today. We're going to be diving into the galaxy s21 ultra camera again in this part, two tips and tricks, video that has been highly requested. So let's go ahead and dive straight into it. What the hell was that so one thing that you can do on the galaxy s21 ultra and the s21 plus and s21 is super steady video. This isn't new, but 60 frames per second super steady is new. Let me show you how it works.
I'm the man I got plans fit the bourbon in my hand, that'll make it change stance, I'm like in advance. So in the past, Samsung phones have been notorious to like to brighten your skin when it comes to selfies and a lot of people do like this. Look because it does hide imperfections and wrinkles. But people like myself prefer a natural look, and you can get that now. Let me show you so what you're going to do is go into the settings and then go under selfie color tone and right here you can change it from natural to bright.
Now, in this lighting environment you're not going to notice that big of a difference but in indoor lighting or artificial lighting, you're really going to see a huge difference and that's how you can eliminate that bright skin tone effect and go like a more natural way. I think they're having sex, so AK on smartphones is cool and a lot of people think that it's overrated, and I would have to agree when it comes to video. However, 8k has a second purpose that I think is much more useful than video and that's photography. So let me show you how to use it. I'm going to hand Danny this phone he's going to take a quick video clip of me, and then I'm going to show you how you can extract a high resolution photo all right.
So I got my 8k video clip here. I'm going to go ahead and push play video. Now I can scrub through find the frame that I want. So let's say, let's see here that looks like a pretty good frame right there and then, in the left, hand, corner you're gonna, see like a little square with the photo in it just tap that now. If I go to this photo and check out the details, you can see 7680 by 4320, giving us a resolution of over 30 megapixels, all from that 8k video and that's an amazing still right.
There, that's Instagram worthy that is Instagram worthy. Look at that all that detail. So, even though the galaxy s21 doesn't feature a time-lapse mode, it does have hyperlapse and even though they both function similarly, hyperlapse is technically for video, whereas time-lapse is using photos, but there are a few different settings inside the hyperlapse mode that you might not be aware of used for capturing different things. So what you're going to do is go into your hyperlapse mode and then up here in the top right. There's a circle with an just tap on that, so by default, auto is set up, which is good just for walking around doing like a sped up.
Basically, sped up video. If you do five times, that's going to be good for active people, so think, like sporting events, if you do 10 times it's going to be great for like traffic, so if you wanted to do like a time-lapse of like a busy intersection, you could do 15 times, which is good for clouds moving across the sky, which is probably your more traditional way of using like a time-lapse and then 30 times is good for crowds of what did. I say, crowds of people walking by so, if you're in a busy city and then last but not least, we have 60 times, which is the fastest good for recording, sunrises and sunsets. So you have a ton of different settings and modes here within hyperlapse plus you can change the resolution from full HD to UHD, and you have super steady video. So, in the last video I talked about high efficiency image format and how to enable it in order to get better compression when it comes to taking pictures.
However, what I didn't tell you was: not only do you get better compression, but you get 10 bit color depth information, so you're going to get richer, colors and overall be able to push your color correction a little further when it comes to post editing. To reiterate, let me show you how to enable HEIF in order to enable HEIF you're going to go into your settings, you're going to go to format and advanced options and then turn on HEIF photos and that's it and if you're worried about compatibility, most modern computers, running windows or macOS do support HEIF. Now, whether your you know photo editing software does that you are going to have to check, like whatever information you have on your photo editing software, but for the most part, modern computers and modern editing platforms should support it. Just fine, so single take isn't new. It's been on the s20 series and even the note 20 series.
However, it's really improved with the s21 series. So now we get five times more AI processing. Thanks to the snapdragon 88. We also get new captures like dynamic, slow motion as well as highlight video, so you can check all of your captures right here, and then you can select the ones that you want to use and deselect the ones that you care nothing about, and you can also change the length of capture so right now, it's on 10 seconds by default, but you can go all the way up to 15 seconds or all the way down to 5 seconds. Here's a quick example of single take.
We just did like a random little clip right here. We have 13 different takes. This is highlight video and it actually plays sound. This was like a little song that plays and if we go back and then pull it up, you can see it did a bunch of photo captures, but the one that I like the most is this slow motion, one right here, which is not slow motion at all: that's actually a boomerang. So let me just keep going this one slow motion right there.
I don't know the AI actually worked really well. I could see this being super useful for kids. So now I still have a pro mode, video in the works where I'm going to break down all the settings inside pro mode and show you how to use it. But for now I do want to quickly go back to what I said in my previous video about using an external microphone with the s21, because now I have the rode blogger kit and I have an USB microphone hooked up, and it works perfect. Let me give you a quick example, so once you're inside of pro mode for video you're, going to see the option right here for your microphone and just tap on that mic, and you can switch from OFNI front rear or USB if you have an USB-C microphone hooked up, which I do so, I'm going to go ahead and select USB-C and now let me give you a quick example of what the audio sounds like so tap record.
So this is audio from the galaxy s21 ultra using the rode, vlogger kit and um. Overall, this is a really nice kit. It comes with like a phone clamp, it comes with a little mini tripod. It comes with the mic, and it comes with a LED light that gets really bright. So if you're looking for an all-in-one kit for your USB-C enabled android device, this is the one to get so if you're, using the regular photo mode and then use food mode, pops up make sure you do just that if you're taking a picture of your food, so we're going to go into food mode and what this does are it really accentuates the colors of your food, and you can also drag around the focus area.
So if I want to focus on the sprinkles right here, I can do that and then up here in the top right there's like a little circle that allows you to adjust the white balance, so I can cool it down or warm it up. So we'll warm it up, we'll bring the focus right there and snap the photo. You can also turn off the radial blur, and you can change the aspect ratio. So if you're going for something more Instagram worthy, you can change it to one. So let me show you another sample using this pizza right here, so I'm going to go ahead and go into food mode.
I'm going to turn on the radial blur focus on one of the pepperonis warm the photo up and then snap the shot. So one cool thing is: if you take a portrait mode shot, and it has a face in the shot like you're taking a picture of a person, you can change the background effect and there's a lot of cool effects in here. Like you can adjust the background blur, you can also apply like studio lighting, so you can decrease and increase the effect there, as well as control the lighting effect here, which will control the lighting on the face. You can do low-key mono, which obviously is going to turn everything black and white, and you can decrease it here. You also have like a color mode, so you can change the color of the backdrop.
Furthermore, you can do color point, so it's going to pick a specific color and then black and white everything else. Furthermore, you have like big circle um, which is going to mess with the both. In the background you have spin both, and you also have Zoom, so there's a lot of cool portrait mode effects that you can do right inside the stock photo editor. So another really cool feature inside the stock photo editor is a blemish remover. So if we go into the stock photo editor by tapping on the pencil icon, it has to be on a picture that has a face in it.
So obviously I have a face in this picture. We're going to go all the way over to the right, where you see like the outline of a person tap on that scroll over past this little white line and then tap on. It looks like a teardrop almost, and it says uh to tap where the blemish is to remove it. So we're going to zoom in you can see. I have like a little blemish right here.
I'm just going to select it, and you can see it removes it. Furthermore, I have another blemish right here on my forehead. Furthermore, I can select it, and now it's gone, so that's a cool way to get rid of like pimples or freckles, or any blemishes on your face, including wrinkles right inside the stock photo editor. On top of that, if you tap on the three little dots here on the top right and then go to labs, you actually have object eraser. It doesn't work that good, but it's still a neat little effect to play around with all right people, so that was even more tips and tricks for your galaxy s21 ultra camera, hopefully, between my last video and this video you're able to use your camera a lot more, don't worry! I still have that pro mode, video in the works, and it's coming so make sure to subscribe and turn on those notifications.
So you can be alerted when that video drops other than that I'll see you beautiful people in the next video. This was not supposed to happen. It flew out of my back pocket and this is why we always use screen protectors and then go down to selfie, color tone and strange kid.
Source : Jonathan Casey
Phones In This Article


Related Articles

![Oppo F19 Pro+ vs OnePlus Nord Speedtest [Dimensity 800U vs SD765G]](https://img.youtube.com/vi/fjFs27DBHVo/maxresdefault.jpg )


![iPad Pro 2018 | Battery Life Test Watching Netflix Videos [4K]](https://img.youtube.com/vi/AjN8KnSClPc/maxresdefault.jpg )

Comments are disabled
Latest Articles


