Creative Photography Ideas with the Redmi Note 10 Pro! (108MP & Tele-Macro) By Umar Naqshbandi
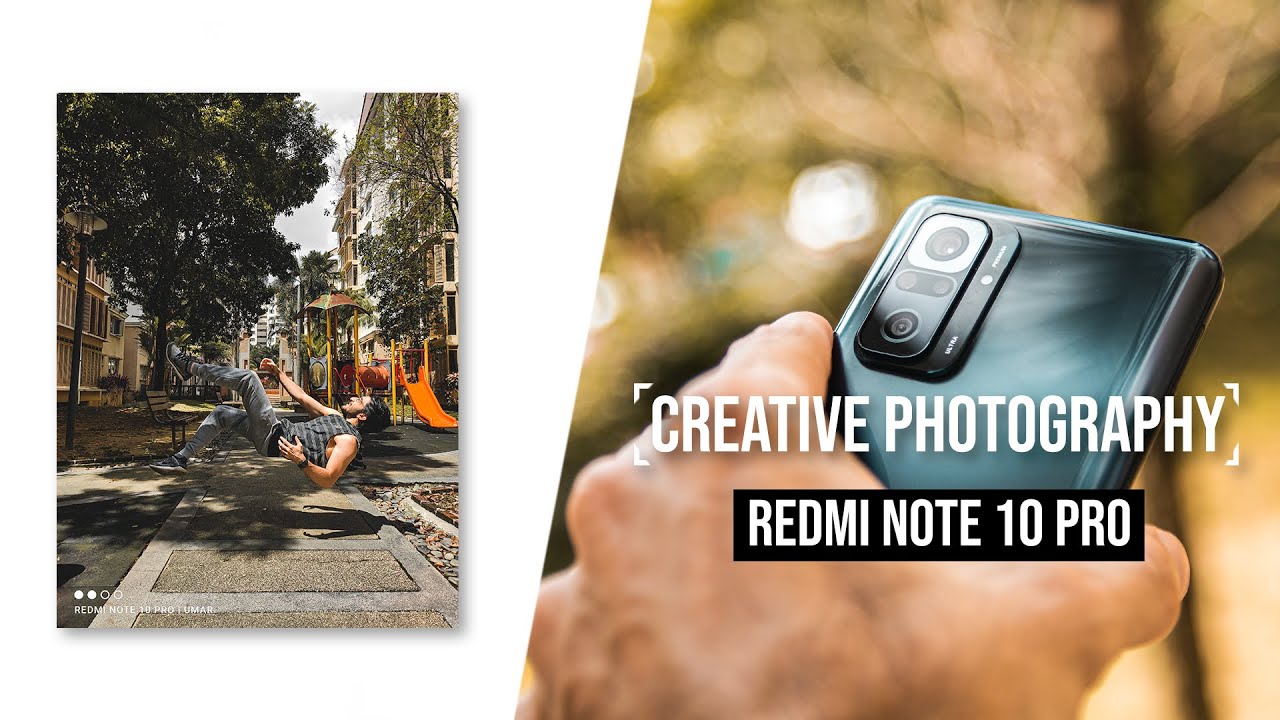
In this video, I'm teaching you guys how to take creative artsy, looking pictures not using a professional camera but using any smartphone and in this case we're using the budget mid-range Redmi Note 10 pro that was just launched. We're going to be using the 108 megapixel camera and the tell macro lens on this. To take some really artsy, photoshop pictures, and I'll show you how to do that. So, let's get started, so I'm going to be teaching you three different techniques in this video, the first one being how to make yourself float so for the first one I used a stool, you're going to need a tripod to set the phone down on in order to lock it, so it doesn't move anywhere and your exposure and everything stays fit. I'm using the promo to take this, like I said, 108 megapixels I set myself in the frame on the chair I made my pose to make it look like I was falling. Had the self-timer turn on and take the picture for me.
So once that's done, I take a couple of pictures to make sure I get at least one good pose and don't forget to get out of frame to take one clean plate picture where basically there's nothing there. So I can erase and add in details later so going through the different pictures. I choose the best one that I find, which is this falling downwards. I'm going to show you a second pose as well how to do it, but this is the first one we're going to start with and pretty much. The first step is going to be to select the stool right there underneath and that's what I'm going to be doing here.
We're going gonna, take the pen tool and draw around this in order to select the stool, and then we have the layer underneath that is empty, which was a clean plate. Like I told you guys that all we have to do is create a mask down there, and it is gone. The stool disappeared now, obviously there's a main problem there, which is the shadow we have a shadow down there, and it's pretty visible that we removed something. So what we're going to do in order to fix this is basically painted it back in. So I'm using the clone stamp tool here to paint all the information back in this takes a little of time, but once you do get it done, it looks really, really good and realistic.
You can go over it a couple of times to get it done perfectly next step is to edit the colors and get it to look exactly how I want to stylize it, and this is my typical process of how I usually edit my picture. So I'm going for that similar look once that's done, you have a floating picture, and you're floating midair. You can do a couple of poses. This is the second pose that I took like I'm. Taking a macro shot on the floor, the second type that I'm going to be teaching you is making yourself either really tiny or really huge.
So first we're going to start with making yourself really tiny. So I have this really cool looking car toy, so I put the phone down on a tripod and I try to get the best possible angle to get a picture of this with the door open, try to make it look pretty cool. Once we have that picture, we can also take a different picture of myself from the same sort of angle, same location, same lighting, and I'm going to cut myself out, put myself in that tiny frame. So it's more of a miniature kind of thing, so the first step is gonna, be resizing myself to fit into that scene. So how? I would really look if I was actually there, so you make a selection of yourself.
I don't really do this effect much, but I just wanted to show you guys a fun little way of doing it. This is not supposed to look very realistic, but it's more about having fun with what you have, so we're going to resize ourselves make sure we fit in perfectly to the scene once we've done, that we're going to make sure we do draw in our shadows, because we want to fit into the scene as perfectly as we can. The sunlight was a pretty harsh uh. You also have to add in that reflection to the car, so I duplicated myself flipped it around, and then I'm able to add the reflection into the hood of the car once I've done that I'm obviously going to paint it out in and out, like decrease increase transparency, to make it look more and more realistic. It's all about that.
I'm going to dodge invert to make myself pop a little more once we're done with that we're going to blur myself a little to make it look more realistic because I can't be super sharp. While the car is dim, then I added some headlights and did the color correction. Overall, the headlines are just a quick little touch to make it look more realistic. Um again we're not trying to go super real here, it's supposed to be fun and yeah color grade it crop it up to make it fit perfectly add a little of dust and stuff around and there you go. You have a miniature looking picture that I think looks nice.
It's not supposed to look realistic. It's just nice. A second example where you can make yourself huge uh within the same type of effect, is gonna. Follow the same concept as the first uh test that I showed you the first tutorial that I showed you, which is removing the chair from underneath, and the second step is gonna, be removing that bluish tint. So I removed the blue tint.
Then I did the same thing, adding in the shadows to make myself look huge, so the goal in this one is the opposite of the previous one. I was tiny this one, I'm huge, so we're gonna, basically add the shadows in and make sure that my hand goes behind the swing to make it look like I'm actually interacting with it everything about the little details, color correct it color grade it and do a little of dodge and burn to the clothes, the shoes and boom. There you go. You have it you're, a massive person in a tiny swig set, so you can make yourself tiny or massive both pretty easily with this step. The third and final effect, I'm showing you guys, is using the tell macro lens on this we're going to take a close up of my eye and then add in some stuff into it to make it look very 3d and real.
So what I'm going to do is switch over to the pro mode switch my lens to the macro lens and then change all these settings to match the environment. I'm in then, obviously, I'm going to get in front of the camera and remove my glasses because I have glasses, and then we're going to bring it really close to the eye. As you can see, the tell macro on this is absolutely amazing. I love this. I'm going to make a whole new video on that, but you can get really close, and I waited for the sunlight to be right.
So I wouldn't get a reflection as much as you saw earlier so once you have that what we're going to do is work with this, but I got this asset online of this nice little mountain ridge. I don't know volcano whatever, so I put it in and uh aligned it pretty much to the pupil, so it fits in exactly the right place once we have that we're going to mask around it, re-colorize it and add in cloud assets, and then it's pretty much just a step of color grading, adding different colors different elements left and right, different clouds uh to cover up some edges to make it look more and more realistic. The point of this is again not too much realism but more creativity, and then we just color grade it. Overall, we added clouds. We added the mountain underneath, and you create different layers once you're done with the color grade, you get the final image and I think it looks pretty good.
So there are multiple ways you can take it. This is one shot and the second shot. I took another picture I took with the drone, which is in getting, and it's something like a similar sort of concept. You do the same thing pretty much, but I cut out the trees and stuff and just left the highway, the road itself, and then we did the same thing. We added in clouds color graded it and boom.
So there are two different types. Let me know in the comments which one you prefer do you prefer the cloud with the volcano or do you prefer the roads structure thing? So that's pretty much it. So that's about it. That's how you can take pretty artsy and creative pictures using a budget smartphone. I mean.
Obviously it involved a bit of editing and I skimmed through a lot of that. But the point it doesn't matter what the price of the phone is. This one is pretty cheap. It has a 108 megapixel camera, as well as a tell macro lens that allowed me to do all of this, pretty insane considering the price point and how tiny it is. It fits in your pocket, and it can do that kind of professional work.
So if you guys enjoyed that make sure you hit that like button and do consider subscribing to the channel as well I'll be doing more tutorials and stuff like this in the future. Thank you guys for watching and bye.
Source : Umar Naqshbandi
Phones In This Article

Related Articles


![OnePlus Nord CE vs Poco X3 Pro Speedtest [SD750G vs SD860]](https://img.youtube.com/vi/lXu2FqmDuIA/maxresdefault.jpg )
Comments are disabled
Latest Articles


