Cool Tech Under $50 For Your Setup - March By TechSource
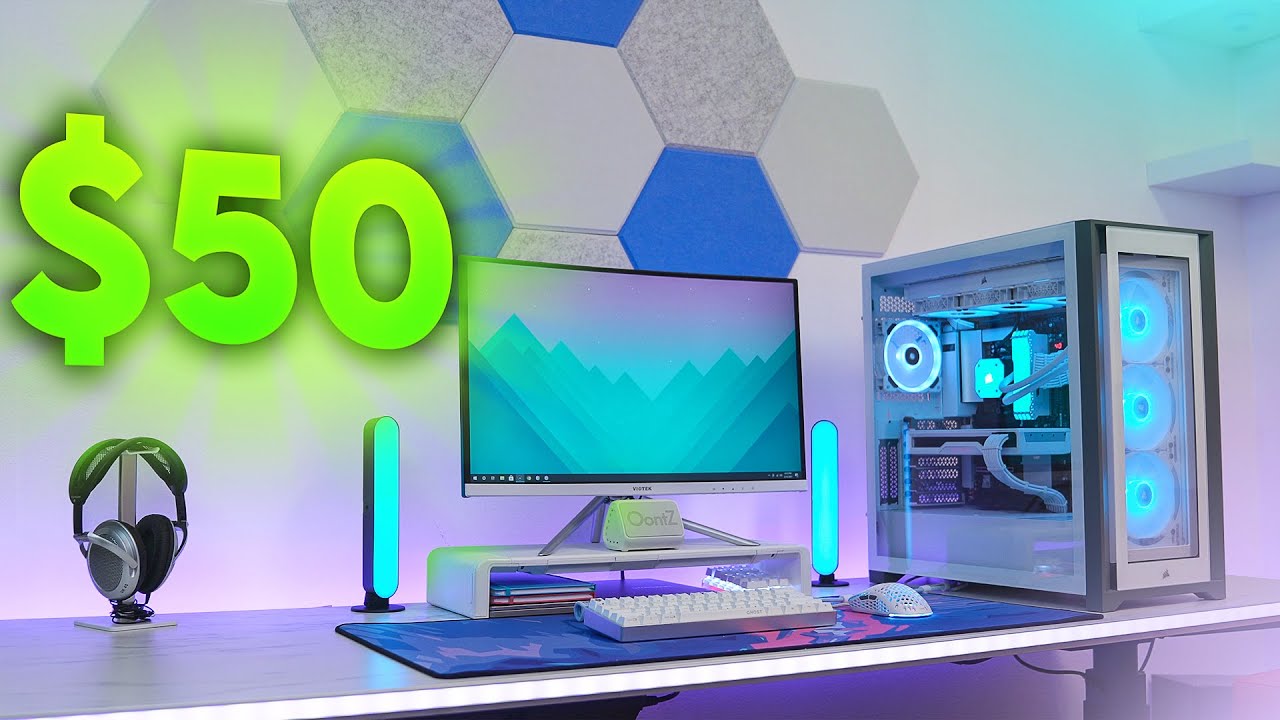
It's a brand-new month, which means it's time for another episode of cool tech, but in this video we're going to be focusing on cool tech on their 50 for your setup. So if you guys are on a tight budget- and you still want to spice up your setup you're going to love today's video, let's get started if you guys want to pick up a fresh windows, 10 pro CD key then make sure to click the link below and visit yourcdk. com. You guys can grab one for less than 15, using my code ts20 at checkout. So most of what you see in this setup cost less than 50 dollars. Aside from the obvious things like the monitor keyboard, mouse and, of course, the sick custom-built all-white PC, which I did a build guide on, and I'll leave a link below, if you guys want to check it out.
So, let's start off with the lighting in the setup, specifically the LED bar. I have going across the edge at the desk, I'm using the Gobi led strips in combination with the Mazda led channel system to help diffuse the lights. I see so many people put the naked RGB strips on their setup or on their wall without diffusing them properly, and it just looks tacky in my opinion. Well, with these led channels, you can now properly diffuse the lights so that they look better. These channels are specifically designed with a frosted cover to help spread the hot spots across the entire channel for a more balanced and even lighting.
Obviously, it doesn't completely remove all the hot spots, and this depends mostly on what RGB strips you're using too, but it's a huge difference without using one. So there are two different Mazda channels that you can go with the flat ones. Look the cleanest, but they don't diffuse the lights as good. The taller ones are the best at diffusing the lights, but they are taller and stick out more than the flat ones mounting. These are really easy and there are two ways of doing this method.
One is the permanent way using the provided mounting brackets. They come with a set of screws and baseplates which are needed to secure the raceway to your desk or wall simply attach the baseplate. Using the provided screws, and then you can snap on the raceways afterwards, you just stick the RGB strip inside and close it off using the frosted covers. Personally, I don't like this method, because it's permanent, and I don't like drilling holes into things in case. I need to move things around or upgrade my setup later on.
So I use method number two: the tech source method. I simply use these very thin, double-sided 3?m tape and I attached them directly behind the raceway. This not only eliminates the need to drill holes into things, but we don't need to use the mounting bracket as well. So overall it just looks much simpler and clean anyways. Once you run your RGB strip through the raceway, you can close it off with the frosted shield and then close off the corner with the provided covers.
If you have a large desk or surface, then follow the same steps for any additional raceways you want to install. However, you will have to cut off the excess so make sure to mark the cutoff point with a pencil or marker and use a metal cutter. I picked up a jigsaw from my local hardware store, which easily cut through the raceway like butter. You are also going to have to cut off the frosted cover as well, so once again make sure to mark the cutoff point, and you can use scissors to cut these off since they are plastic. The result is this beautifully diffused lighting that doesn't look like it belongs to a 12-year-old who plays Fortnite.
Unfortunately, the Gobi strips I'm using are way too bright, and it gets washed up on camera. So I can't really show you what they look like at peak brightness, but, let me just say they look amazing compared to before. You really have to look at these in person to understand what I'm talking about next up on the list. Are these super simple, yet awesome light bars from a company called Koizumi? They only go for 10 each, so even with both of them together, the total is still under 50 bucks. These are a super, cheap and easy way to add a bit of lighting to your setup or space.
You can position these two ways using the circular base that it comes with either vertically, just like how I have it in my setup, or you can put them horizontally now. These do come with remotes. However, they only control that specific light bar. So if you have multiple light bars, you're going to have to switch the colors individually between all the remotes, which can be quite annoying, but luckily they do have an app. So I sync both the lights together, and can control them at the same time, which is way more convenient plus, it has way more features on the app compared to the remote.
For example, I can set a schedule for the lights to turn on and off on certain times. I can also have the lights react to music from my phone, and there are even effects that you can choose from. I wasn't expecting much from these lights when I saw the price, but I was pleasantly surprised on how great they are. The only caveat on these are the cables so first off they're, USB powered, so they're going to take up an additional USB port from the back of your PC unless you're, using like an USB hub or something second, these cables are annoyingly short. I think they're like less than three feet or something I had to buy two USB extensions just to plug these into the back of my PC, but again ten dollars.
I can't really complain. Furthermore, I do recommend these for anyone that wants to add a bit of lighting on their setup. That's also on a super tight budget. Speaking of lighting up next is a fully customizable led jumped. This is perfect for those who use 60 or small form factor keyboards, I'm someone who uses numbers a lot, especially when I'm editing videos, the jumped, comes in really handy with those shortcuts, but I do prefer smaller keyboards.
In my opinion, they look so much cleaner, and they don't take up much space from the desk. So I found a better alternative to get the best of both worlds. A fully customizable dedicated jumped. I pull it out when I need to use it and tuck it away when I'm finished. The cool thing about this jumped is that it's fully customizable you can select the layout of the jumped, the switch type and even the colors for both the underflow and the switch itself.
There are three kits that you can choose from on the website. Kit 1 has mostly gator on and kill switches, while kit 2 has cherry switches, and then you have the option of doing just bare bones by selecting kit 3. In this case they just send you the case PCB and the screws you would have to install your own switches. Keep in mind that these don't come with any key caps, which I actually prefer, because then you can use any key caps. You want that way matches your current keyboard.
I originally opted for kl red switches with white back lighting and a red underflow, which looks amazing. In my opinion. However, I'm going to swap the switches to some aspirations that I recently picked up for my custom keyboard later this year. The jumped does come with a braided USB-C cable, but I ended up swapping it with a white one, so that matches the setup's colors speaking of cables. We have some beautiful double-sleeved coil cables.
I featured some of these in my last cool tech- video, if you guys remember, but these are from another company called TES cables and in my opinion they are much better cables than before the braiding on these are noticeably better, and you get nicer colors to choose from. I personally love the soft blue, cable and the white connector combo the most, but they do have a pretty sweet, vaporware purple option, as well plus with these you get an aviator cable as well. Coil cables are a really easy way to add a bit of customization to your keyboard, and I have mine hooked up to my ghost k1 keyboard. All right. Let's talk about the monitor riser.
This is the jelly comb adjustable monitoring, and they come in three flavors black white and mint green. A modernizer has many use cases in a setup. For starters, it raises the monitor to your eye level. This means a more comfortable viewing angle and less neck strain having to look down in addition to that, it also frees up extra space underneath the monitor for storage. As you can see, I took advantage of that extra space to store my Chromebook, a couple of journals and my custom jumped.
So the riser has two adjustable options: 16.5 inches by default, which still has enough space to store a 15-inch laptop. But if you have a larger display, you can expand the legs, increasing the total width to 20.5 inches. I would say it's big enough to comfortably support up to a 24-inch monitor, but you can probably get away with a 27 inch as well. If you don't mind it hanging off the sides a bit, the motorized also comes with some pretty cool features like a pull-out phone stand and a tiny pencil drawer. I mean it's not deep enough to store a bunch of things, but it's very useful for thin objects.
Personally, I like to keep all my essentials in here like a microfiber cloth, a flash drive and the up keep also a funny story. I thought this small gap over here was for storing pens or pencils, but it turns out. It's actually a tablet stand, I don't own a tablet, so I'm just going to use my phone as an example, I like using a mono riser to multitask by playing raid shadow legends on my phone, while I'm gaming on the PC or, if you're, a twitch streamer with a single monitor, you can have a tablet or your phone on either of the stands to rec hat as you're playing. I think this is a really cool modernizer that provides a lot of functionality to your setup, Sponsored by Cubic Sponsored by Cubic cool tech item from today's video. This tiny little key acts as a form of two-factor authentication for my accounts.
Usernames and passwords sadly aren't enough to protect yourself these days, especially if you have a lot to lose. In my case, my entire life no big deal. The first thing I did was add the key to all of my Gmail accounts, including my YouTube account. This means anytime, someone tries to log into my account. They will not only have to put the password in, but they also have to have the physical key as well.
This means no one can hack into my accounts, not even the most skilled hacker in the world, because they will need the physical key with them in order to get access. It's also perfect for travel, since it has a keychain option, and it doesn't require any batteries to use lots of applications actually support these keys and if you're, someone who values their security, I strongly recommend picking one up, I'm currently using the USB-C option, but they do offer different keys for different devices. Once again, links will be down below if you guys been looking for a solid pair of headphones for less than 50 dollars, then buckle up because I'm about to save your day, the legendary cost your 40s are hands down the best sounding headphones. I have ever heard for this price range, I'm no audiophile by any means, but damn the sound quality that comes out of these dinky headphones is impressive. The only reason I even came across these headphones in the first place was through the cool tech section of my discord.
I don't even know how I haven't heard of these before these are super lightweight, open, back headphones that provides good, mid-range and treble and compared to other headphones within this price range. They do punch a little more on the low end, I mean there are people comparing the sound quality of these to pricier headphones, and you can check the reviews out for yourself if you want so, the build quality is definitely more on the flimsy side, which makes sense, I guess, looks like they spend most of the budget on the actual sound quality than the build quality and because of how lightweight they are. It doesn't even feel like you're wearing headphones. To be honest and with the open back design, you can still hear everything around you. This means no sound isolation or canceling feature with these headphones.
They do collapse, making it perfect for travel. However, it doesn't come with a carrying case, but it does come with a quarter inch adapter. If you decide to use it with a DAC or amp, I have the headphones sitting on a cheap aluminum stand. I picked up from Amazon for only 10 bucks. If you guys are looking for some kick-ass headphones for around 30 dollars, you have to at least try them out, and you'll see why the headphones aren't the only source of audio for the setup.
I also use a tiny Bluetooth speaker that I keep under the monitor it's nothing special, just a good-looking portable Bluetooth speaker that I use, if I don't feel like putting on headphones. Last but not least, let's talk about the acoustic panels on the wall. These are the buckaroo acoustic panels. You've probably seen these in a previous episode of setup wars, but I decided to buy them and test it out myself to see if it's actually worth the money. For starters, they come in a pack of 12, with several color options to choose from to match your setup's color scheme.
As you can see, I went with a tricolor setup for mine with a mix of blue gray and white. I was kind of disappointed to find out that they don't come with any installation materials. Unfortunately, that's something you have to buy separately. Installation, however, was very easy. I was able to use a single double-sided 3?m square right in the center of the panel, which was all it needed to stick to my wall, but of course this will depend on your wall and the type of coating it has in terms of soundproofing does a decent job like I wasn't blown away by any means, but I did only use about 12 foams.
After all, and the room already had some sound absorption present like I had a huge couch in there with carpet flooring, so the difference with acoustic panels were very minimal. I think these would be more effective if your room has a lot of echo and reverb to begin with and if you use up all 12 of the panels, otherwise you're just buying these for aesthetics, which isn't a bad thing either. I think this is a really cool way of not only improving the look of your setup, but also soundproofing your room as well. So that is all the cool tech I have for you this month, if you guys enjoy the cool tech series, consider dropping a like before you head out and if you're picking something up from this video. Let me know in the comments section down below also, if you guys are new here, consider subscribing because I do cool tech series every single month and if you're bored consider watching some of my previous cool tech videos.
Thank you guys so much for watching. As always and I'll see you very soon in the next one.
Source : TechSource
Phones In This Article

Related Articles


Comments are disabled
Latest Articles


